I keep seeing Air Dry Clay Candle Holders everywhere lately. On Pinterest. On handmade reels.
On cozy home feeds that make you stop scrolling. I haven’t made these myself yet, but I’ve studied them closely, saved way too many tutorials, and broken down how they’re actually done so anyone can try.
These clay candle holders feel raw, warm, imperfect. And that’s the charm.
If you like handmade decor, soft lighting, and pieces that don’t look factory-perfect, you’ll enjoy this. Ready to get your hands messy? Or atleast imagine doing it.
1. Organic Pebble-Style Air Dry Clay Candle Holder
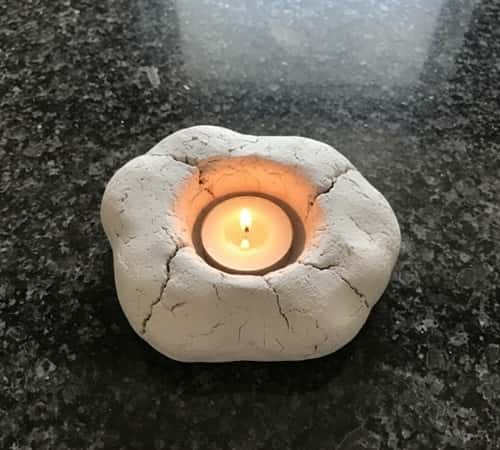
This one looks like a smooth stone you found on a beach. Soft edges. No sharp lines. Very calming.
Start with air dry clay at room temperature. Cold clay cracks faster, trust me.
Take a small ball, about the size of a lime. Roll it gently between your palms, but don’t overdo it. You actually want slight unevenness.
Press it down on a flat surface like marble or granite. Now use your thumb to slowly press a shallow hole in the center. This is where the tealight sits.
Don’t push all the way down, or the candle will fall through, which is annoying.
Smooth the edges with a little water on your fingertip. Not too much water, the clay gets mushy real quick.
If cracks appear, that’s okay. Homemade clay decor is allowed to breathe. Let it air dry for 24 to 36 hours, flipping once halfway. Once dry, you can leave it natural, or lightly sand the bottom so it sits flat-ish.
I haven’t tried this personally, but from everything I’ve seen, this is the easiest air dry clay candle holder for beginners. And forgiving. Very forgiving.
2. Folded Pinch Bowl Clay Candle Holder
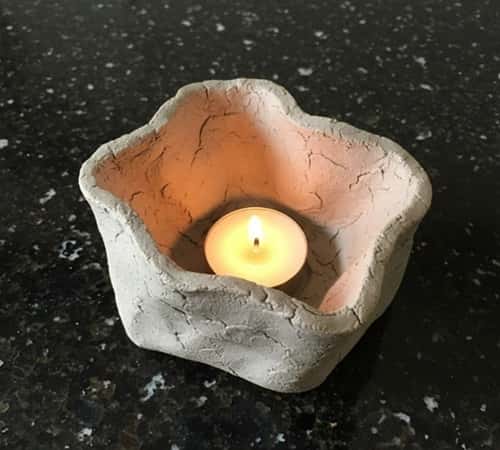
This one feels artsy. Almost like a crumpled fabric frozen in clay. And yes, it looks harder than it is.
Take a flattened slab of air dry clay, roughly palm-sized. Thickness matters here. Too thin and it will warp. Too thick and it looks bulky. Aim for ½ cm.
Gently lift the slab and let it sag naturally in your hand. Then pinch and fold the edges inward randomly.
Don’t overthink symmetry, because symmetry kills the vibe here. I know it sounds wrong, but it works.
Place a tealight in the center while the clay is still soft. This helps shape the candle cavity perfectly.
Remove the candle after shaping, do not dry it with candle inside. That’s important. Smooth only the inside rim lightly.
Leave the outside rough. Let it dry naturally on a flat surface. No sun. No fan. Clay hates being rushed.
I personally haven’t made this, but I’ve watched enough failed attempts to know rushing drying causes cracks, and nobody wants that mess.
This style fits boho decor, cozy corners, and shelf styling really well.
3. Minimal Arch Air Dry Clay Candle Holder
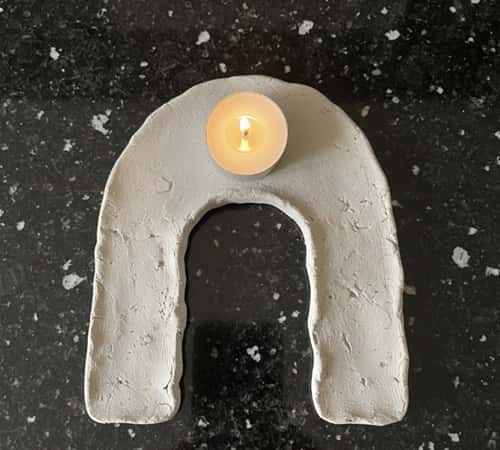
This one looks modern. Clean. But still handmade if you don’t over-polish it. Think soft architecture for your shelf.
Start by rolling air dry clay into a thick slab, around 1.5 cm thick.
Cut out a rough rectangle using a butter knife or old card. Don’t worry about perfect lines, slightly wonky is better.
Now gently carve out an arch opening at the bottom. Go slow. Clay tears if you rush, and then you feel angry for no reason.
Once the arch shape is done, place it upright and gently press a tealight-sized indentation on the top. Not too deep.
Just enough so the candle doesn’t slide when lit. Smooth the top area only. Leave sides raw. Finger marks add character here, seriously.
Let it dry upright for at least 48 hours. If it tips over while drying, prop it using something soft like folded cloth.
I haven’t tried this myself, but every tutorial screams one thing – don’t move it once drying starts. Clay remembers.
This air dry clay candle holder works great for console tables, window sills, or even bathroom decor.
4. Textured Press-Print Clay Candle Holder
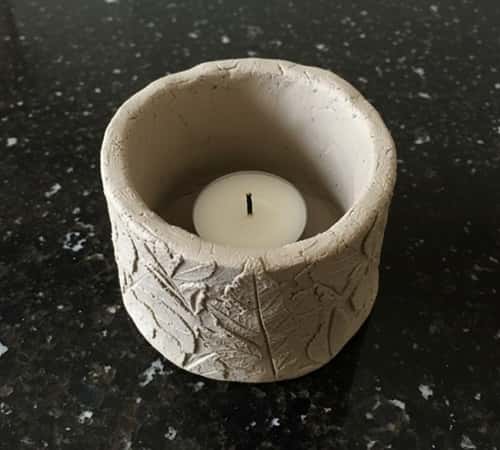
This one is fun. Also slightly addictive once you start pressing textures.
Roll a ball of air dry clay and flatten it slightly like a thick cookie. Now comes the texture part.
Use everyday things – lace fabric, leaves, jute rope, old buttons, or even a fork. Press the texture gently onto the surface.
Don’t press too deep or the pattern distorts when drying. Light pressure is enough.
After texturing, press a tealight cavity in the center using the candle itself. Twist slightly and lift it out clean.
Smooth only the inner rim with water. Do not touch the texture again. That’s how details get ruined and you feel regret.
Let it dry flat for a full day, then flip and dry another day.
I haven’t made this personally, but based on clay behavior, flipping helps prevent curling edges. Clay does weird things sometimes.
This style of air dry clay candle holders looks beautiful in rustic or farmhouse decor.
5. Stacked Disc Air Dry Clay Candle Holder
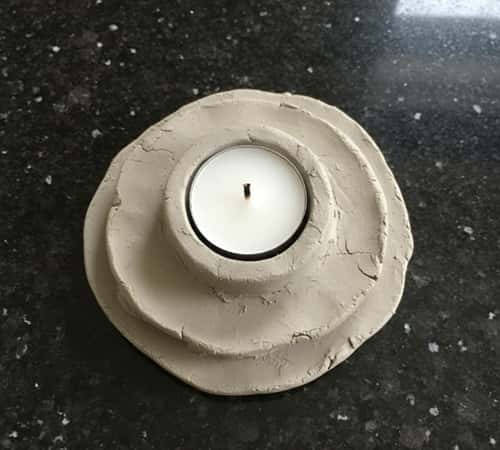
This one looks intentional. Like you planned it. But it’s actually very beginner-friendly.
Start by rolling out air dry clay into an even slab, about 1 cm thick. Use a round cutter, bottle cap, or glass rim to cut 3 to 4 circles.
Make them slightly different sizes. Perfect matching looks boring here.
Stack the discs while the clay is still soft, largest at the bottom, smallest on top. Press gently so they bond. No glue needed. Clay sticks to itself easily.
Now press a tealight cavity into the top disc. Go slow. If the stack leans, adjust it now. Later it’s impossible. Smooth the sides lightly but don’t erase the seams.
The layered look is the charm. Uneven edges are fine. In fact, they look more handmade that way.
Let it dry completely, at least 48 hours. Don’t move it during drying or it may tilt. I haven’t tried this myself, but stacked forms almost always shift if disturbed. Clay has mood swings, honestly.
This style fits modern, Scandinavian, and neutral home decor really well.
6. Open Ring Air Dry Clay Candle Holder
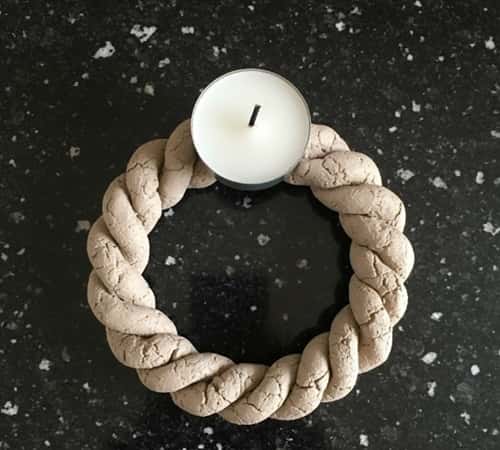
This one feels airy. Light. Slightly sculptural. And it looks harder than it is.
Roll air dry clay into a long rope, about the thickness of your finger. Keep the thickness uneven on purpose.
Now form a loose ring shape, leaving a small gap or overlap. Don’t close it perfectly. Place it flat on your surface and gently press one spot on top to create a shallow candle seat. That’s where the tealight goes.
Make sure the base touches the surface evenly. If it wobbles now, it will wobble forever.
Smooth only the candle seat area. Leave the rope texture visible. Finger lines are good. They tell a story. Or something like that.
Let it dry flat. No flipping needed here. Drying time is around 36 to 48 hours.
I haven’t made this myself, but ring shapes dry better when left untouched. Moving it cracks the joints.
This air dry clay candle holder works beautifully for coffee tables and side trays.
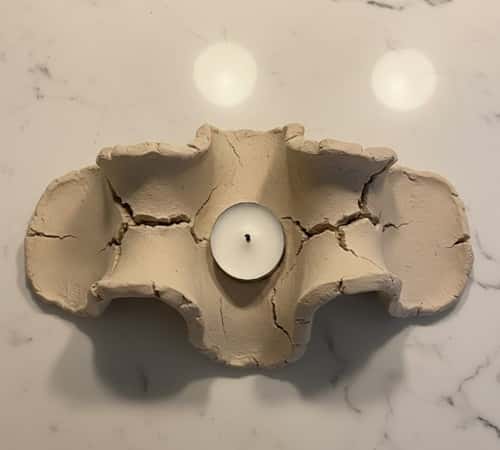
7. Cracked Edge Rustic Air Dry Clay Candle Holder
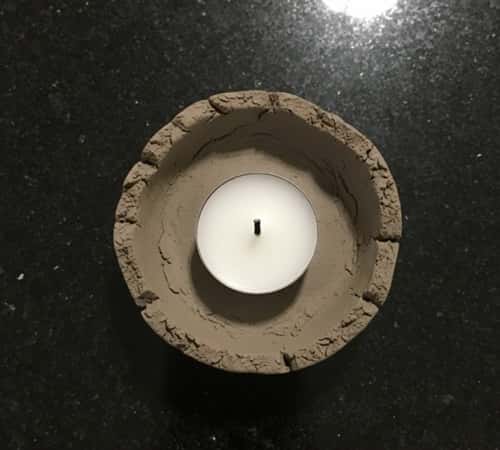
This one embraces flaws. Cracks, chips, uneven rims. Nothing neat here and that’s the point.
Take a ball of air dry clay and flatten it slightly. Press it into a shallow bowl shape using your thumb. Don’t smooth the rim too much.
Instead, gently pinch and stretch the edges outward. Small cracks will appear naturally. Let them stay. Do not panic. Clay does that when it dries and it looks beautiful.
Press a tealight cavity in the center. Remove the candle carefully. If the cracks widen a bit, it’s fine.
If one breaks fully, patch it lightly with a tiny piece of clay and water. Don’t aim for perfection because perfection ruins rustic decor, really.
Let it dry slowly, away from heat. Fast drying increases cracks in a bad way.
I haven’t made this myself, but cracked-edge air dry clay candle holders always look better when dried patiently.
This style works great for earthy homes, cozy corners, and shelf decor that feels lived-in.
8. Double Dip Air Dry Clay Candle Holder
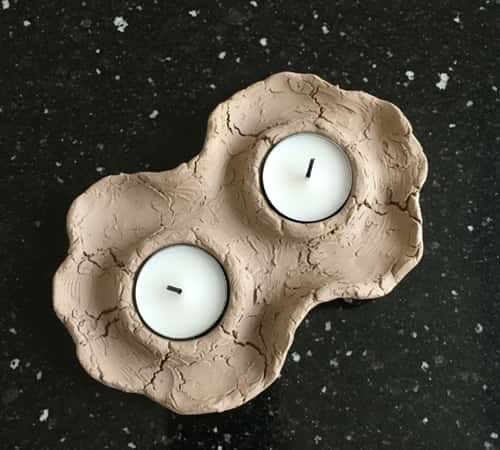
This one is practical. Two candles. One holder. Very Pinterest-worthy.
Roll a slab of air dry clay around 1.5 cm thick. Cut out an oval or organic rectangle shape. Nothing sharp.
Now press two tealight cavities side by side, leaving enough clay between them so it doesn’t crack later. Use the candles themselves to size the dips.
Smooth only the inside of each cavity. Leave the outer shape rough. Lightly lift the piece and tap it on the surface once to flatten the base. That trick helps prevent wobbling. Not everyone talks about this, but it helps.
Let it dry flat for a full day, then flip gently and dry another day. I haven’t tried this personally, but wider clay pieces tend to curl if not flipped. Clay logic is strange sometimes.
This air dry clay candle holder looks great on dining tables and entry consoles.
9. Abstract Wave Air Dry Clay Candle Holder
This one feels playful. Almost like the clay was moving when it froze. Very artsy, very cozy.
Start with a thick slab of air dry clay, about 1.5 to 2 cm thick.
Cut out an organic shape. No straight lines. Now gently lift one side and bend it upward into a soft wave.
Support the lifted part with a small bowl, cloth, or rolled towel so it holds shape while drying. This step matters a lot.
Press a tealight cavity into the lowest, flattest area. That keeps the candle stable. Smooth only the candle seat. Leave the wave edges rough.
Uneven thickness actually helps here. If tiny cracks form along the curve, let them be. They add drama. Too much fixing kills the flow.
Let it dry for 48 hours minimum. Do not remove the support too early or the wave will slump.
I haven’t made this myself, but curved air dry clay candle holders need patience more than skill.
This style works beautifully as a statement piece on shelves or coffee tables.
Final Thoughts
Here’s something most people don’t say about Air Dry Clay Candle Holders.
They don’t need to be perfect to feel special. In fact, the charm comes from uneven rims, fingerprints, tiny cracks, and pieces that look slightly off.
Air dry clay decor teaches patience. It also teaches letting go.
Clay dries how it wants sometimes, and that’s okay. If one piece fails, it still teaches you how clay behaves, how thickness matters, how drying speed changes everything.
These handmade candle holders aren’t just decor. They’re quiet practice in slowing down. And honestly, cozy homes are built exactly like that. One imperfect piece at a time.


