DIY Bee crafts are always a fun activity for people of all age groups.
Crafting bumblebees using different methods is all about using your creativity with the available resources.
Recently I made a bumblebee using homemade clay and it looked like a real bee.
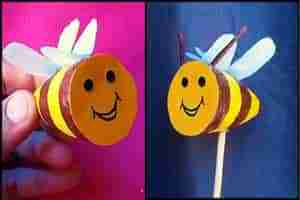
Here I’ve used a different method and elements to craft this DIY Bumblebee for Kids.
It’s easy to craft the structure and for your reference I’ve shared the step by step instructions along with the images in this article below.
To start with let’s take a quick look at the list of things required followed by easy to follow step by step instructions to craft a DIY bumble bee using LED bulb lights cover.
Step 1: Things Required To Craft This Bumble Bee
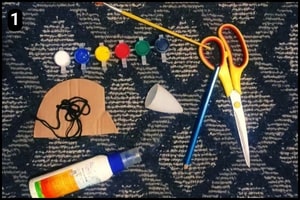
Things I’ve used to make the bumblebee are listed below:
- LED Bulb Cover: To make the Bumblebee’s base I’ve used a LED bulb cover.
- Cardboard: To cut the round shape for Bumblebee’s facial structure I’ve used a piece of cardboard sheet.
- Acrylic Paint: To paint the Bumblebee’s body I’ve used acrylic colors. Alternatively you can use water colors.
- Hot Glue Gun: To stick the elements together I’ve used a hot glue gun.
- Foam sheet: To craft the Bumblebee’s wings I’ve used a thin piece of foam sheet.
- Matchsticks: To make the antenna of the fly I’ve used 2 match sticks.
- Pencil and Scissor: To mark and cut the required shapes I’ve used a pencil and scissor.
- Black Marker: To draw Bumblebee’s mouth I’ve used a black marker pen.
Now that we have all the necessary components, let’s proceed with the steps to create the Bumblebee.
Step 2: Cutting the facial structure
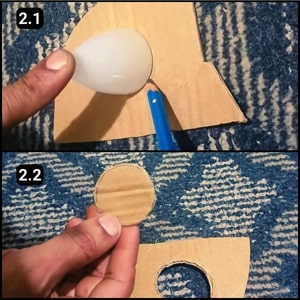
Earlier, I had cut the Bumblebee’s facial structure from a piece of cardboard sheet.
I had marked the required size using a pencil according to the Bulb cover’s opening face. Post which, I cut it using the scissor.
As an alternative to cardboard, you could use a yellow origami paper to draw the facial structure.
Step 3: Painting the Bumblebee’s base
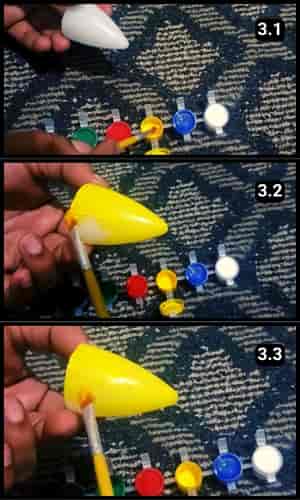
Next, I painted the led bulb cover using yellow acrylic color.
I had a faulty bulb with a cone shaped cover so I removed it to use it for this particular project.
Alternatively, you can make a cone shape using yellow or black origami paper if you don’t have a similar cover.
Step 4: Fixing the Facial Structure
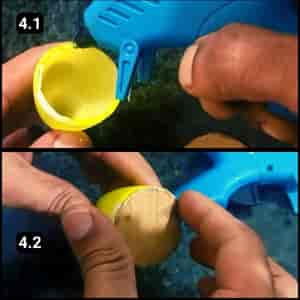
Now I will stick the facial cutout over the bulb’s edge.
To stick them together firmly, I have used a hot glue gun.
I applied it all around the edge of the bulb cover and placed the cutout over it.
Next, I will hold it for sometime so that it dries evenly.
After it dries the next step is to paint it yellow.
Step 5: The Dark Stripes
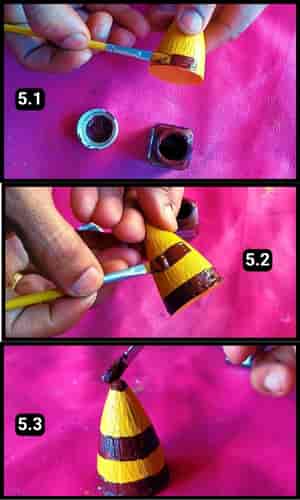
After the yellow paint dried, I applied black shades over the Bumblebee’s body structure.
I have used acrylic paint, but you can also use watercolors.
To get the perfect paint job done I began painting from the base of the head and then moved to the center of the body.
And then, I added a touch of black paint to the tip of the Bumblebee’s tail and let it dry for some time.
Step 6: Crafting the Eyes
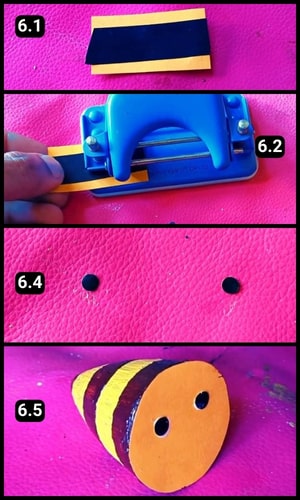
To create the illusion of popping eyes, I attached a piece of black masking tape (often used for electrical wiring) onto a piece of cardboard.
Next, I used a hole punch to create two perfectly round cutouts followed by applying the glue and meticulously attaching the eyes in their desired positions.
Alternatively, you can use googly eyes or draw the eyes with a black marker pen.
Step 7: Crafting the tiny wings
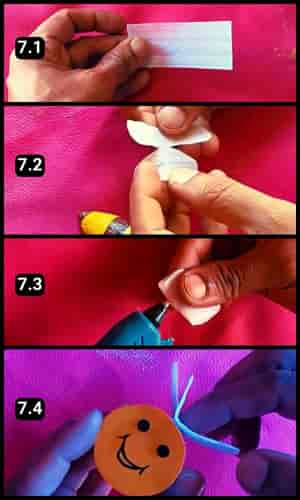
The next step is to craft the thin and tiny wings using a piece of foam sheet.
To get the proper shape I’ve folded the foam sheet and cut the required design as seen in images 7.1 and 7.2 above.
Then, I applied hot glue to the center and stuck the wings over the Bumblebee’s structure and waited until it dried properly.
Step 8: Fixing the Antennas
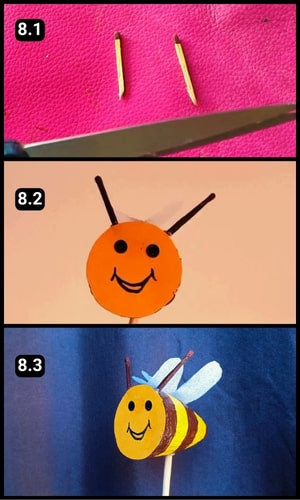
To craft the antennas I’ve used a couple of matchsticks and cut them short.
Next, I painted them dark and finally fixed them to the Bumblebee’s structure.
I’ve stuck a long wooden stick to its base so that kids can hold it and play.
Video Walkthrough of Bumblebee Craft using LED Bulb Cover & Match Sticks
Final Thoughts
Creating this DIY Bumblebee for Kids along with kids is surely going to be a buzzing experience! Utilizing a LED bulb cover, cardboard, acrylic paint, and other waste items, the process is both engaging and straightforward.
For an alternative twist, consider using origami paper for the facial structure or experimenting with various color combinations.
Encourage creativity by letting kids personalize their bees with unique patterns or colors.
This project not only enhances artistic skills but also provides a hands-on learning experience about shapes and colors.
It’s a delightful, educational, and eco-friendly way to spend quality time with your kids.
Lastly, based on what I have used in this project, I’ve found that the water color did not work well over the plastic bulb cover. Therefore, I had to apply acrylic color.
I have also shared the step by step video walkthrough of this DIY Bumble Bee project above for your reference.
Additionally, you can also watch the complete video tutorial on our YouTube channel.
Frequently Asked Questions
How long did it take to complete the Bumblebee craft?
It took 30 minutes for me to complete the Bumblebee craft project.
Can I use something else to make the bumble bee wings?
Yes, you can use white craft papers such as a piece of thin origami paper.
Can I substitute cardboard for the facial structure with something else?
Yes, In place of cardboard, try using yellow origami paper to draw the facial structure. It adds a different texture and aesthetic to your Bumblebee.
Is there a specific reason for using matchsticks for the antennas?
Matchsticks are used for their simplicity and ease of crafting. You can cut them short, paint them dark, and easily attach them to the Bumblebee’s structure.
Can I use a different base for the Bumblebee if I don’t have a long wooden stick?
Yes, the long wooden stick is optional. You can skip it or use an alternative like a popsicle stick or any other suitable item to provide support.
Is there a specific reason for using foam sheets for the wings?
Foam sheets are lightweight and easy to manipulate, making them ideal for crafting delicate wings. However, you can experiment with other materials like colored paper if you prefer.


