Creating a whimsical butterfly from a simple paper plate is one of my favorite crafts to do with the kids.
It’s not just fun, but it’s a wonderful way to ignite their creativity while teaching them about nature.
This project is perfect for a rainy day or a weekend activity, and the best part is, you probably already have most of the materials at home.
Let’s transform an ordinary paper plate into a vibrant butterfly with just a few basic supplies and some imagination.
But first let’s take a quick look at the basic craft supplies you’ll need to make this cute butterfly..
Step 1: Things You’ll Need For Paper Plate Butterfly Craft
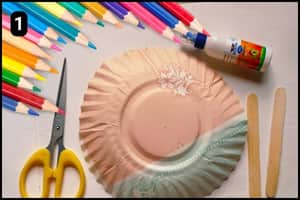
- Paper Plate: You’ll need a paper plate for the butterfly’s wings. I used a medium-sized plate with designs on one side and a blank white surface on the other.
- Popsicle Sticks: You will need 2 popsicle sticks as the main body of the butterfly structure.
- Scissor: You’ll need scissors to cut the paper plate and shape it into butterfly wings.
- Glue: To attach the paper plate wings to the popsicle sticks, you’ll need glue. Multipurpose glue works best for this craft.
- Paint or Watercolor: To shade the blank side of the paper plate you can either use watercolors, acrylic paint, or markers and crayons.
Step 2: Shaping/Preparing the Wings
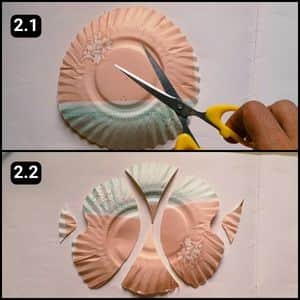
I started by trimming the paper plate to form the proper shape of the butterfly wings.
Next, I placed the paper plate upside down and cut it from the middle to obtain two identical large wing shapes (The middle section resembled an hourglass).
Next, I cut the wings from the sides to form inward curves, as seen in image 2.2 above. I took my time with this step to ensure the wing shapes were even.
Step 3: Assembling the Popsicle Sticks
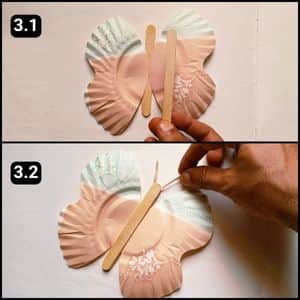
Next up, I positioned the wing shapes to align them with the popsicle sticks.
Placing one popsicle stick down, I aligned the paper plate shapes on either side of it.
Then, I applied glue to their connecting edges and affixed the paper plates to the base stick.
Next, I cut two long strips from the remaining paper plate pieces for the antennae and glued them to the top.
Finally, I took the second popsicle stick and affixed it from above, as shown in image 3.2.
From this angle, the butterfly structure was complete with the intricate designs on the paper plate visible.
However, I also worked on the other side by adding colorful shades.
Step 4: Shading The Reverse Side
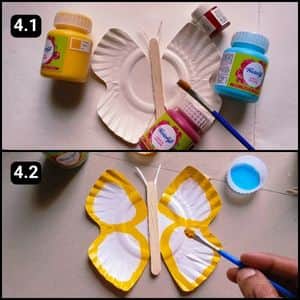
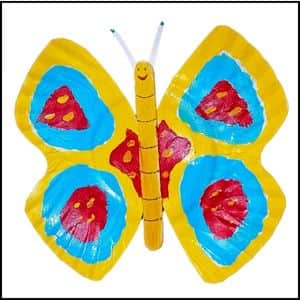
If you look at the images above, you’ll notice that the opposite side of the paper plate is colored using acrylic paints.
I began by outlining the wings with yellow borders, as shown in image 5.2. Different colors were used to fill in and shade the wings.
Step 5: Apply The Final Touches To Our Paper Plate Butterfly
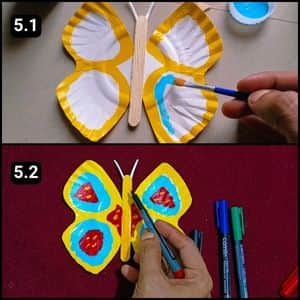
I further shaded the wings with blue and added patches using red paint.
Afterward, I applied yellow paint to the popsicle stick and allowed it to dry for about 5 minutes.
Once the paint had dried evenly, I moved on to shading the body of the butterfly.
Lastly, I used colorful marker pens to draw the eyes, mouth, and curved lines on its body.
For example, you can use a red marker for the mouth, a black marker for the eyes, and to shade the lower part of the butterfly’s body.
Video Walkthrough Of Butterfly Craft For KIDS With Paper Plate & Popsicle Sticks
Final Thoughts
To be honest, this paper plate butterfly project is both delightful and accessible.
I recommend experimenting with different color schemes and patterns to personalize your butterfly.
Consider adding glitter or sequins for extra sparkle, or try using textured paper plates for a unique effect.
To enhance the learning experience, I suggest incorporating this craft into a lesson about butterfly life cycles or symmetry in nature.
For durability, you might want to seal the finished product with a clear spray varnish.
Overall, it’s a fantastic way to upcycle everyday materials into something beautiful and educational.
Note: To assist you further I have also shared the complete video walkthrough of the butterfly craft on our official YouTube channel.


