Whenever I sit down to brainstorm DIY Clay Projects for Kids, I’m always surprised by how timeless these Kids worthy Clay crafts feel. No screens. No fuss.
Just tiny hands shaping simple craft ideas into something full of charm.
And honestly, isn’t that the kind of calm we all want on a random afternoon? If you’ve been hunting for diy clay ideas for kids that are easy, adorable, and don’t require a whole workshop, you’re in the right place.
These projects are fun, budget-friendly, and perfect for any kids craft session – rainy days, playdates, or even those “I’m bored” moments that sneak up at 8 p.m. Let’s make magic with clay, shall we?
1. Mini Clay Finger Puppets
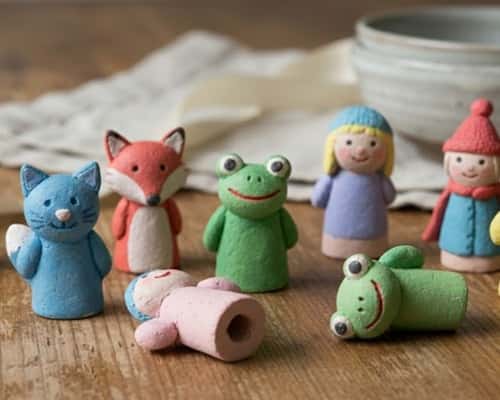
These tiny puppets are such a win because kids can shape anything – animals, silly monsters, cartoonish people.
Start with small clay balls, pinch one side to form a head, then poke a finger-sized hole at the base.
Add tiny ears or horns with leftover scraps. Keep the details simple so they don’t fall off when the clay dries.
Once dry, grab markers or acrylic paint to bring them to life.
Kids love making entire puppet families, so maybe plan for at least three each. Quick question: why do kids always make one puppet with giant googly eyes? No idea. But it’s adorable.
2. Easy Clay Name Plaques
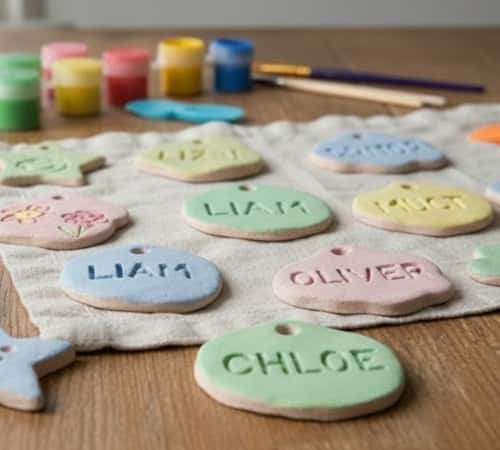
This one always feels like a proud moment project. Roll the clay into a flat oval or rectangle – whatever shape feels fun.
Kids press alphabet stamps into the clay to make their name pop.
No alphabet stamps? Use a blunt pencil to carve letters slowly. Add tiny clay stars, hearts, or dots around the edges.
Make a small hole at the top if you want to hang it later. Dry it, paint it, seal it with Mod Podge, and boom – bedroom door décor sorted. It’s a great confidence booster too. Kids love seeing their name on things. Don’t we all?
3. Playful Clay Cookie Cutter Shapes
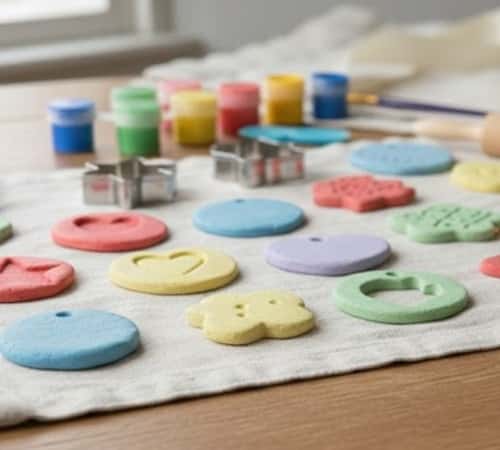
If you’ve got cookie cutters at home, this project practically makes itself.
Roll out the clay like cookie dough, press your favorite shapes, and gently lift them onto a tray.
Stars, dinosaurs, flowers – kids never run out of ideas. Before the clay dries, let them poke patterns with a pencil or straw.
Want to turn them into charms? Make a tiny hole at the top. Once dry, paint them however wild you want.
Kids love mismatched colors, so don’t try to make it perfect. Imperfect is cute here. And honestly, isn’t that freeing?
4. Simple Clay Pinch Pots
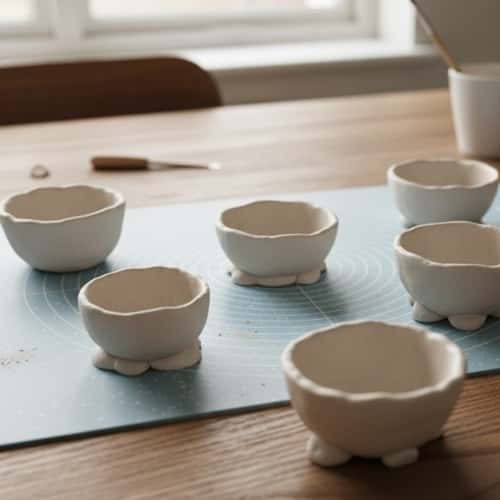
This is one of the oldest diy clay ideas for kids and still one of the best.
Show them how to make a ball, press a thumb in the center, and pinch the sides to form a tiny pot. That’s it.
Kids can add texture using forks, old toothbrushes, or bubble wrap (yes, really). Let them dry completely before painting.
These make great trinket dishes for beads, marbles, or the “mystery rocks” kids always collect. Ask them what they plan to store in their pot – you’ll get some hilarious answers.
5. Clay Animal Magnets
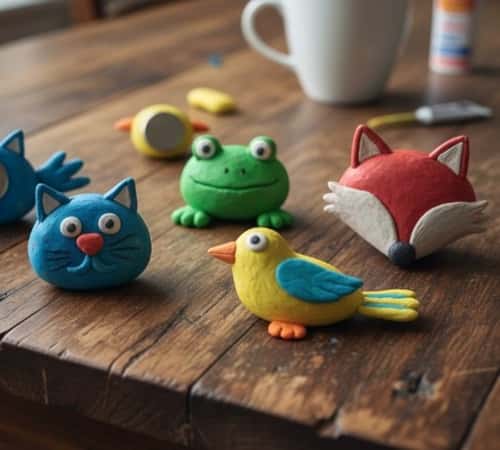
Kids adore these because they mix crafting with instant fridge bragging rights.
Roll small clay shapes for heads and bodies – keep them flat so magnets stick well later.
Add tiny ears, tails, wings, or little snouts. Think cats, owls, elephants, turtles… whatever sparks excitement. Once dry, paint them bright and seal.
Hot glue small magnets to the back (adult step). Stick them onto the fridge and watch kids show them off to every visitor. They love it. And it’s ridiculously cute.
6. Clay Bead Bracelets
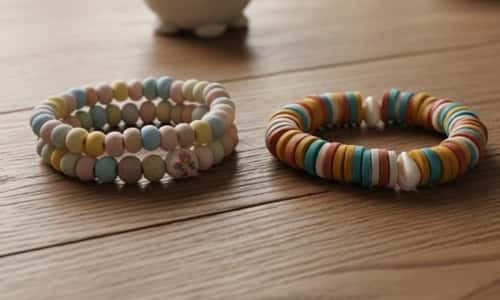
Kids love anything wearable, and clay beads are such an easy win. Roll tiny balls of clay and poke a hole through each using a toothpick.
Mix up the bead shapes – round, oval, even squished little cubes. Let the beads dry fully before painting so the colors stay crisp.
If kids want patterns, show them how to dab paint with cotton buds. Once everything is dry, thread them onto elastic and tie a tight knot.
These bracelets end up looking surprisingly cute, which is great because kids proudly wear them everywhere.
If you’ve ever seen a child stack ten bracelets on one wrist, you know what’s coming.
7. Mini Clay Garden Markers
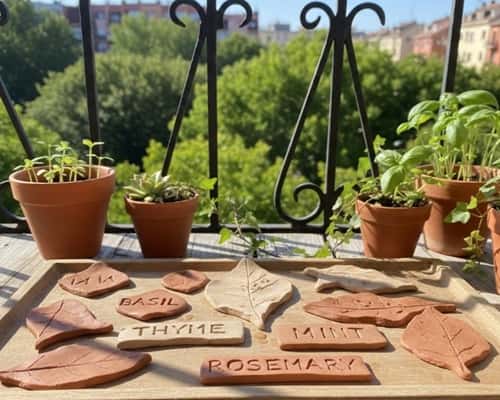
This project sneaks in a bit of learning while still staying fun.
Roll the clay into small flat rectangles or long oval tabs. Kids can carve the names of plants with a blunt pencil – “Mint,” “Basil,” “Tomato,” or whatever grows in your pots.
Keep the text short so it dries clearly. Add tiny clay leaves or fruits on top for extra charm. Once dry and painted, stick a wooden skewer or popsicle stick at the back with glue.
These look adorable tucked into plant pots, and kids love checking on “their” plant every morning. It’s like responsibility… but in a cute way.
8. Tiny Clay Picture Frames
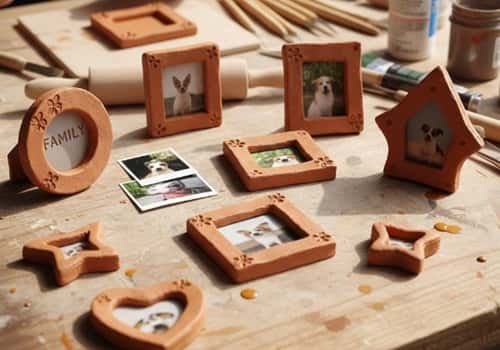
These mini frames make great gifts and they’re easy enough for kids to shape on their own. Start by flattening the clay, then cut a square or rectangle.
Hollow out the center using a butter knife so the opening looks like a frame.
Add simple decorations – dots, stripes, tiny clay bows or stars. Dry it completely, paint it, and seal it.
Once ready, tape a small printed photo on the back. Kids love handing these to grandparents because it feels personal and handmade. And let’s be honest – grandparents treasure anything made of clay, crayon, or chaos.
9. Clay Keychains for Backpacks
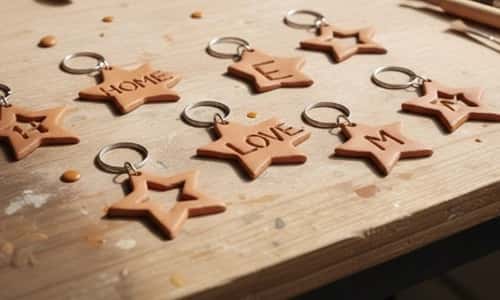
Kids go wild for backpack accessories, so this one always becomes a favorite.
Roll the clay into fun shapes – stars, hearts, initials, or even tiny animals.
Use a straw to make a clean hole at the top. Let kids add texture with forks or patterned fabrics.
Once dry, paint them bold and colorful. Add a keychain ring or small hook, and you’ve got a backpack charm that kids proudly show off at school. And no, they won’t stop jingling it. You’ve been warned.
10. Clay Stampers for Play-Dough
This one is surprisingly fun because kids get to make tools they can reuse.
Roll small clay disks and press different textured items into them – buttons, leaves, beads, forks, anything safe.
When the clay dries, the texture turns into a DIY stamper. Kids can use these on play-dough or fresh clay to create patterns.
Encourage them to test each stamper to see which ones make the funniest designs. The experimentation is half the fun. It’s a simple craft but sometimes simple is exactly what works best.
Final Thoughts
If you want these clay projects to turn into long-lasting keepsakes, there are a few small things that make a huge difference.
Always let the clay dry completely – rushing this step causes cracks, and that’s frustrating for kids.
Use simple paints like acrylics and seal the finished pieces with a clear coat so they survive real-life handling.
Keep a “clay basket” ready at home with basic tools: toothpicks, markers, cookie cutters, a plastic knife, and a craft mat. It makes spontaneous creativity easier.
And if you’re worried about mess, here’s a secret – kids take cleanup seriously when you turn it into a two-minute race.
A tiny trick, but it works wonders. Let clay time feel relaxed, fun, and full of imagination.


