Who knew a simple piece of paper could transform into a treasure? Today, we’re diving into the world of origami to create something special i.e. a paper ring.
This craft isn’t just about making a cute accessory, it’s a journey into creativity, perfect for kids and anyone looking to add a little spark to their day.
With each fold, we’ll not only craft a ring but also weave a tale of imagination and joy.
I’ve crafted rings from origami papers and have shared the steps along with images for your reference in this article below.
Let’s take a quick look at the list of things required for the Origami paper ring.
Step 1: Using the appropriate size
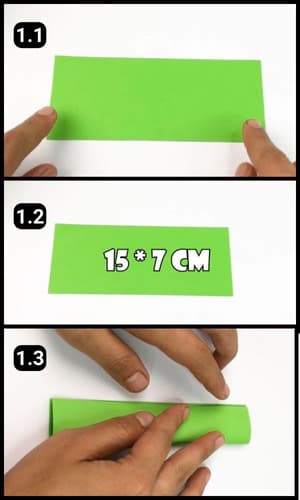
First up, grab a rectangular origami paper, about 15×7 cm.
It’s the perfect size to wrap around your fingers once we’re done.
Let’s fold it right down the middle, pressing the edges to make them nice and crisp.
Then, we’ll open it back up and that crease we just made? It’s our guide for the next steps (more on that in the following steps).
Step 2: Fold The Origami Paper right

Next, let’s bring the paper’s two sides to meet right at the center, just like the images 2.1 and 2.2 above.
Got it?
Great! After that, we’ll switch things up and fold it another way, following what you see in image 2.3.
It’s like a little dance for our paper, moving in one direction, then another.
Step 3: Fold and unfold the upper edges
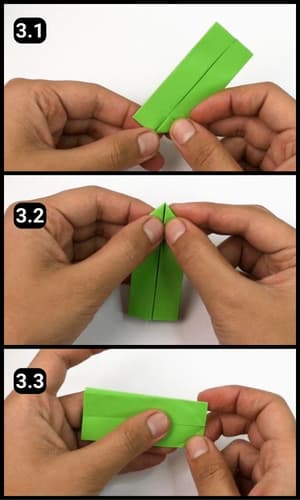
To create flexibility over one of the edges I folded them to form a triangular shape as seen in the images 3.1 and 3.2 above.
Then, I carefully unfolded those triangles to set the stage for our next creative step.
Step 4: Forming a triangular edge
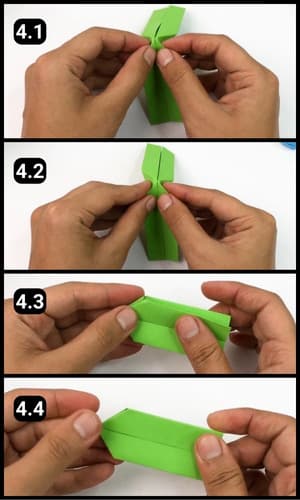
With the groundwork laid by our earlier folds, it’s time to gently push that flexible edge inward.
This little nudge transforms one side of our sheet into a neat triangle.
Thanks to the magic we worked in step three, the top edge now moves with just a whisper of effort.
Step 5: Folding the sides

Next, I’ve picked one side and folded it to the center of the shape.
Once it’s snugly in place, we’ll mirror that move with the other side, giving it the same loving attention.
If you glance at the images above, you’ll notice how one side now perfectly meets our vision.
Step 6: Folding the other ends

Alright, let’s repeat the same process on the other end too.
Make sure to fold it nicely and evenly, just like we did before, it’s all about making both sides match up perfectly.
Step 7: Folding the triangular edge for flexibility
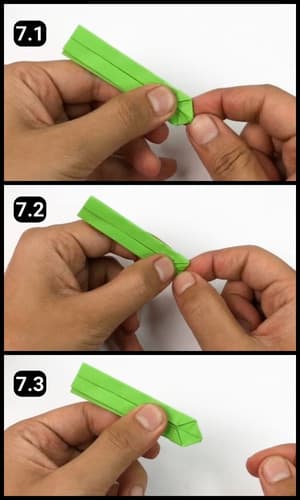
Next, to add some flexibility to the triangular edge I’ve folded its tip and pressed it gently followed by unfolding it (Check the sequence in the above images).
Step 8: Resizing the Ring

Next, I cut off the extra part of the ring so it wasn’t too big for my fingers.
Step 9: Fold in upper direction

Now, leaving some space towards the triangular edge I will fold one of the sides in the upper direction as seen in the above images.
This step will help form the ring head.
Step 10: Folding the other side
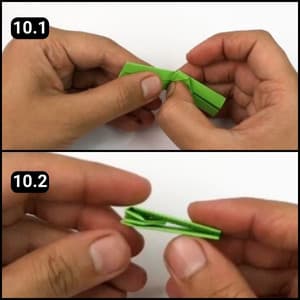
Similar to the above step it’s time to fold the other side in the upper direction.
Step 11: Shaping the Origami Ring Head

The next step is to gently pull the folded sides from both ends to form the shape of the ring head.
I have used my finger to shape it further.
Then, I rolled my fingers from the bottom gap and the outer part of the ring head to give it a proper shape as seen in images 11.3 and 11.4 above.
Step 12: Curling the Ring

I needed to curl the edges to join them, so I used a cutter.
Holding the cutter’s sharp end in one hand, I placed my thumb over the ring’s edge, pressing it against the cutter’s blade.
I gently pulled the cutter along the ring’s edges, pressing softly with my thumb to roll it against the cutter.
I did this on both edges to get them nicely curled.
Step 13: Joining the Ring Base

The two ends of the rings have enough curls to fix them together.
I’ve joined the two edges and inserted one of the ends into the gap of the edge to its opposite side.
You can refer to the images above for more clarity.
The origami paper ring is finally ready to be rolled into the fingers.
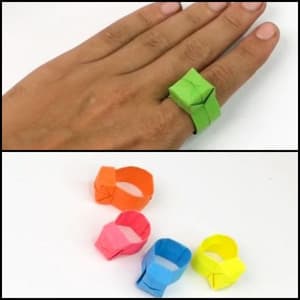
You can make multiple rings using different color sheets and let children fill their Fingers with joy.
Video Walkthrough Of Origami Ring
Final Thoughts
Often, many of us create simple ring shapes, usually adding different pieces to form the ring’s head.
But the ring I’ve made comes from just one sheet of paper, with no extra bits attached.
It shows how a touch of creativity can elevate our crafting projects to something special.
Plus, I’ve included a video above as well to guide you through the process, making it even easier to follow along and make your own.
Precision and patience are key, and experimenting with different papers can make each ring uniquely yours.
As we wrap up, remember, this craft isn’t just about making an accessory, it’s a gateway to discovering the joy of creating with your hands, turning the ordinary into the extraordinary.
Frequently Asked Questions
How much time does it take to make one origami paper ring?
Depending on your skill level, crafting one origami paper ring can take anywhere from 3 to 6 minutes. Patience and practice can speed up the process.
Can children make these origami rings on their own?
Yes, children can definitely engage in making these rings. It’s a fantastic way for them to practice fine motor skills and creativity, though younger kids might need a bit of guidance on the trickier folds.
Do I need any special tools to make an origami paper ring?
No special tools are required. You just need a sheet of origami paper and a cutter for the final steps. Everything else relies on precise folding and creativity.
Can I use regular paper instead of origami paper?
Yes, regular paper can be used, but ensure it’s cut to the recommended size. Origami paper is preferable for its ease of folding and vibrant colors.
What’s the best way to fix a mistake if I fold something incorrectly?
If you make a mistake, gently unfold the paper and smooth out the crease as much as possible. Origami paper is forgiving, but too many folds and refolds can weaken the paper. Start with a new sheet if the paper becomes too creased or torn.
Can this activity be incorporated into an educational setting or curriculum?
Absolutely! Making origami rings can be a fun, hands-on way to enhance lessons on geometry, symmetry, and art. It encourages spatial reasoning, following instructions, and creative thinking, making it a valuable addition.
How can I share this activity with a group of children at a party or classroom setting?
For group activities, pre-cut the paper to the right size and have enough for multiple attempts. Set up stations with step-by-step instructions and maybe a demonstration video. Encourage kids to help each other, and make sure to walk around to offer assistance and praise their efforts.


