In this article, I’ll show you how to create a stunning handprint lily flower craft using just a few materials and a bit of creativity.

From colorful craft papers and bamboo sticks to a handy template, I’ll show you how to make each step enjoyable and easy.
Whether you’re a seasoned crafter or just looking for a fun project to do with your kids, this craft is perfect for adding a personal touch to your home or making a heartfelt gift.
Before you begin, let’s go through the list of basic craft supplies you’ll need to make handprint Lily flowers in step 1 below.
Step 1: Materials You’ll Need For Handprint Lily
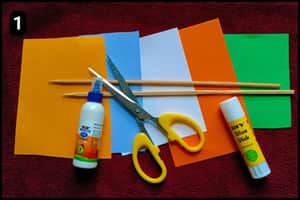
- Craft Papers: You will need colorful craft paper sheets to make the handprint Lily flowers. I have used some lighter and vibrant shades for the same.
- Bamboo Stick: I have used a bamboo stick for the stamen of the flowers. You can use something similar or green straws.
- Scissor: To cut the shapes of the Handprints from colorful craft papers and other elements you will need a scissor.
- Glue: To assemble your Handprint Lily craft, you’ll need a reliable adhesive. You can use a standard white glue or a multipurpose glue, both of which will effectively hold the elements together. Simply apply a small amount of glue to the desired area and press the pieces together firmly until they bond.
- Crepe Paper Strip: I have used a dark green crepe paper strip to wrap the stems on the Lily flowers.
- Colorful Handprint Template: I have made a ready template which includes colorful handprints shapes for your reference and you can access the same in the below step 2.
Estimated Time Taken to Craft the Handprint Lily Flowers: It took 12 minutes for me to craft the bunch of Handprint Lily flowers using the ready template from our website. However, the time will vary with manually cutting the shapes using colorful craft papers.
Step 2: Handprint Flower Template

To avoid the hassle of collecting craft papers of different shades for the bunch of handprint Lily flowers you can simply use our ready template.
You can download and print multiple copies of the template with a few clicks from our website.
Later you can start cutting and assembling the handprint Lily flowers bunch.
However, you can use the colorful papers of your choice and customize the flowers.
Step 3: Cutting The Colorful Handprint Shapes
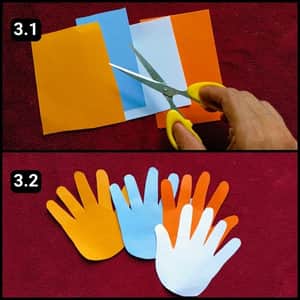
If you don’t have the handprint template, just use colorful craft papers to cut out handprint shapes.
Choose colors based on your preference or what you have on hand.
Outline the handprints with a pencil, then cut out the shapes as shown in image 3.2 above.
If you have multiple children, you can have each one create a flower.
Later, you can group them together or arrange them as you like.
Step 4: Forming The Lily Shapes
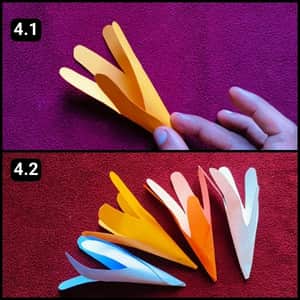
Now that you have your handprint cutouts ready, it’s time to create the Lily flowers.
Roll each cutout into a cone shape, as shown in image 4.1 above.
Secure the edges with multipurpose glue to ensure they stick firmly.
Once all the flowers are rolled and glued, let them dry thoroughly to keep their shape.
Step 5: Preparing The Stamen
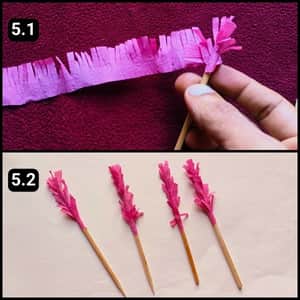
Next, I prepared the stamen for the Lily flowers using a bamboo stick and a strip of pink crepe paper.
I made multiple cuts along one edge of the crepe paper strip, as shown in image 5.1 above.
I then applied glue to the tip of the bamboo stick and began wrapping the pink crepe paper strip around it, working downward until half the stick was covered.
To finish, I secured the edges of the crepe paper with glue
I repeated this process to prepare all four stamens for the Lily flowers.
Step 6: Push it Through the Center
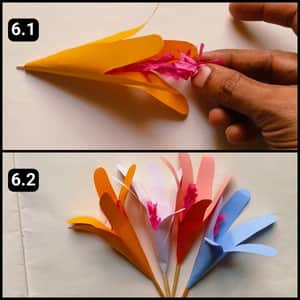
Next up, it’s time to insert the stamens through the flowers to prepare the structure.
I started by inserting the stamens inside each flower one by one.
In case the lower end of the flowers have less space to pass on the stamens through the bottom simply, grab a scissor and apply a small cut to the bottom of the Lily flowers.
Make the cut in such a way that there’s only room for the bamboo stick to go through the hole.
Step 7: Wrapping The Stem
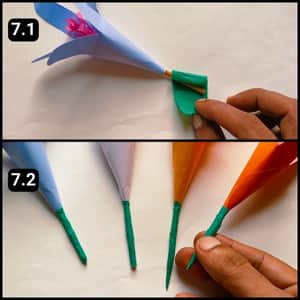
The final step in creating your vibrant Handprint Lily craft is to add a touch of foliage.
To do this, I wrapped the stems with dark green crepe paper strips, securing them under the flower petals as shown in Image 7.1.
This added a natural and cohesive element to the design.
I repeated this process for all four stems, using glue to hold the crepe paper in place and allowing it to dry completely before moving on to the next step.

I would say transform the paper lily stems into a beautiful bouquet by wrapping them with decorative paper sheets.
This thoughtful gesture makes for a lovely gift for loved ones, or you can use them to add a touch of elegance to your living space.
Whether you’re looking to brighten up a room or show appreciation for someone special, this creative idea is sure to bring a smile to their face.
Check out the complete video walkthrough of this handprint project here.
Final Thoughts
My top takeaway from this Handprint lily craft is that you must have a solid plan and template to work from.
While it’s tempting to wing it and cut out shapes freehand, I found that using a template saves a ton of time and ensures that the flowers turn out uniform and professional-looking.
If you’re looking to take your Handprint Lily game to the next level, I recommend experimenting with different colors and textures for the flowers and stems.
You could also try adding some embellishments, like glitter or rhinestones, to give your bouquet some extra sparkle.
Ultimately, the key to success with this craft is to have fun and be patient.
Don’t be afraid to get creative and make mistakes, they’re all part of the process! With a little practice and perseverance, you’ll be creating stunning Handprint Lily flowers in no time.
Note: I have also uploaded a quick video walkthrough of this handprint Lily flowers craft on our official YouTube channel.


