I’ve lost count of how many cornstarch clay projects my son and I have made over the years. Some have cracked.
Some melted when water touched them. And one adorable “snowman” straight-up collapsed during monsoon season.
That was my sign. I needed a waterproofing method that actually worked – one I could trust even if my kid decided to wash his toys in the sink.
And after enough trial and error (and one clay heart that is definitely smoother than the floor tiles), I found a technique that finally made my cornstarch clay water-resistant enough to survive regular handling.
Today, I’ll walk you through the whole thing so you can make your creations last longer too.
Disclaimer: Before we dive in, let’s be honest, cornstarch clay will never be fully waterproof like ceramic or resin. But with the method I’m sharing here, you’ll get it close enough to withstand splashes, humidity, and accidental taps from wet hands. And trust me – for a homemade clay, that’s a big win.
Why Your Cornstarch Clay Needs Waterproofing
Cornstarch clay is soft, light, cheap, and perfect when kids want to sculpt “just one more snake.”
But once it dries, it’s still a starch-based material. Which means water is basically its worst enemy.
Humidity?
Rainy weather?
Sweaty little fingers?
All of them can make your clay get soggy or lose shape.
So to keep your pieces looking polished – especially if it’s something like a coaster, ornament, or decorative bowl – waterproofing becomes a must.
The Waterproofing Method I Use (And Trust With My Life… and Crafts)
While most people jump to Mod Podge (and I’ve used it too), today I’m sharing a completely different method I developed while trying to seal a cornstarch clay trinket dish for my wife.
I call it:
The Triple Layer Oil-Resin Sealing Method
It uses:
- A homemade oil-resin mix (don’t worry, it’s simple)
- A drying schedule that actually matters
- A final curing trick that makes everything last longer
It sounds fancy, but it’s surprisingly easy. You’ll love it.
Ingredients needed to make your cornstarch clay water proof
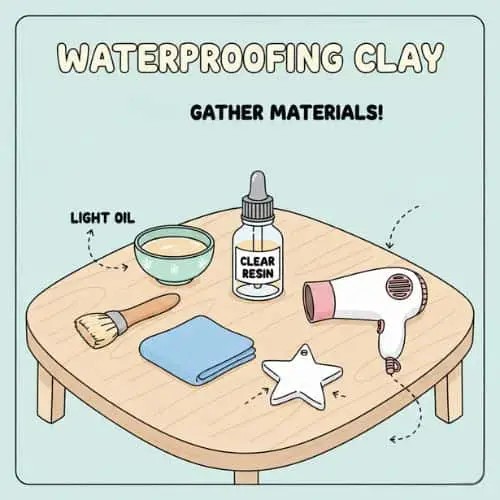
Here’s everything I used to waterproof my cornstarch clay pieces:
- Light cooking oil (I use refined coconut oil)
- Clear craft resin (the thin liquid kind, not the thick two-part epoxy)
- A soft detail brush
- A microfiber cloth
- A hair dryer (optional but helpful)
- Your fully dried cornstarch clay masterpiece
Instructions To Make Your Cornstarch Clay Waterproof
Step 1: Warm Up Your Clay Piece
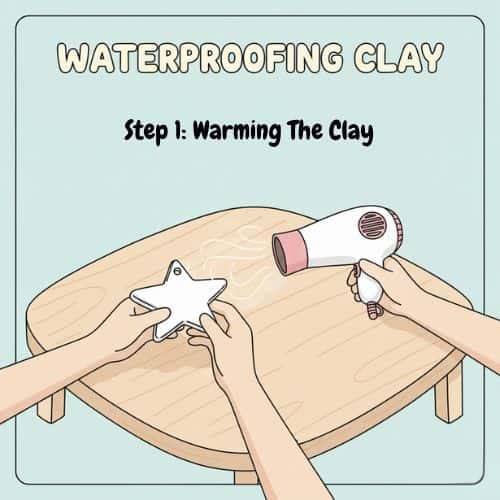
I usually start by gently warming the dried clay piece using a hair dryer on low. Nothing dramatic. Just enough to open up the pores a little.
Why?
Warm clay absorbs sealant more evenly.
Hold it 6 to 8 inches away and move in circles for about 20 – 30 seconds. Easy.
Step 2: Make the Oil-Resin Mix
Now for the magic sauce.
In a tiny bowl, I mix:
- 2 parts light oil
- 1 part clear liquid resin
This mixture stays brushable and thin, which helps the clay absorb it instead of letting it sit on top like a sticky puddle.
Stir it with the brush until it looks glossy.
If it feels thick, add a few more drops of oil.
Step 3: Apply the First Coat
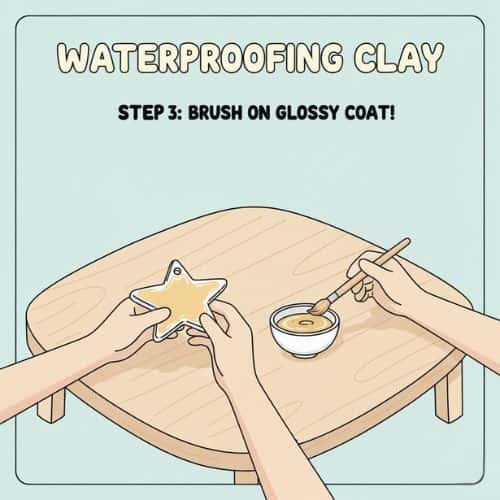
Dip your brush into the mixture and start applying thin layers on your clay piece. The first coat should disappear quickly – that’s the clay drinking it in.
Work slowly.
No heavy brushing.
Light strokes feel best here.
Let it sit for 15 minutes.
If you see any shiny puddles, dab them off with a microfiber cloth.
Step 4: Add Two More Coats (With Drying Gaps)
After the first layer completely soaks in, repeat the same process two more times. But this time, let each coat dry for 30 minutes.
On coat number two, you’ll notice the clay doesn’t absorb as fast.
By coat three? You’ll see a gentle satin sheen – that means the barrier is forming.
Step 5: Heat-Cure the Piece
Here’s the part most people skip, but it makes a HUGE difference.
Once your final coat is dry, gently warm the piece again with the hair dryer. Not too much. Just enough to help the resin settle and cling.
This mini heat cure strengthens the waterproof layer.
I usually let it sit overnight after this.
If the weather is chilly or humid, 24 hours is even better.
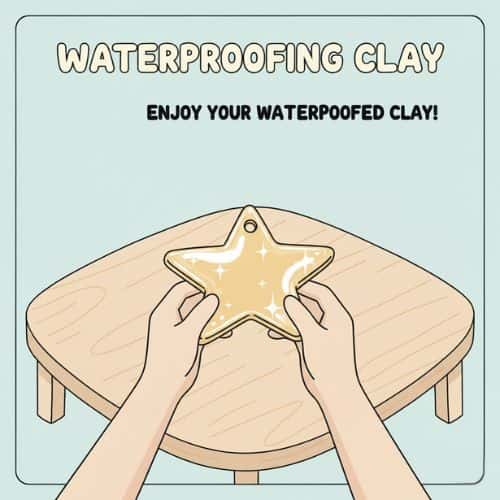
Step 6: Test It (The Fun Part!)
I always test my pieces with a few drops of water. Watching the water bead up on top the first time gave me way more joy than it should have – like watching a child finally drink with a cup that doesn’t leak.
If the water beads and rolls off, you’re golden.
If it looks like it’s absorbing, just add one more thin coat of your magic sauce.
Optional: Add a Top Satin Finish
If you prefer your clay pieces to look more polished, you can brush one final layer of plain liquid resin (very thin!) on top.
But this is optional.
Some pieces look perfect with just the oil-resin mix.
Final Thoughts
Waterproofing cornstarch clay used to intimidate me more than assembling my son’s Lego sets.
But once I figured out this method, everything became easier – and honestly, more fun.
This process doesn’t just protect the clay; it makes the final piece look smoother, richer, and way more durable.
So next time your kid hands you a dinosaur or heart-shaped magnet made from cornstarch clay, you won’t have to silently panic about how long it will last. You’ll know exactly how to protect it.
And if you’re anything like me, you’ll probably make a few extra pieces for yourself while you’re at it. That’s the real joy of crafting with kids – you get your own playtime too.


