Today, I’m excited to share a lifelike paper plate ladybug craft for kids that’s sure to delight.
You might know this adorable insect as a Ladybeetle or Lady fly, but whatever you call it, this craft captures its charm perfectly.
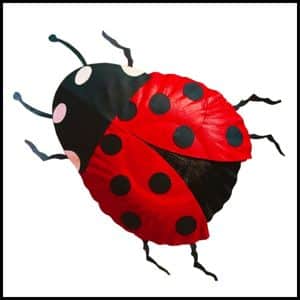
With just a few simple materials and some imagination, you and your little ones can transform ordinary paper plates into these delightful creatures.
This project is not only entertaining but also educational, teaching children about insect anatomy and color patterns.
So, gather your supplies, roll up your sleeves, and get ready to craft this simple yet lifelike ladybug craft that will have everyone buzzing with excitement.
Editor’s Note: I’ve also created two other types of ladybugs.
- One is crafted from a paper plate, a simpler version compared to this.
- And the other is made directly from the template where you cut and assemble the shapes (Check this out here).
Step 1: Things You’ll Need for Paper Plate Ladybug Craft
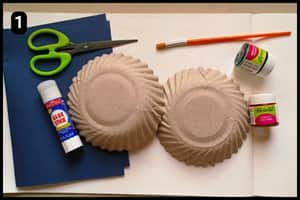
- Paper Plate: I used a standard-sized paper plate as the foundation for the ladybug craft, but you can adjust the size by using smaller or larger plates. I cut the plate into shapes for the wings and body of the ladybug. After painting each piece in different shades, I assembled them to complete the craft.
- Paint and Paintbrush: To shade the paper plate resembling the colors of the Ladybug I have used water color and a paintbrush.
- Scissor: You will need a scissor to cut the paper plate and the shapes from the ready template.
- Glue: To stick the paper plates and the template shapes of the ladybug you will need a quality adhesive such as a multipurpose glue.
- Ladybug’s Template: To obtain the shapes for assembling I have designed a unique template. You can download and print the free paper plate ladybug template in the following step (scroll down).
Estimated Time To Complete This Paper Plate Ladybug Craft: It took 15 minutes for me to craft the Paper Plate Ladybug structure using the ready template from the website. The total time includes the painting and drying time, however, if you manage to get colorful paper plates then you can reduce the time by 5 to 7 minutes.
Step 2: Preparing/Downloading The Ladybug Template
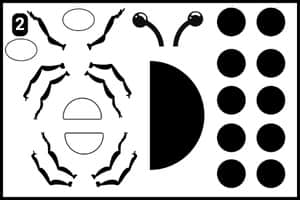
Above is the template for the ladybug, showing details like the mouth, legs, antennas, head, eyes, and body shades.
The oval outlines are for the eyes, and the semicircles represent facial shades. You can easily download the paper plate ladybug template and print it.
Step 3: Shaping the Paper Plate
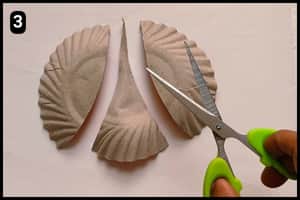
Here’s a crucial step i.e. transforming the paper plate into the delicate and intricate wings and body of the ladybug..
As shown in the image above, divide the paper plate into three sections: Two equal parts for the wings and the central portion for the body. It’s important to cut the wing shapes meticulously to achieve evenly shaped wings. If the wing shapes vary, you can trim them further to ensure they match and look uniform.
Step 4: Shading the Wings
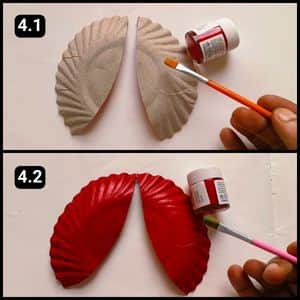
I meticulously painted the two sections of the plates designated for the wings, ensuring each brushstroke added vibrant color and a lifelike texture.
I used red acrylic paint to shade the wing shapes, as shown in the images above.
Acrylic paints provide a glossy finish similar to real ladybugs, which is why I opted for acrylic colors.
However, you could also use regular watercolors or red paper plates if they’re available.
Step 5: Shade the Body
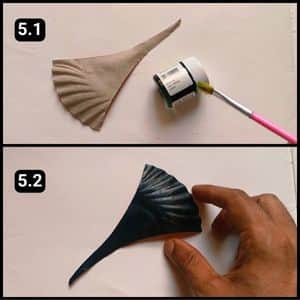
Next, I shaded the central portion of the paper plate, which served as the main body shape.
Similar to how I painted the wings, I opted for black acrylic paint to give the ladybug’s body its distinctive hue.
The main body and wings structure of the ladybug craft are now complete, forming a delightful base for this charming project.
I then left the paper plates to dry for about 5 to 8 minutes in a well-ventilated area.
Step 6: Assembling the Body Parts
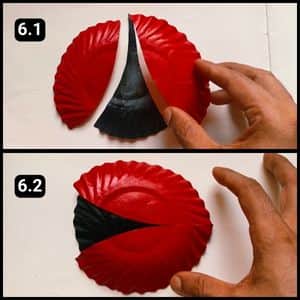
The paint dried on the paper plate parts, giving them a realistic look with the glossy finish.
Next, I carefully pieced together the components, meticulously crafting the lower body structure of the ladybug.
As shown in the images above, I positioned the wings slightly above the central body shape, leaving space to apply glue to the edges and stick them together.
Step 7: Assembling the Template Shapes
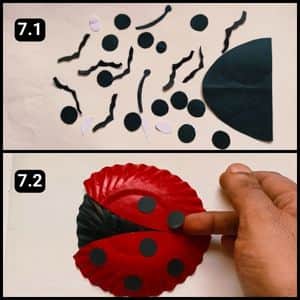
Next, I assembled the template shapes onto the paper plate structure to create the typical dotted patterns of the ladybug.
I evenly aligned five black circles on each wing and adhered them securely.
With this step, I finished adding the final touches to shade and define the lower body of our paper plate ladybug, bringing out its charming details.
Step 8: Fixing the Head to Body
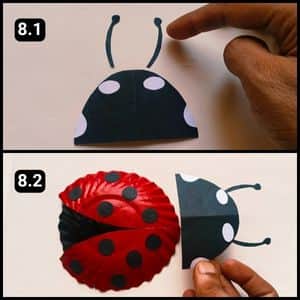
It was time to prepare the head of the ladybug so it would be ready to attach to the lower body.
I used the black semicircle shape as the base for the head.
First, I adhered the white oval shapes as the eyes of the ladybug, followed by the white semi circles on the sides of the head.
Next, I carefully affixed the antennas to the top of the head, securing them from behind the structure to ensure they stood upright and added a realistic touch.
Finally, I joined the head to the body of the ladybug using multipurpose glue.
Step 9: Assembling the Tiny Legs
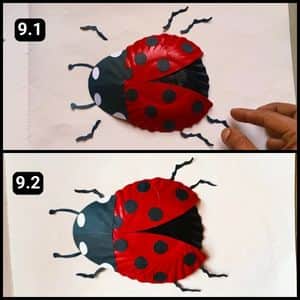
The final step of the paper plate ladybug craft was to attach its tiny legs around the body.
I carefully aligned the legs around the ladybug’s structure, as shown in image 9.1 above.
Then, I patiently applied glue to the edges of each leg and attached them one by one. The completed paper plate ladybug looked remarkably lifelike.
Video Walkthrough of our Lifelike Paper Plate Ladybug Craft
Final Thoughts
As I step back and admire our completed paper plate ladybug, I’m filled with a sense of accomplishment and joy.
I highly recommend trying this project with kids of various ages, as it can be easily adapted to different skill levels.
For younger children, pre-cut the shapes and focus on the painting and assembly.
Older kids might enjoy designing their own unique ladybug patterns or even creating other insects using similar techniques.
Don’t forget to display these charming creations proudly, they’ll brighten any room and serve as a delightful reminder of the fun you shared.
Note: To further assist you I have also shared the complete video walkthrough of this paper plate ladybug craft on our official YouTube channel.
