Folding paper airplanes is a classic childhood activity that never seems to lose its charm!
Remember spending hours perfecting your own paper gliders? Now you can bring that same joy to your kids with this easy airplane paper craft project but with a unique twist.
I have made a paper airplane craft and added some clouds to excite children with this perfect and unique figure.

Not only will this craft project keep them occupied and entertained, but it’s a fantastic opportunity to bond and explore some basic scientific principles together.
This article provides clear instructions and even includes a template to make creating awesome paper airplanes a breeze.
Key Takeaways
- Download the paper airplane template.
- Cut the airplane shapes as outlined in the template.
- Assemble the pieces in order to make it look complete.
- Watch the Video Walkthrough For Hand Holding.
Step 1: Making of Airplane Cutout Template
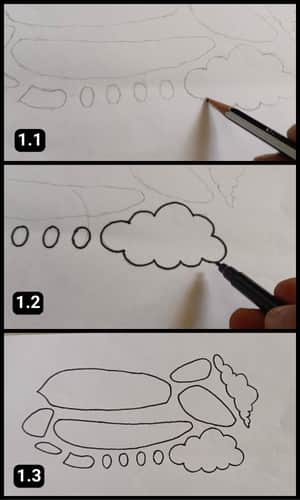
Before I start any of my paper craft projects, I always take a moment to decide on the shape I want.
Once I have my heart set on a particular design, I move on to create a cutout that matches my chosen figure exactly.
Here’s how I went about it: I sketched out various shapes with a pencil, then carefully outlined the final ones for cutting. I even made sure to share this template on my website for anyone looking for a bit of guidance or inspiration.
Step 2: Download and print the template
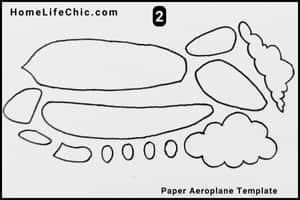
The image above showcases the final product of the template used for this project.
To save time and effort, you can easily download the pre-made airplane template rather than drawing it from scratch.
This template will not only save you time but also provide you with a perfect airplane shape and precise cutouts for your project.
Step 3: Cutting shapes on colorful papers
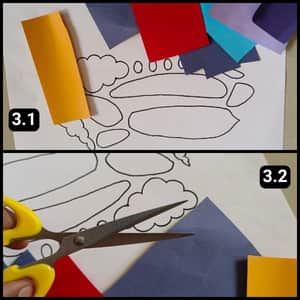
Then came the exciting part that is picking out the vibrant paper sheets for cutting into shapes.
This craft project is all about color, therefore you need to mix and match shades according to your taste.
So, I made it a point to blend dark and bright colors, aiming to bring out the best in the overall design.
Step 4: Fixing the main body
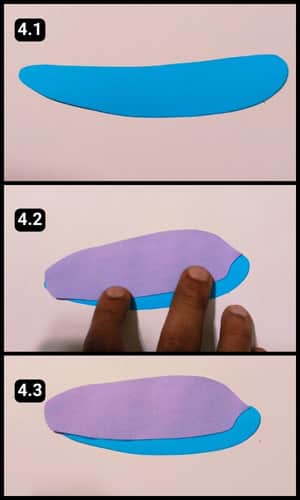
In order to create the foundation of the paper, I used a sheet of blue-colored paper.
Next, I adhered the larger, light purple paper to the main base of the paper airplane.
Aligning the points precisely, as shown in the above images, ensured a smooth and secure attachment.
Step 5: Sticking the Wings and Tail
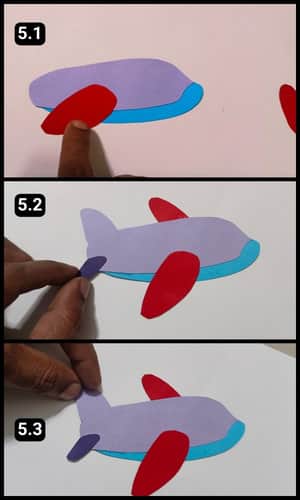
It’s time to attach the supporting elements like the wings and the tail.
I’ve used red paper for the main wings because it contrasts well with the shades of the body of the paper airplane.
The larger wing should be attached to the front of the paper airplane, and the smaller wing to the back.
The tiny wing near the tail looks great in dark purple, and I’ve attached it to the front of the structure as shown in image 5.2 above.
The top tail panel in light purple contrasts nicely with the other shades I’ve used.
Step 6: Align the window cutouts
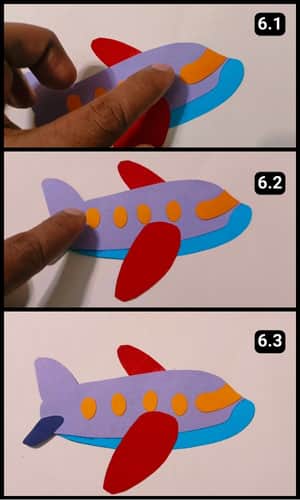
To complete the paper airplane craft project, I attached the cutout shapes to the window
I started by attaching the pilot’s window, followed by the windows for the passengers. Once I finished this step our paper airplane looked fantastic and seemed ready to take off.
Step 7: Set the clouds

Next up, I cut and aligned the cloud shapes around the paper airplane.
After navigating through the clouds, I expertly positioned our aircraft between their billowing masses. It looks visually stunning, doesn’t it?
Fasten your seatbelts and soar through the dark, mysterious clouds in the company of this exceptional paper airplane.
While the paper airplane itself is a prize-winner, the addition of the cloud designs elevates it to award-winning status LOL.
Video Walkthrough Of Paper Airplane Craft
Final Thoughts
This paper airplane with fluffy clouds isn’t just a craft project, it’s a springboard for imaginative adventures!
Don’t be afraid to experiment! Let your kids unleash their creativity by adding birds, stars, suns, or even other airplanes to create a whole paper airplane world.
Play with different paper textures! Construction paper adds sturdiness for longer flights, while tissue paper creates wonderfully wispy clouds.
Consider using patterned or double-sided paper for the airplane body. This creates a visually stunning effect when the plane takes flight.
Lastly, for your reference I have shared the complete video walkthrough which includes the making of this amazing paper airplane on our YouTube channel.
Frequently Asked Questions
How long will it take to make the paper airplane?
It will take 5 to 10 minutes to craft the paper airplane with the ready template.
What age group is this paper airplane craft suitable for?
This paper airplane craft is suitable for children of various age groups, typically ranging from preschoolers to pre-teens. However, adult supervision is still needed as a paper cutting step is required.
What are some creative ways to display or showcase this paper airplane?
You can hang the paper airplanes from strings to create a whimsical mobile, or display them on shelves or in shadow boxes as decorative accents.


