I’ve made a lot of tiny crafts at home, and sushi is always a hit. It’s colorful. It’s forgiving. And it doesn’t need perfection.
That’s why polymer clay sushi craft ideas work so well for kids and beginners. You mess up, you roll again. No stress. No pressure.
I’ll walk you through everything slowly, like I’m sitting next to you. Ready? Let’s get clay on our fingers.
1. Classic California Roll Polymer Clay Sushi
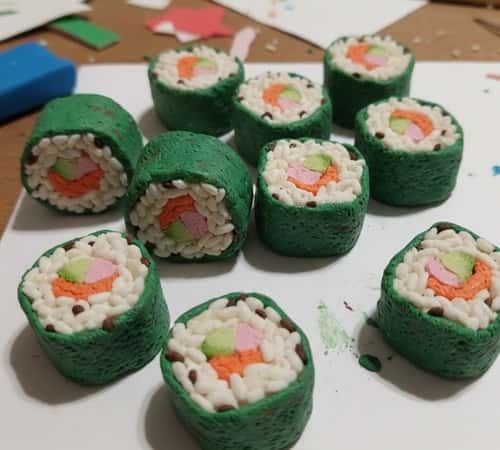
This is where I always start. Simple shapes. Easy colors. Kids get confident fast.
What you need
- White polymer clay
- Black polymer clay
- Orange polymer clay
- Green polymer clay
- Craft blade or butter knife
- Toothpick
- Oven (with adult help)
- Baking paper
How I make it
Step 1: I start with the rice. Take white clay and knead it until soft. It should feel warm in your hands. If it cracks, keep kneading. Roll it into a thick log, like a fat finger. Don’t make it perfect. Sushi in real life isn’t perfect too.
Step 2: Next is the filling. Roll a thin orange log for crab. Then a thin green one for cucumber. Place both on top of the white log. Gently press them in. Sometimes they slide, and thats okay.
Step 3: Now comes the seaweed. Take black clay and flatten it into a thin sheet. Wrap it around the roll. Overlap the ends slightly. Trim extra clay with a blade. If it looks messy, good. Homemade vibes matter.
Step 4: Use a toothpick to poke tiny rice texture dots on the white clay. Kids love this part. Bake it according to your clay instructions. Let it cool fully before touching.
After baking, I slice it into small sushi pieces. Slow cuts. Don’t rush or it squishes.
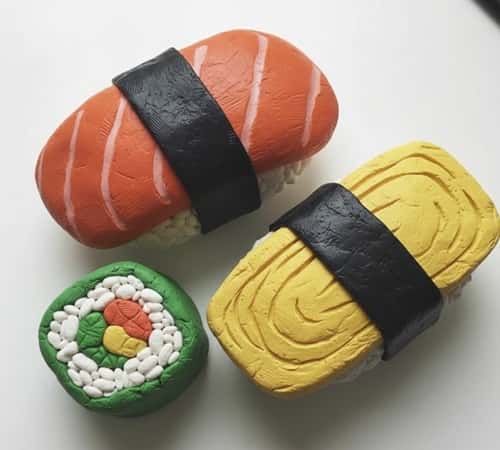
2. Polymer Clay Nigiri Sushi (Salmon on Rice)
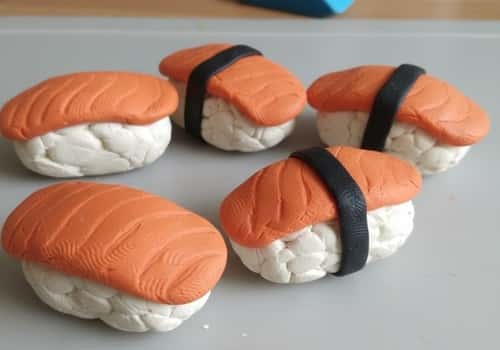
This one looks fancy but it’s actually easier than it looks. Trust me.
What you need
- White polymer clay
- Pink or orange polymer clay
- Toothpick
- Craft blade
- Soft brush (optional)
- Baking paper
How I make it
Step 1: Start with rice again. Roll small oval shapes using white clay. Think thumb size. Press lightly so it’s flat on bottom. If they all look different, thats normal.
Step 2: For the salmon, take pink or orange clay. Roll it flat. Not too thin. Cut small rectangles slightly bigger than the rice. Texture it with a toothpick using light lines. Don’t overdo it. Less lines look more real.
Step 3: Place the salmon on top of the rice. Gently press. Sometimes it sticks. Sometimes it falls. Kids laugh. I let them fix it themselves. If you want realism, take a dry soft brush and lightly brush the surface before baking. It softens harsh marks.
Step 4: Bake everything. Let it cool. I don’t paint these. Raw clay colors look more kid-made and cute. One time I rushed the baking and warped a piece, so please don’t rush. Patience matter here.
3. Cute Kids-Style Tamago Sushi (Egg Sushi)
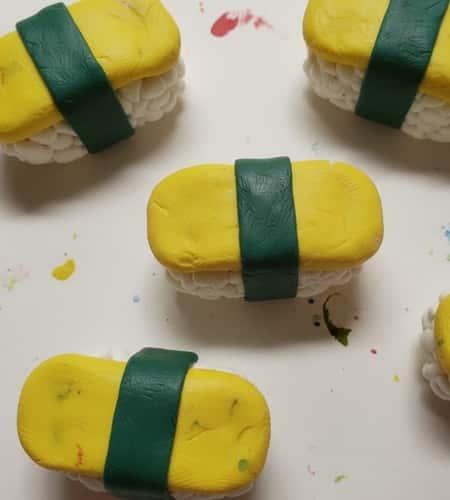
This one is pure fun. Bright yellow always wins with kids.
What you need
- White polymer clay
- Yellow polymer clay
- Brown clay (tiny amount)
- Black clay for seaweed strip
- Blade or plastic knife
- Toothpick
- Baking paper
How I make it
Step 1: Make rice base same as before. Oval, chunky, soft edges. Don’t smooth too much. Over-smoothing kills the charm.
Step 2: For the egg, mix yellow clay with a tiny dot of brown. It gives a cooked egg look. Roll it flat. Cut rectangles slightly curved. Lay it over the rice.
Step 3: Now the seaweed strip. Roll black clay very thin. Cut narrow strips. Wrap it around the center of egg and rice. Press gently. If it breaks, roll again. Clay is forgiving. I poke tiny dents in the rice again. Not everywhere. Random looks more real.
Step 4: Bake as per instructions. Cool completely. Sometimes kids touch early and leave fingerprints, and honestly I leave them. It tells a story.
This craft teaches patience, color mixing, and shape control without feeling like learning. Thats why I love it.
4. Polymer Clay Shrimp Sushi (Ebi Style)
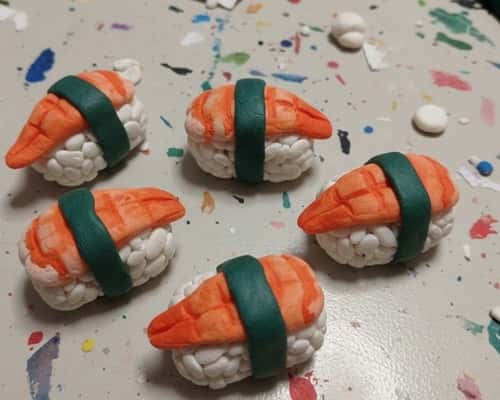
This one always excites kids because it looks fancy but it’s secretly easy. I’ve made this on lazy afternoons. No rush. Just roll and press.
What you need
- White polymer clay
- Light pink polymer clay
- Tiny bit of red clay
- Black clay (optional for seaweed detail)
- Toothpick
- Craft blade
- Baking paper
Step 1: Make the rice base
Take white clay and knead it well. Roll into small oval shapes. Flatten the bottom slightly so it sits stable. Don’t smooth too much. Rough rice looks more real and kids dont overthink it.
Step 2: Create the shrimp body
Mix light pink clay with a tiny bit of red. Roll into a thin log. Flatten it gently. Shape one end slightly wider than the other, like a shrimp tail. If it bends weird, let it. Shrimp aren’t straight.
Step 3: Add texture
Use a toothpick to add shallow lines across the shrimp. Not deep. Just enough to suggest texture. Sometimes I mess this up and redo it, sometimes I don’t.
Step 4: Assemble
Place the shrimp on top of the rice. Press gently. You can add a thin black clay strip under the shrimp if you want extra detail, but skip it for younger kids.
Step 5: Bake
Bake according to clay instructions. Let it cool fully. Don’t touch early, it will bend and thats annoying.
5. Polymer Clay Rainbow Sushi Rolls (Kid Fusion Style)
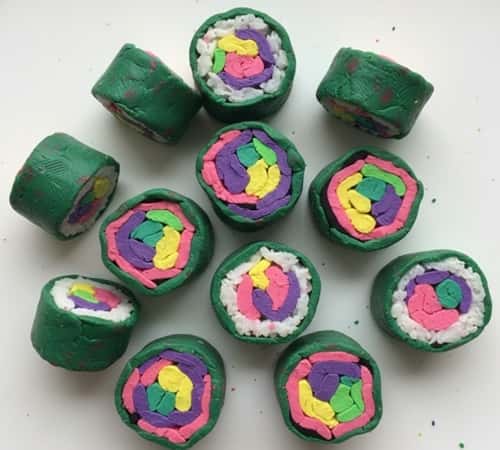
This one breaks all rules. And kids LOVE breaking rules.
What you need
- White polymer clay
- Multiple bright clay colors (blue, pink, green, yellow, purple)
- Black clay
- Blade
- Toothpick
- Baking paper
Step 1: Prepare the rice
Roll white clay into a thick log. This is your base. Keep it chunky. Thin rolls are harder to slice later.
Step 2: Create rainbow fillings
Roll tiny thin logs of different colors. Line them up side by side. Press them lightly together. Colors may mix a little. That’s fine. Fusion sushi is a thing.
Step 3: Combine
Place the rainbow strip on top of the white clay roll. Press gently. Try not to squash it flat. If it happens, call it abstract art.
Step 4: Wrap with seaweed
Flatten black clay into a thin sheet. Wrap it around the roll. Trim excess. Overlaps are okay. Crooked edges make it look handmade.
Step 5: Texture and bake
Add rice texture using toothpick dots. Bake. Cool completely.
Step 6: Slice
Slice slowly into sushi pieces. If a piece falls apart, kids usually eat it with their eyes and laugh.
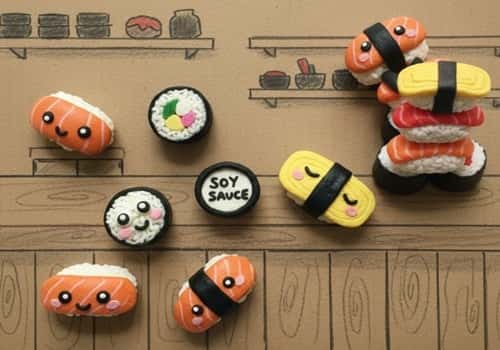
6. Polymer Clay Sushi Platter (Mixed Mini Set)
This is my favorite because kids feel like chefs. Everything comes together here.
What you need
- Leftover clay from previous ideas
- White clay for extra rice
- Black clay
- Blade
- Toothpick
- Baking paper
Step 1: Plan the platter
Ask kids what sushi they want to include. Rolls, nigiri, weird shapes. Planning gives them ownership. I don’t correct ideas here. Ever.
Step 2: Make mini pieces
Create tiny versions of sushi from earlier ideas. Smaller than before. This part tests patience. Some pieces will look funny and thats okay.
Step 3: Add details
Use toothpick for rice texture. Add tiny seaweed strips. Don’t aim for perfection. Aim for variety.
Step 4: Bake in batches
Bake all pieces together if sizes are similar. Let them cool fully. Don’t stack them hot or they stick.
Step 5: Arrange the platter
After cooling, arrange sushi pieces on cardboard or a clay plate. Kids usually rearrange it ten times. Let them.
This step builds storytelling. And confidence. And pride.
7. Polymer Clay Inside-Out Sushi (Uramaki Style)
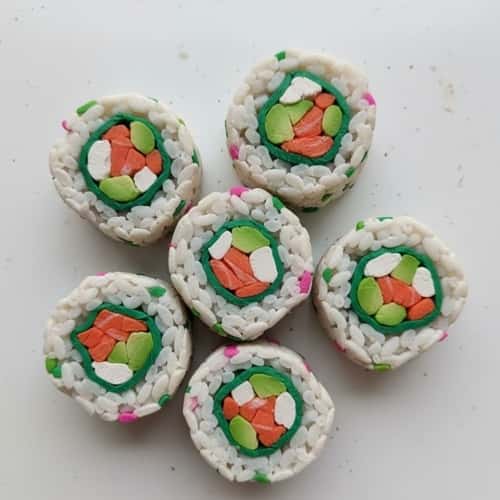
This looks tricky. It’s not. Kids feel very proud making this one.
What you need
- White polymer clay
- Black polymer clay
- Orange clay
- Green clay
- Toothpick
- Craft blade
- Baking paper
Step 1: Make the rice sheet
Flatten white clay into a rectangle. Not too thin. If it cracks, warm it up in your hands again. Rice on the outside is what makes this fun.
Step 2: Prepare the filling
Roll thin logs of orange and green clay. Keep them neat but don’t stress. Place them across the center of the white sheet.
Step 3: Add seaweed layer
Flatten black clay very thin. Place it on top of the fillings. This feels backward, and kids find that funny.
Step 4: Roll it up
Slowly roll everything together, pressing gently. Some rice will squish out. That’s okay. Sushi isn’t shy.
Step 5: Texture and bake
Use toothpick to add rice dots on the outside. Bake and cool fully.
Step 6: Slice
Cut into bite-sized pieces. Uneven cuts look more realistic, trust me.
8. Polymer Clay Sushi Charms (Keychain Style)
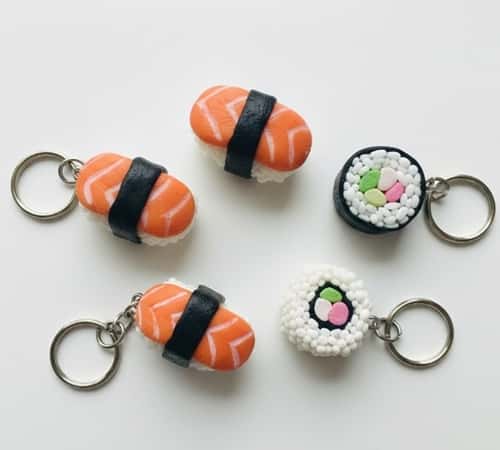
This is where crafts turn into gifts. Kids feel proud giving these away.
What you need
- Polymer clay sushi pieces
- Toothpick or needle tool
- Keychain rings (after baking)
- Baking paper
Step 1: Shape the sushi
Use any sushi style you like. Keep them smaller than usual. Thumb nail size works best.
Step 2: Add hole before baking
Use toothpick to gently make a hole on top or side. Don’t push all the way through if the piece is thin. If it cracks, remake it.
Step 3: Bake carefully
Bake as per instructions. Let cool completely. This part needs patience and kids struggle here.
Step 4: Attach hardware
Once cool, insert keychain ring. Adult help helps here. No glue needed if hole is right.
These make great backpack charms. And they look imperfect in the best way.
9. Polymer Clay Sushi Faces (Cute Character Style)
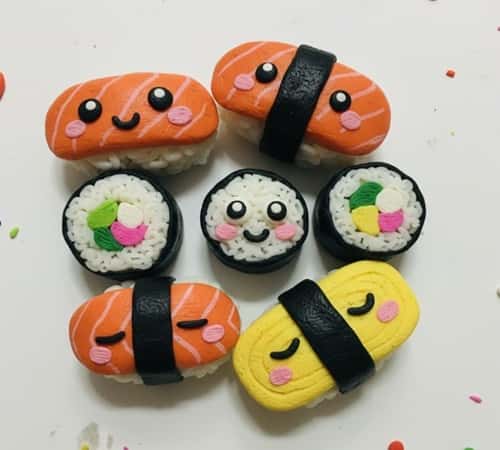
This one brings out giggles. Faces always do.
What you need
- White polymer clay
- Black clay
- Pink clay
- Colored clay for toppings
- Toothpick
- Blade
- Baking paper
Step 1: Shape the rice base
Roll white clay into rounded squares or ovals. Keep them chunky. Flat faces don’t work as well.
Step 2: Add toppings
Add simple clay toppings like salmon or egg. Press lightly so they stick.
Step 3: Create faces
Use tiny dots of black clay for eyes. Pink dots for cheeks. A toothpick helps place them. If eyes go crooked, don’t fix it. Crooked is cute.
Step 4: Bake and cool
Bake fully. Let cool. Faces sometimes shift slightly, and kids notice. They usually like it more.
These become toys, not just crafts. Thats a win.
10. Polymer Clay Sushi Stack (Tower Style)
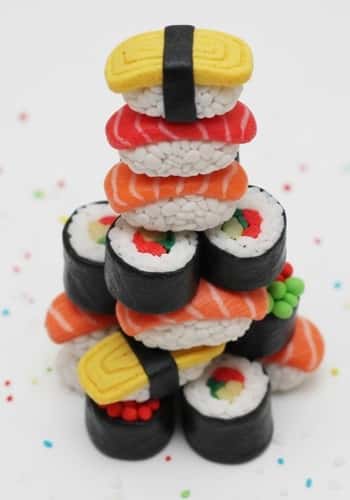
This looks silly. Kids absolutely love it.
What you need
- White polymer clay
- Black clay
- Mixed color clay scraps
- Toothpick
- Blade
- Baking paper
Step 1: Make flat sushi pieces
Create thin sushi rolls and nigiri. Keep them flatter than usual. Stacks fall easier otherwise.
Step 2: Bake first
Bake all pieces fully. Let cool. This step matters. Soft clay stacks collapse and kids get frustrated.
Step 3: Stack creatively
Once cool, stack sushi pieces like a tower. No rules. Tall, short, leaning. Gravity teaches lessons here.
Step 4: Optional fixing
If you want permanent towers, use glue with adult help. I usually leave them loose. Kids rebuild again and again.
This isn’t realistic sushi. It’s play sushi. Thats the point.
11. Polymer Clay Giant Sushi (Oversized Fun Pieces)
This flips everything. Bigger pieces. Bigger excitement. Kids love scaling up.
What you need
- White polymer clay (lots of it)
- Black polymer clay
- Colored clay for fillings
- Toothpick
- Craft blade
- Baking paper
Step 1: Make oversized rice
Roll white clay into a large oval or thick log. Bigger than your palm. Keep the surface rough. Smooth rice looks fake at this size.
Step 2: Create bold fillings
Roll thick logs of colored clay. Orange for salmon, green for cucumber, yellow for egg. Place them on or inside the rice. Don’t hide them. Bold looks better.
Step 3: Wrap or top
Either wrap with black clay for rolls or place toppings on top for nigiri. Press gently. Heavy pressure flattens details.
Step 4: Add texture
Use toothpick to add large rice dots. Fewer dots. Oversized texture needs space.
Step 5: Bake longer
Oversized pieces need extra baking time. Follow clay brand guidance. Let cool fully. Cooling takes patience and kids struggle here.
These become display pieces. Not toys. Kids feel proud showing them.
12. Polymer Clay Sushi Story Set (Imaginative Play)
This one goes beyond craft. It becomes storytelling.
What you need
- Any polymer clay sushi made earlier
- Scrap clay for accessories
- Cardboard for scenes
- Markers or crayons
Step 1: Create characters
Pick sushi pieces and give them roles. Chef sushi. Customer sushi. Silly sushi. Add tiny clay hats or faces if you want.
Step 2: Build the scene
Use cardboard to make a sushi shop. Counter, menu board, seating. No perfection needed. Crooked signs look charming.
Step 3: Arrange and play
Place sushi characters in the scene. Let kids create stories. They talk more than they craft here.
Step 4: Bake accessories if needed
If you add new clay items, bake them. Cool fully before play resumes.
This builds creativity. Language skills. Confidence. And none of it feels like learning.
Final Thoughts
Here’s something I’ve learned doing crafts with kids again and again.
The value isn’t in the final look. It’s in the decisions they make along the way. Polymer clay sushi works because it’s flexible, forgiving, and open-ended.
Kids aren’t copying food, they’re interpreting it. That matters. If you let go of perfection and let their hands lead, you’ll see creativity grow fast.
And honestly, those slightly messy sushi pieces end up meaning more than any perfect craft ever could.