Every year I go hunting for fresh clay Easter egg craft ideas because paper crafts get boring fast, right? Clay just feels different in the hand. It’s messy. It’s forgiving. And it turns into the sweetest little keepsakes.
These ideas lean into Easter Homemade Gifts, simple Easter Projects For Kids, and even playful Diy Easter playdough activity moments.
I haven’t personally made these, but I’ve broken them down so clearly that you can. Ready to get your hands dusty?
1. Pressed Flower Air Dry Clay Easter Eggs
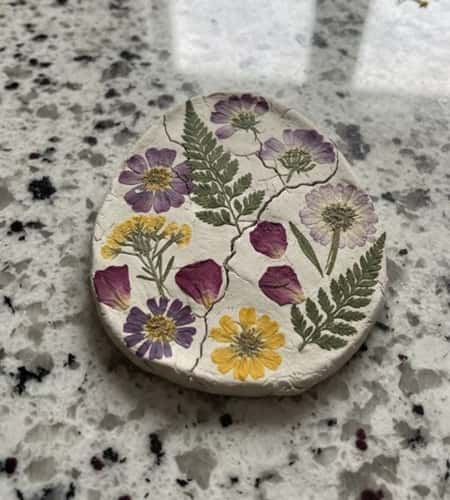
Want something that looks delicate but is actually super easy? This one uses air dry clay Easter eggs as the base.
What you need:
- Air dry clay
- Rolling pin
- Egg template (draw one on paper and cut it out)
- Real or faux tiny flowers/leaves
- Toothpick
- Acrylic paint (optional)
- Clear sealer
Steps:
- Roll the clay to about ¼ inch thick. Not too thin or it will crack, trust me.
- Place your paper egg template on top and cut around it with a butter knife.
- Gently press small flowers and leaves into the surface. Don’t push too deep.
- Use a toothpick to make a small hole at the top if you want to hang it.
- Let it dry flat.. ideally you would want it to keep it as it is for 24 to 48 hours. Flip once after 12 hours.
- Once dry, lightly brush white or pastel paint over it, letting the flowers peek through.
- Seal with clear varnish.
It may look fragile, but it holds up pretty well. And if a edge chips, that actually makes it cuter.
2. Chick Clay Egg
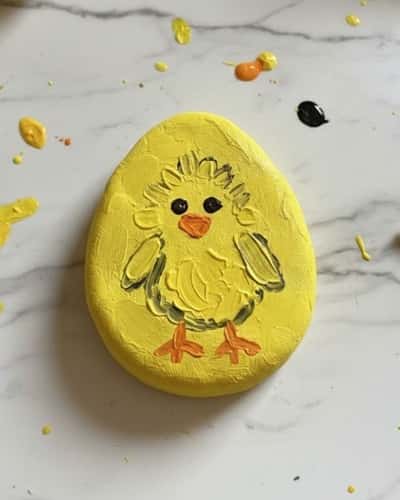
This one screams Easter Projects For Kids. Simple. Cute. Slightly chaotic.
What you need:
- Air dry clay or homemade salt dough
- Yellow and orange acrylic paint
- Black fine-tip marker
- Paintbrush
Steps:
- Shape an egg about palm size. Smooth it with damp fingers.
- Let it dry completely (if using salt dough, bake at 200°F/90°C for 2–3 hours).
- Paint the entire egg yellow. Let it dry.
- Dip your finger in slightly darker yellow paint and press in the center to form the chick body.
- Add tiny orange triangle beak.
- Draw eyes with marker.
If the eyes come out uneven, just leave it. It makes the chick look surprised or confused or something.
This can also double as an Easter Egg Play Dough Activity if you’re using soft dough with toddlers instead of drying it.
3. Rustic Salt Dough Easter Eggs with Twine

Now we move into classic Salt Dough Easter Eggs Diy territory. I love how rustic these look.
What you need:
- 1 cup flour
- ½ cup salt
- ½ cup water
- Bowl
- Rolling pin
- Twine
- Neutral acrylic paint
Steps:
- Mix flour and salt. Add water slowly and knead until smooth. If sticky, add little flour.
- Roll dough and cut egg shapes.
- Make a hole at the top with a straw.
- Bake at 200°F (90°C) for 2 to 3 hours. Let cool completely.
- Paint in muted tones i.e. beige, dusty pink, sage.
- Once dry, wrap twine around the center and knot at back.
It won’t be perfectly smooth. And that’s the charm.
These also work beautifully as Salt Dough Egg Ornaments for spring decor.
4. Marble Swirl Clay Easter Eggs
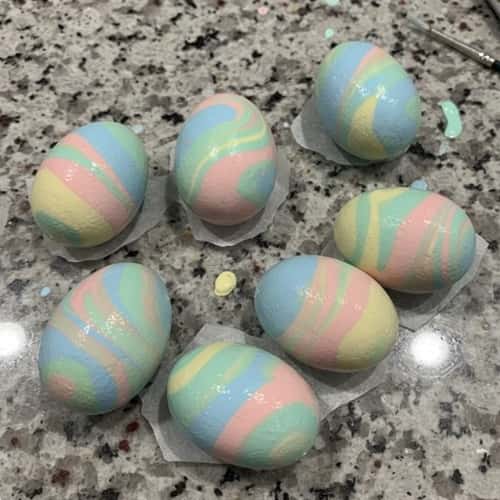
Okay this one looks fancy… but it’s basically controlled chaos.
What you need:
- White air dry clay
- 2-3 pastel acrylic paints
- Toothpick or skewer
- Rolling pin
- Clear gloss sealer
Steps:
- Roll your clay about ¼ inch thick. Cut egg shapes.
- Squeeze tiny drops of pastel paint randomly over the surface. Don’t overdo it.
- Drag a toothpick gently through the paint to create swirls. Light hand here.
- Let the eggs dry completely on a flat surface.
- Once dry, seal with gloss for that ceramic look.
If the colors mix too much, it turns muddy. So don’t over swirl it too much.
These Air Dry Clay Easter Eggs look almost store bought, but still slightly imperfect. Which I personally like.
You could easily turn this into an Easter Homemade Gifts idea by wrapping them in tissue paper with a handwritten tag.
5. Mini Clay Egg Magnets
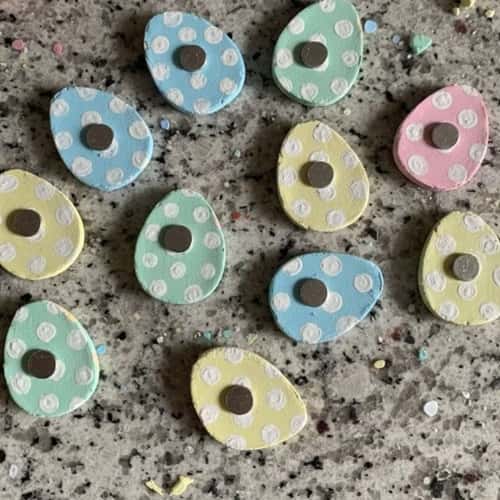
Tiny things are just cuter, aren’t they?
What you need:
- Air dry clay
- Small round magnets
- Strong glue
- Acrylic paints
- Fine brush
Steps:
- Roll small egg shapes about 1.5 inches tall. Keep them thick enough so they don’t snap.
- Let dry completely (24 to 48 hours).
- Paint simple patterns: dots, stripes, tiny flowers. Let dry.
- Glue magnets at the back. Press firmly and let glue cure fully.
If one cracks slightly, don’t panic. Just glue and paint over it. Nobody will notice.
These are perfect little Easter Projects For Kids when you supervise the magnet part. And honestly, they make sweet Easter Homemade Gifts too.
6. Carved Pattern Salt Dough Easter Eggs
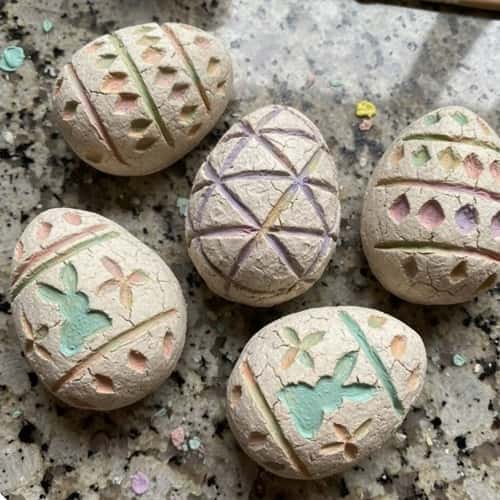
This one feels almost therapeutic.
What you need:
- Basic salt dough (flour, salt, water)
- Toothpick or blunt knife
- Acrylic paint
- Soft cloth
Steps:
- Roll dough and cut egg shapes about ¼ inch thick.
- Before baking, lightly sketch simple patterns: lines, leaves, zigzags.
- Carve gently with a toothpick. Don’t press all the way through.
- Bake at low temperature (200°F/90°C) until fully hardened.
- Paint over entire egg in one color.
- Wipe paint lightly with cloth so color stays inside grooves.
The carved lines pop beautifully after wiping. And if your carving is crooked, it still works.
These Salt Dough Easter Eggs Diy designs can also be turned into hanging Salt Dough Egg Ornaments by adding a hole before baking.
7. Stamped Texture Clay Easter Eggs

You ever press random objects into clay just to see what happens? This is that… but intentional.
What you need:
- Air dry clay
- Rolling pin
- Lace, leaves, fork, buttons (anything textured)
- Acrylic paint
- Sponge
Steps:
- Roll clay to about ¼ inch thickness.
- Cut egg shapes using a template.
- Press lace or leaves firmly onto the surface. Lift gently.
- Let dry completely on a flat surface.
- Lightly dab paint over the raised areas using a sponge.
Don’t press too hard or the clay tears. I mean it.
The texture gives this a handmade ceramic vibe without needing a kiln.
These Air Dry Clay Easter Eggs are perfect for subtle farmhouse-style Easter decor. They quietly stand out.
8. Pastel Layered Clay Egg Plaques
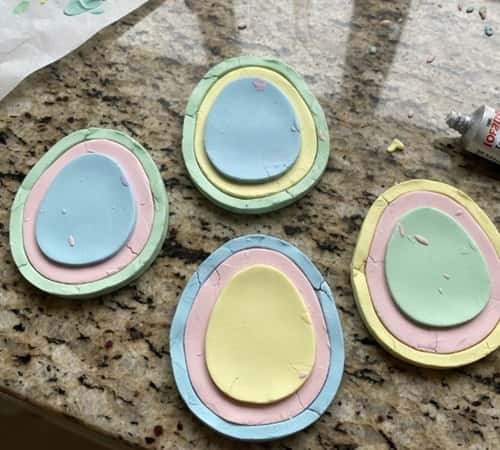
This one feels a little extra. But still beginner friendly.
What you need:
- Two pastel shades of air dry clay
- Rolling pin
- Craft knife
- Glue (if layering after drying)
- Clear sealer
Steps:
- Roll first pastel clay sheet and cut egg shape.
- Roll second color thinner. Cut smaller egg shape.
- Place smaller egg on top of larger one. Gently press to attach.
- Smooth edges lightly with damp finger.
- Let dry 24 to 48 hours.
- Seal for slight sheen.
If the layers shift, just nudge them back before drying. It doesn’t have to be perfect.
These make lovely Easter Homemade Gifts, especially if you personalize with initials scratched lightly before drying.
9. Polka Dot Salt Dough Easter Eggs
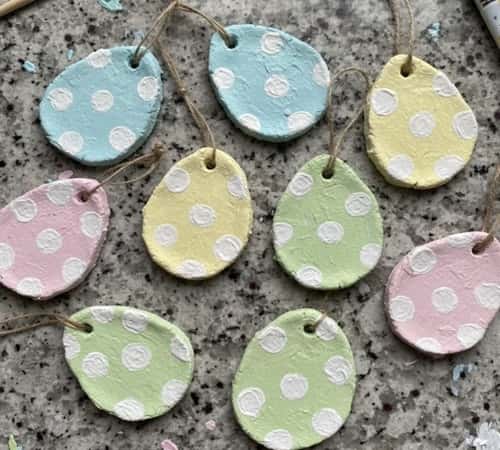
Sometimes simple works best. And polka dots never fail.
What you need:
- Salt dough mixture
- Straw (for hanging hole)
- Acrylic paints in 2 to 3 colors
- Small round brush or cotton swab
Steps:
- Prepare Salt Dough Easter Eggs by rolling and cutting egg shapes.
- Make a hole with straw if you want ornaments.
- Bake low and slow until hardened. Let cool.
- Paint base color first. Dry completely.
- Use cotton swab dipped in contrasting color to create dots.
Let the dots dry before stacking them. Or they’ll smudge, and then you’ll sigh loudly like I would.
These are perfect Salt Dough Egg Ornaments and easy Easter Projects For Kids.
10. 3D Bunny Face Clay Easter Egg
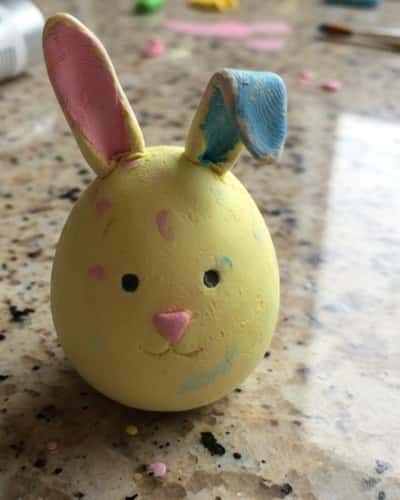
Okay this one is slightly more detailed. But stay with me.
What you need:
- Air dry clay
- Small clay scraps (for ears and nose)
- Toothpick
- Acrylic paints (white, pink, black)
- Glue (if attaching after drying)
Steps:
- Shape a thick egg base, about ½ inch thick so it can hold extra pieces.
- Roll two small oval shapes for bunny ears. Flatten slightly.
- Attach ears to the top of egg while clay is still damp. Blend the seam gently with your finger.
- Add a tiny oval nose and two little cheek balls. Press lightly.
- Use toothpick to mark whisker lines.
- Let dry fully for 24 to 48 hours.
- Paint white base. Add pink inside ears and nose. Dot eyes last.
If one ear droops, don’t stress, bunnies in real life aren’t perfectly symmetrical anyway.
These Air Dry Clay Easter Eggs feel playful and make adorable Easter Homemade Gifts for little ones.
11. Mosaic Style Clay Easter Egg

This one looks advanced but really it’s just breaking things on purpose.
What you need:
- Air dry clay
- Acrylic paints in 3 or 4 bright colors
- Craft knife
- Glue
- Black paint or marker
Steps:
- Roll clay and cut egg shape. Let it dry completely.
- Paint the whole egg white as base. Let dry.
- Lightly draw mosaic sections with pencil.
- Paint each section different colors.
- Once dry, outline sections with thin black paint or marker.
Alternatively, you can cut tiny colored clay pieces first, let them dry, then glue onto base like tiles. That part takes patience, not gonna lie.
The lines may wobble. Mine probably would wobble too. But that’s what makes it handmade and not factory perfect.
This can easily fit into creative Salt Dough Easter Crafts variations if you prefer salt dough instead of air dry clay.
12. Speckled Farmhouse Clay Easter Egg
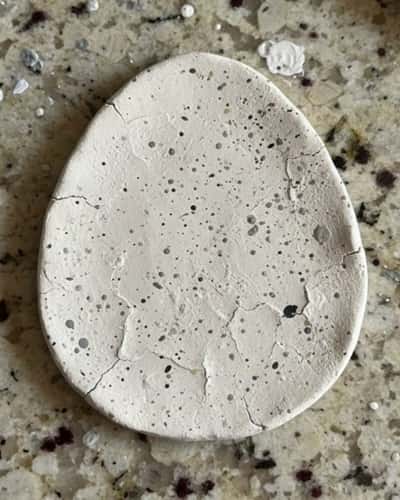
This one is subtle. Calm. Almost minimal.
What you need:
- Air dry clay or salt dough
- Beige or off-white acrylic paint
- Small stiff brush
- Brown paint diluted with water
Steps:
- Shape and dry your egg base completely.
- Paint with beige base coat. Let dry fully.
- Dip stiff brush into diluted brown paint.
- Flick the bristles gently with your finger over the egg to create speckles.
- Let dry. Seal if desired.
Cover your surface before flicking paint. Because those speckles fly everywhere, seriously.
These are beautiful as Salt Dough Easter Eggs Diy ornaments or even simple table scatter decor. They look understated but thoughtful.
Final Thoughts
Clay crafting for Easter isn’t really about perfection. It’s about texture, patience, and letting small flaws exist without fixing every single one.
That’s the magic behind most Easter Projects For Kids and even grown-up decor.
When you try different bases like air dry clay easter eggs or salt dough easter eggs, you start noticing how drying time, thickness, and paint layers change the outcome.
Tiny adjustments matter. So experiment. Test thickness. Let things dry longer than you think.
The beauty of these Clay Easter Egg Craft Ideas is that every single piece will turn out slightly different – and that’s exactly why they feel special.