If you’ve ever stared at cute Air Dry Clay Earrings online and thought, “I bet I could make that,” you’re right. And honestly, it’s way easier than it looks.
Air dry clay is beginner-friendly, budget-friendly, and perfect for any Kids craft afternoon or a little weekend creative break.
You can shape it, paint it, mess up, fix it, and still walk away with something fun.
Plus, these are the kind of Air Dry Clay Earrings you can make and sell without needing fancy tools.
Most of these ideas feel like a simple Air Dry Clay clay craft or a diy clay ornament – just… mini!
If you keep things simple and follow the steps, you’ll have earrings that look store-bought but feel totally handmade.
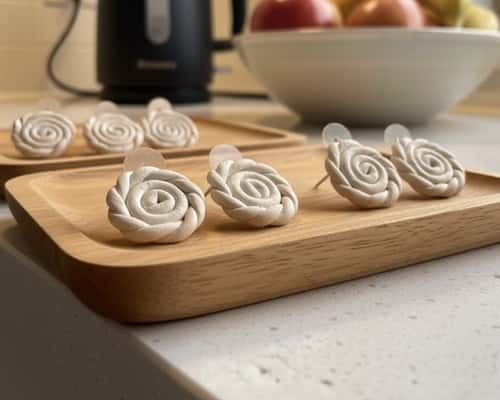
1. Minimalist Circle Studs
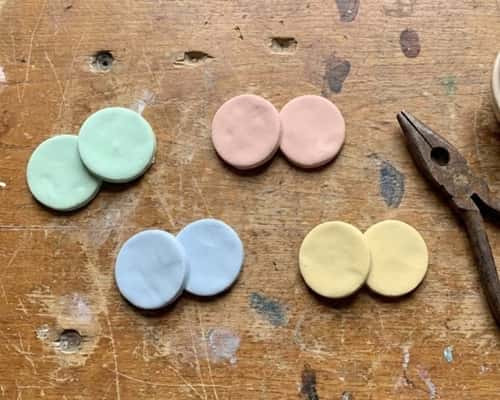
Circle studs are the easiest place to start when you’re still getting comfortable with clay.
Roll a small ball of air dry clay, flatten it gently with your thumb, and aim for even thickness. Use a bottle cap or icing nozzle to punch out perfect circles.
Let them dry flat for 24 hours. Then lightly sand the edges with a nail file to get that neat, clean finish.
Paint them in pastel shades or keep them raw for a natural look. Glue flat earring posts to the back using strong craft adhesive and let them cure. Simple, wearable, and honestly a great first win.
2. Leaf Imprint Dangle Earrings
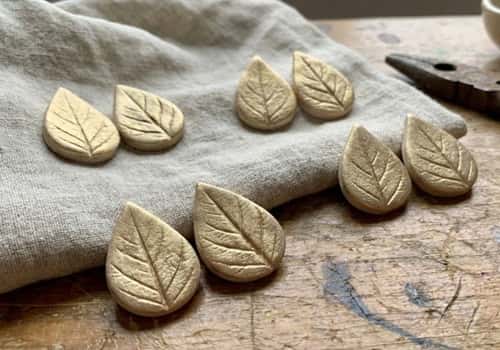
If you’ve got leaves in your backyard, you’ve already got a texture plate.
Roll out a thin sheet of clay. Press a small leaf onto the clay so the veins imprint naturally. Cut out a teardrop or oval shape around the imprint using a small knife or cookie cutter.
Let the pieces dry on a flat tray. Once dry, brush them with gold or green acrylic paint, lightly wiping off excess to keep the texture visible.
Attach jump rings and hooks. The best part? Every pair comes out unique because no two leaves are the same.
3. Tiny Rainbow Studs
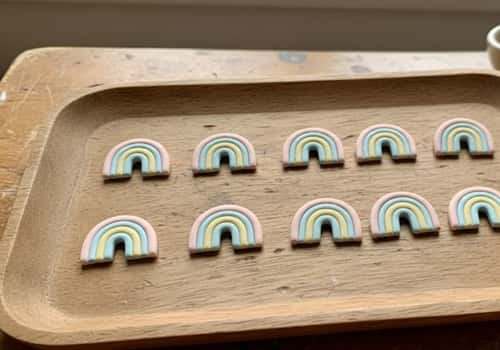
These are cute, cheerful, and shockingly easy. Roll out tiny snakes of clay in three colors – keep them thin.
Curve each into a small rainbow shape, trimming ends so they’re even.
Press the arcs together gently so they stick without flattening. Let them dry completely.
Paint tiny white dots or leave them plain. Glue earring posts to the back. Kids love making these too, so this doubles as a fun supervised craft activity.
And they sell surprisingly well at craft fairs because people adore mini rainbow anything.
4. Marble Oval Drops
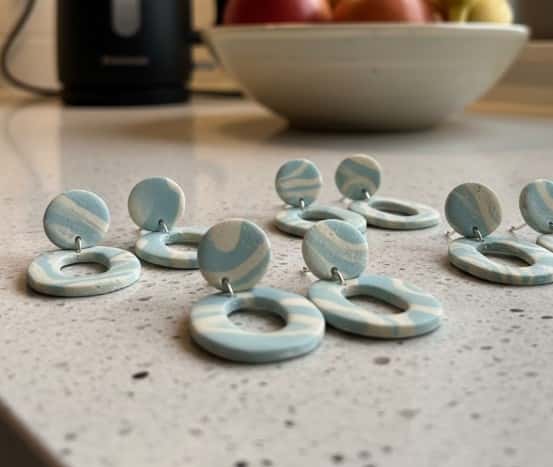
This design looks fancy but takes barely five minutes. Mix two contrasting clay colors by twisting them together – stop before they fully blend to keep the marbled look.
Flatten the clay and cut an oval shape using a small cutter. Make a tiny hole at the top with a toothpick.
Let them dry, then lightly sand the surface to smooth it out. Oil-based metallic paint adds a clean highlight along the edges if you want a polished finish.
Attach jump rings and hooks and you’re done. Great gift option because the pattern always feels intentional.
5. Tiny Heart Studs
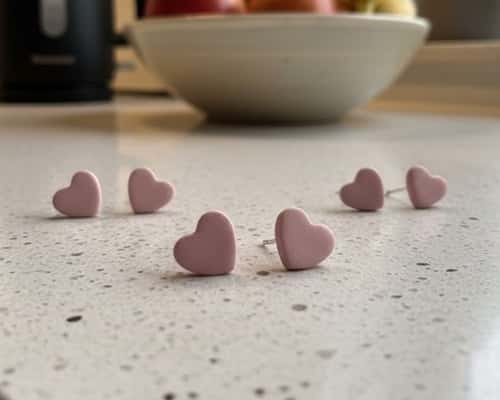
Hearts always sell. Roll a small ball of clay, flatten, and use your fingertips or a tiny cutter to shape small hearts.
Keep them thick enough so they don’t snap later. Let them dry for a full day. Sand slightly if needed.
Paint them red, blush pink, metallic rose gold, or leave them unpainted for a matte ceramic look.
Glue earring posts on the back and let them cure. Whether discovered at a bustling Valentine’s market or presented in a clean-lined gift box, they carry the same charm.
6. Speckled Arch Dangles
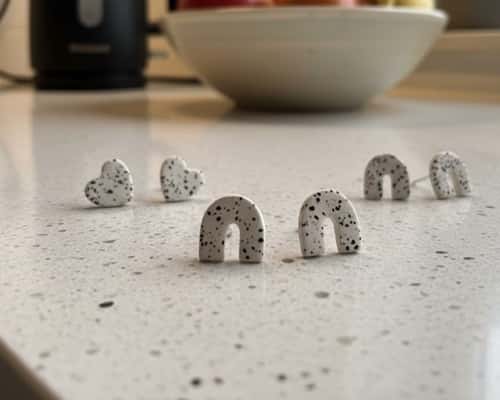
These look modern but are honestly the easiest arches you’ll ever make. Roll out a small slab of clay and cut two rainbow-arch shapes using a knife or a small arch cutter.
Keep the edges smooth – your fingers work better than any tool here. Before drying, use a toothpick to make a hole on each top.
Once dry, flick a tiny brush dipped in watered-down black paint to create that pottery-style speckled finish.
Add jump rings and hooks. They’re light, neutral, and go with absolutely everything.
Also a great option if you’re planning “Air Dry Clay Earrings you can make and sell” because speckled anything always moves fast at craft stalls.
7. Mini Flower Studs
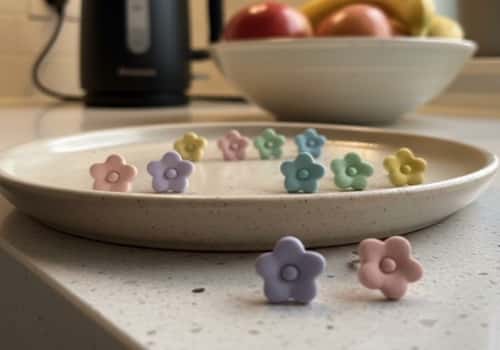
If you can roll tiny balls, you can make these. Create five tiny clay balls for petals and one for the center.
Gently press them together into a small flower shape – don’t flatten too much or they’ll lose dimension. Let them dry undisturbed.
Paint the center in a contrasting color or leave it natural for a soft ceramic vibe. Attach earring posts on the back.
These look adorable on kids and adults, and they even work as a small Kids craft project if you’re supervising. They make great gifts because they look delicate but take very little effort.
8. Mini Bar Earrings
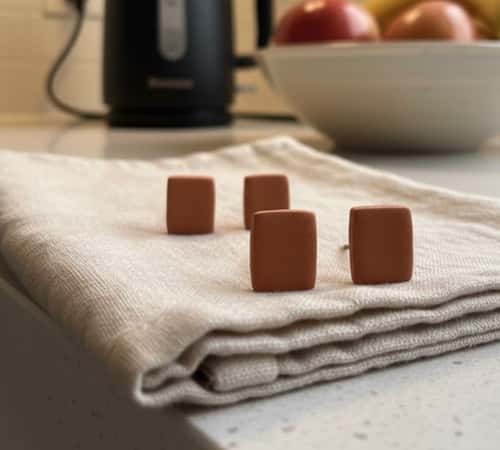
This is simplicity at its best. Roll out a thin snake of clay and trim into tiny bar pieces—aim for even lengths so the pair matches.
Smooth the edges with your fingertip. Let them dry flat. Once dry, paint them in metallic gold, navy, terracotta, or whatever fits your vibe.
These pair beautifully with minimalist outfits and are one of the easiest “Air Dry Clay clay craft” options to start selling.
Glue the posts on the back and let them cure fully before wearing. Great for anyone who wants quick results without any fancy shaping.
9. Twisted Rope Dangles
This one looks like a complicated jewelry piece but takes maybe five minutes. Roll two thin snakes of clay and twist them together gently.
Keep the twist loose so the texture shows clearly. Cut two equal segments for a matching pair. Add a small hole at the top before drying.
Once dry, paint lightly or leave them raw for that artisan look. These look especially good in earthy neutral tones. Add hooks and you’re done.
They’re lightweight, eye-catching, and perfect if you’re exploring “Air Dry Clay Earrings you can make and sell.”
10. Abstract Shape Mix-and-Match Set
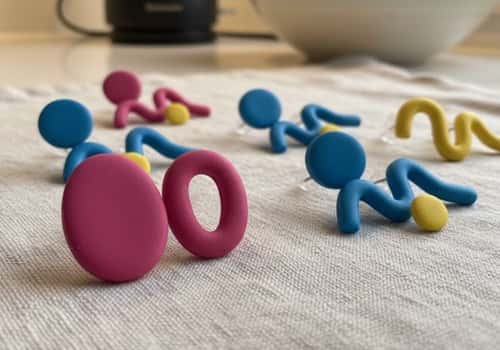
Here’s where you can play. Cut out mismatched shapes – one oval, one squiggle, one tiny circle. Keep them small so they’re wearable.
Let them dry fully before lightly sanding sharp edges. Paint them in contrasting colors or go monochrome for a modern look. Add posts to the back.
This is a great diy clay ornament–style project but shrunk into earrings. People love asymmetry right now, so they sell well too. The fun part? Every pair is totally unique. If you’re bored of perfectly matching earrings, this one will give you new energy.
Final Thoughts
When you start working with air dry clay, you realize quickly that you don’t need expensive tools or complicated techniques.
What you really need is patience, a flat surface, and the confidence to try shapes that feel doable.
These simple designs help you build those foundational skills.
Once you’ve mastered basic cutting, sanding, and painting, you can experiment with textures, layering, or adding small charms.
If you’re planning to sell, keep your designs consistent and your finish clean – small details matter more than perfect symmetry.
And if you’re crafting just for fun, enjoy the process. Clay has a way of slowing you down and making creativity feel easy again.


