Today, I’m thrilled to share a delightful project that will brighten up your day and spark a whirlwind of creativity.
We’re going to fold, snip, and glue our way into creating a colorful troop of Angry Birds, perfect for kids (and the young at heart) to enjoy.
This craft is not only a fun way to engage in creative play, but it’s also a fantastic opportunity to hone those fine creative talents.
Ready to bring these feisty characters to life? Let’s take a quick look at the prerequisites or the requirements first.
Things You Will Need For Your DIY Angry Bird Craft Project
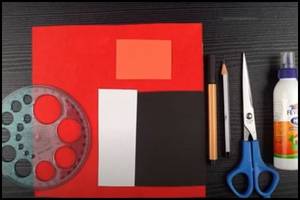
- Pencil: I have a pencil for soft markings of the cutouts needed for the project.
- Marker: I have used a marker to highlight the dark eye shades.
- Glue: You will need glue to stick the cutouts.
- Full Circle Protractor: I have used a geometry protractor to draw and cut small circles for the eyes.
- Papers: Soft card papers can be used to craft the angry birds and the color theme preference is up to you.
I have used red paper for the main face structure, orange for the beak, white for the chin and eyes, and black for the eyebrows and head-crest.
Alright, now that we have all the prerequisites ready let’s get started and make some magic with paper!
Step 1: Triangular fold
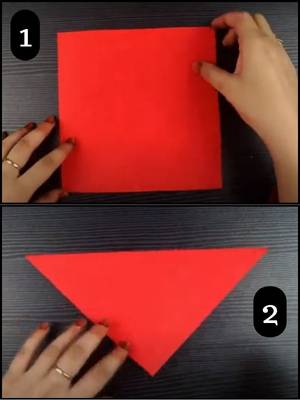
Here we have a vibrant red square paper that’s about to become the face of our beloved Angry Bird.
Make sure your paper is a perfect square to start with.
Now, gently fold it in half diagonally, just like the top image shows.
This fold is the first step in creating our bird’s iconic look.
If any edges stick out, just give them a quick trim.
Step 2: Join the edges of the triangle
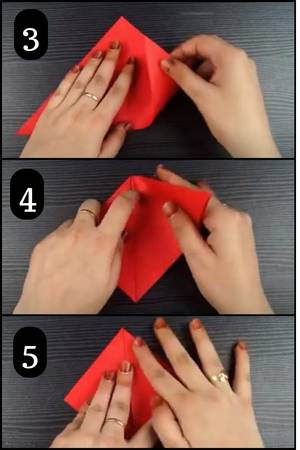
Take a look at image number 3 and see how one point of our triangle is meeting the center? Let’s do the same with the other side.
Press down firmly along the edges to set them in place.
It’s like each side is giving a high-five to the center! Just like in image 4, both edges meet in the middle, like best friends coming together.
And there, as shown in image 5, I’ve pressed down the folds to create a new shape.
It’s taking form, and our Angry Bird’s face is just a few folds away from coming to life! Isn’t it amazing how a few simple folds can start to reveal a character we all love?
Step 3: Craft the angry eyebrows
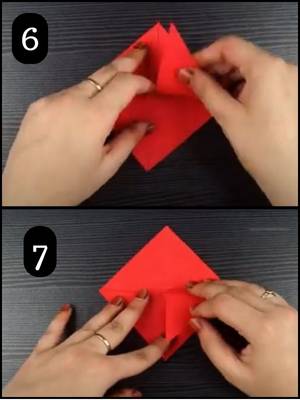
On to the next exciting step!
Take a quick look at image 6, where I have managed to create the Angry Bird’s signature furrowed brow.
Just half-fold these top corners down towards you, mirroring the direction on both sides.
Keep the folds neat, and you’ll see how these small touches add so much character.
We’re not just folding paper, we’re bringing a character to life with our very own hands!
Step 4: Shape the eyebrows
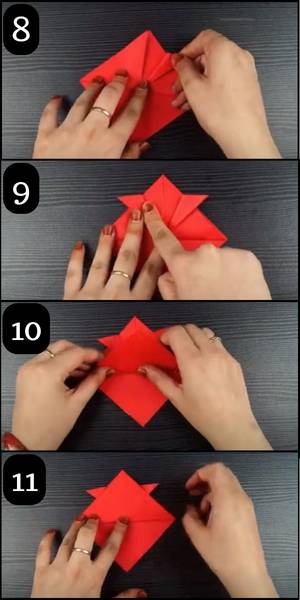
Now, I’m shaping the personality of our Angry Bird with a clever little trick.
In image 8, by folding these half-folded sides outward, I’m crafting those distinctive, expressive eyebrows.
Just a simple outward fold on each side, and like magic, they pop out just like in image 9.
Then, I’m onto the beak, it’s really just a piece of cake!
I just lifted one layer up, folding it to form that sharp beak our birds are known for, as you can see happening in images 10 and 11.
It’s these touches that really start to bring our Angry Bird to life. Who knew a few folds could create such a character, right?
Step 5: Craft the Beak
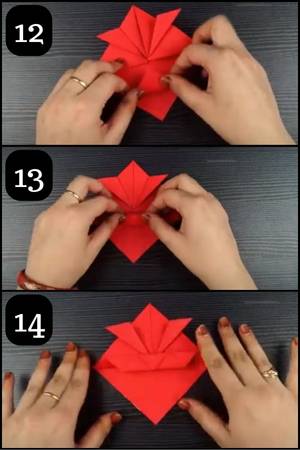
Here’s where I add a little pizzazz to our bird’s beak, making it pop right off the page! I gently pull down that section we folded up, shaping it into a beak, just like in image 12.
Then, for that extra bit of Angry Bird flair, I folded the tip of the beak up and then back down again, as you can see in image 13.
And voila, in image 14, we’ve got a beak with a 3D effect that truly stands out.
It’s these small details that make our craft come alive, giving it personality and attitude.
I can’t help but smile at our progress, our Angry Bird is really starting to show its feisty spirit!
Step 6: Fold the reverse side
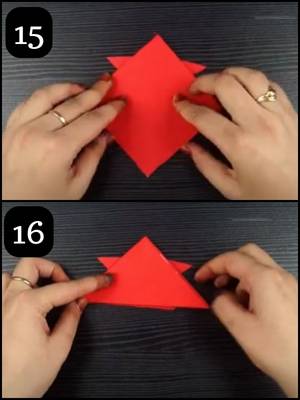
I turned my half ready bird over, as you can see in image 15, with a quick flip to the backside.
Here, I folded up the bottom half neatly towards the center.
It’s a simple move, as shown in image 16, but it shapes our Angry Bird’s body, giving it that rounded look we’re aiming for.
This fold was the finishing touch, the last piece of our craft puzzle.
It pulled everything together, giving me the perfect base for our DIY Angry Bird.
Step 7: Press sides for support
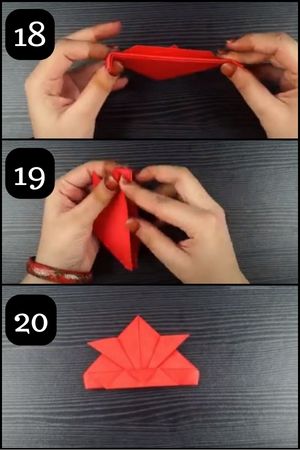
I then took the edges, just as image 18 shows, and folded them in.
It’s a bit like tucking in the wings of our soon-to-be Angry Bird.
Next, with a gentle nudge, I pushed these folds inside, transforming the shape as seen in image 19. This wasn’t just about looks, it gave our craft a sturdy base.
Now, as image 20 shows, our Angry Bird has a proper face and can even stand proudly on a table.
I loved watching it gain not just a personality but also some function.
It’s these steps that turn a simple piece of paper into a playful companion to decorate a space.
Step 8: Cut out shade for the beak
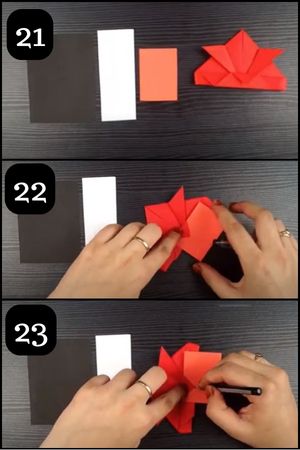
I moved on to the final, delightful details.
In image 21, you see I selected the orange paper, the key to crafting our Angry Bird’s iconic beak.
I marked it with precision, ensuring the size and shape would be just right.
The satisfaction of seeing that perfect beak shape emerge from a simple piece of paper is one of my favorite crafting moments.
Step 9: Eyebrow Shades
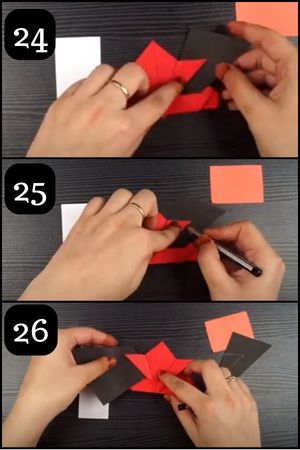
I have used black color paper to cut and paste it over the eyebrows.
Make sure to properly mark the angles for both eyebrows.
Step 10: Chin and Eyes
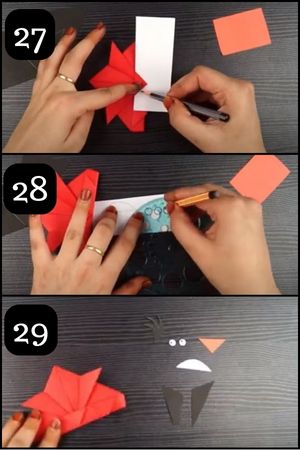
I have used white paper to draw and cut the chin as per image no. 27 above.
To draw and cut eye shapes I have used the full circle protractor that has multiple circle sizes to choose from.
You can use something similar or any available tool that can help you draw the perfect shape and size.
Finally, I have cut all the marked items that were needed to complete the project.
Step 11: Paste the Cutouts
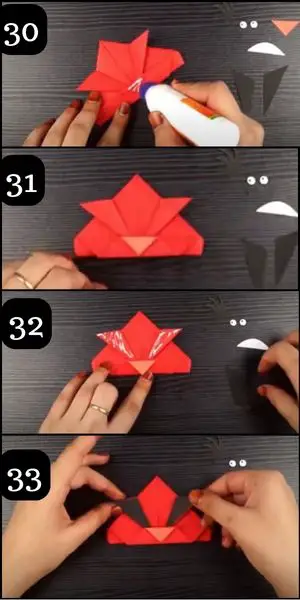
I will now paste them one by one, starting with the orange beak.
You will have to carefully apply the glue over the required surfaces and cutouts.
As seen in images 30 and 31, I have glued and pasted the beak.
Finally, the eyebrows are now in place and it makes it look more happening now.
Step 12: Add life with Eyes and Chin
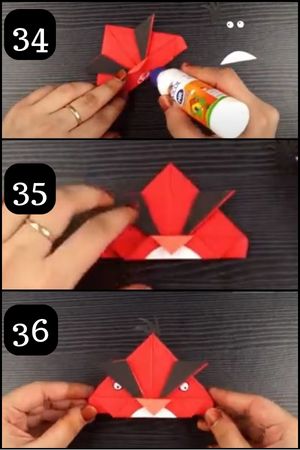
Next, lift the beak and apply glue to stick the white chin.
Followed by applying glue to paste the two eyes carefully.
Finally, paste the crest on its head to complete the angry bird’s structure.
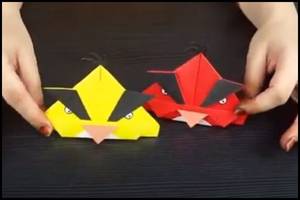
You can use different colors and themes and craft multiple angry birds as seen in the image below.
Final Thoughts
And there you have it, our very own handcrafted Angry Bird, ready to ruffle some feathers! But why stop here? Let your creativity soar by experimenting with different colors or sizes.
Imagine a whole flock on your windowsill! How about adding texture with fabric or felt? Or you can even make it a fun learning activity by asking the kids to mix and match colors for their birds, turning it into an educational color theory game.
The sky’s the limit when you put your heart into your art, share your creations and inspire others with your unique twists.


