I’m all about DIY home decor, and I’m excited to share my passion with you.
Turning everyday stuff into beautiful decor pieces is what I love to do.
I often pick out things that are just lying around unused.
In this article, I’ll share a simple DIY bedroom decor idea using stuff you probably already have at home.
Things I have used to prepare my DIY bedroom light decor
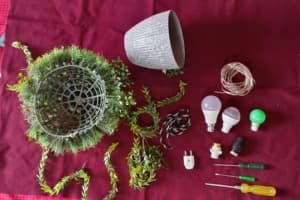
- Artificial Decor: I have used an Old piece of broken artificial decor that was lying on my balcony.
- Electrical Wire: To connect the lights and electrical sockets I have used the electrical wire of nearly 3 meters length.
- Flower Pot: I have used a planter that was sitting idle for months.
- Electrical Plug (Two pin-plug): Two pin standard electric plugs are sufficient to power LED lights.
- Bulb: I have used a few different LED bulbs for different themes.
- Bulb holder: I had a spare bulb holder, hence I used it for this particular project.
- Screwdriver: To unscrew and fix electrical requirements.
- Rope or Lace: To hang your DIY lamp light. (I have used one of my old Shoelace)
Step 1: Dress up the decor
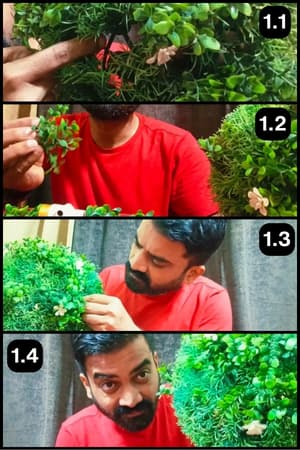
First, I have filled the gaps in this artificial decor using available sources such as some pieces of old decor materials.
Doing this makes it appear dense and striking, and the light will reflect outside evenly.
See the gaps are filled, it’s looking dense and good as seen in the image above.
Step 2: Fixing electrical plugs
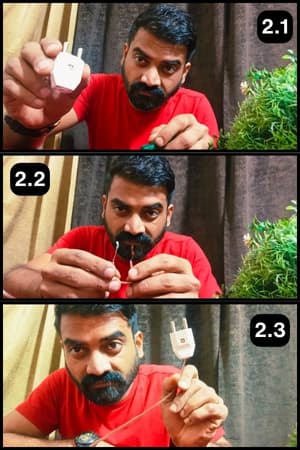
Next, I will now fix the dual-pin electrical plug with the wire.
I am using an electrical wire of 3-meter length so it’s sufficient to reach the electrical outlet.
Note: You can use shorter or longer lengths depending on the distance of the electrical outlets in your desired space.
I disassembled the two-pin plug using a screwdriver and then I then peeled the wire insulation to fix the plug and reassembled it successfully.
My two-pin plug is ready for the DIY Lamp project.
Step 3: Drill the Pot’s base
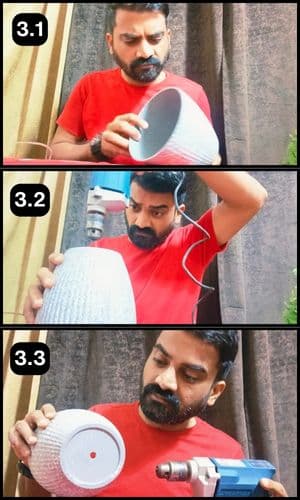
I will now drill a single hole to the Pot’s base using the Drill machine.
This will help to create a space for the electrical wire to go through.
Remember, this will also hold the LED light and the hanging rope.
Be careful when drilling the hole to avoid harming the pot.
Make sure to drill at the center of the pot’s base to keep it balanced when you use it for hanging.
Step 4: Install the bulb holder
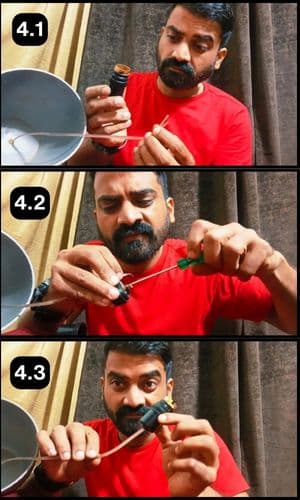
Before installing the bulb holder I have pushed the other end of the wire through the drilled hole.
It’s the other end of the electrical wire used in step 2 where I have fixed the 2 pin plug.
Next, I peeled the insulation and fixed the wire to the bulb holder as seen in image 4.3.
Step 5: Fix the bulb
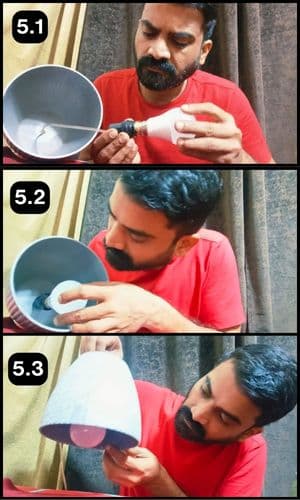
With the bulb holder ready, it’s time to attach the bulb.
Now, gently guide the bulb into the pot by pulling the wire from the other end.
Step 6: Install the Hanging Rope
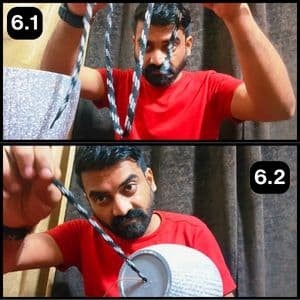
Let’s secure and tie the rope for hanging our DIY lamp light.
I’m using an old shoelace as my hanging rope for the DIY lamp decor.
Thread it through the hole alongside the electrical wires.
Step 7: Tying the hanging decor
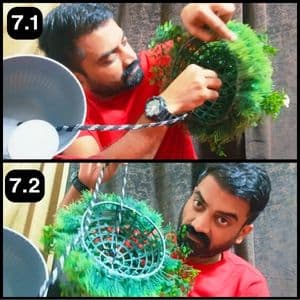
Now, let’s secure the decor using the shoelace I’ve chosen as a rope alternative.
Ensure you tie it evenly and at the center for proper balance.
Step 8: Attach the pot with decor

Next, I’ll position the artificial decor on top of the pot.
Once it’s in place, I’ll gently flip it over.
I’m keeping a grip on the electrical wire and hanging rope to maintain balance for the hanging lamp.
Before hanging it in my bedroom, a quick test to ensure it’s working, saving me from redoing the whole process.
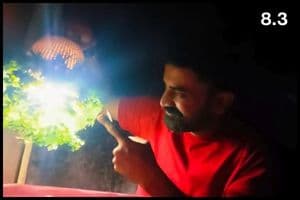
It looks amazing!
Step 9: Placement Ideas
Placing it on a bedside table or drawer can be a fantastic choice to appreciate its captivating beauty in the darkness.
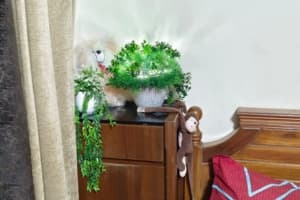
You can also hang it near the wardrobe or in a corner to lighten the entire room with sparkling shades (as seen below).

Use different lights to add amazing effects to your bedroom decor.

Check out how effortlessly it rests in the corner of the room on those dark evenings.
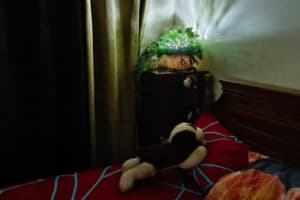
There are literally unlimited ideas to place this beautiful DIY light, I prefer it in my bedroom as it acts like a night lamp too.

Final Thoughts
This DIY bedroom decor lamp project is more than just a craft, it’s a journey into creativity, sustainability, and personalization.
By utilizing household items, we not only give new life to forgotten objects but also add a unique touch to our living spaces.
This guide is a testament to the beauty of DIY and the endless possibilities it offers.
If you are doing a similar type of DIY activity, remember to let your creativity flow, prioritize safety, and most importantly, enjoy the process.
The final product will not only illuminate your room but also serve as a beacon of your ingenuity and environmental consciousness.
Frequently Asked Questions
Should I use batteries for power?
Using batteries for power is a smart move for this project. Remember to opt for rechargeable batteries, they’re a cost-effective energy source.
How do I add more ambiance?
Just place white LED lights inside the pot and cover it with different color sheets before placing the green decor items
Can I use any type of pot for this project?
Yes, you can use any type of pot, but ensure it’s made of a material that can be safely drilled without cracking, like plastic or a thick ceramic. The size and shape of the pot should also accommodate the bulb holder and the LED bulb comfortably.
Is it necessary to use LED bulbs, or can I use any bulb?
It’s highly recommended to use LED bulbs for this project due to their low heat emission, energy efficiency, and long lifespan. Other types of bulbs, especially incandescent ones, generate more heat, which could be a safety concern, especially in a confined space like a pot.
What if I don’t have an old shoelace for the hanging rope?
If you don’t have an old shoelace, any strong, durable rope or string that can securely hold the weight of the lamp will work. Consider using nylon rope, jute, or even a decorative ribbon for a different aesthetic. Ensure the material chosen is not prone to fraying or breaking over time.
How can I adjust the light intensity of the DIY lamp?
To adjust the light intensity, you can use a dimmable LED bulb and connect it to a compatible dimmer switch. Another simpler way is to choose bulbs with different lumens (light output) or use a smart LED bulb that can be controlled via an app for brightness adjustments.
Can this DIY lamp be used outdoors?
This DIY lamp is primarily designed for indoor use. If you wish to use it outdoors, ensure all electrical components are rated for outdoor use to prevent damage from moisture and weather conditions. Also, it’s important to place it in a covered area to protect it from direct exposure to the elements.


