I’ve always believed that Christmas is the perfect time to explore global traditions with my kids.
This year, I’ve collated a treasure trove of 14 Christmas crafts inspired by different cultures, and I couldn’t wait to share them with you.
From Swedish Tomte ornaments to Japanese origami stars, these projects offer a unique way to celebrate diversity while creating lasting memories.
I was particularly drawn to the eco-friendly Makedo ornaments and the charming DIY bon bons with an Aussie twist.
Whether you’re looking for a simple activity for young children or a more challenging project for teens, this list has something for everyone.
Let’s go through the list of 14 cool Christmas crafts for kids inspired by different cultures.
Swedish Tomte Ornaments
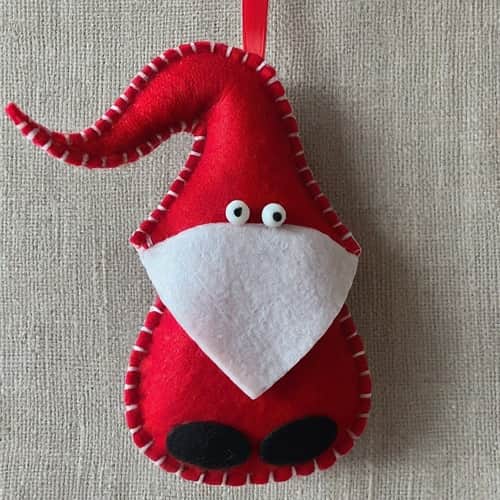
Tomte, also known as Nisse, are friendly little gnomes or elves in Swedish folklore.
Traditionally, they’re shown with lengthy white beards, pointed red caps, and rotund bellies.
These adorable Tomte ornaments are a perfect way to add a touch of Scandinavian charm to your Christmas tree.
Did you know: Tomte in Swedish folklore is believed to bring good luck to households where they reside. They’re often associated with protecting farms and bringing joy during the Christmas season.
Materials:
- Red felt
- White felt
- Pipe cleaners
- Cotton balls
- Embroidery floss (black and red)
- Scissors
- Craft glue
Difficulty Level: Beginner.
Instructions:
- Cut out two identical Tomte shapes from red felt.
- Cut a small triangle from white felt for the beard and glue it to the bottom part of one red felt piece.
- Cut a long, pointy triangle from the red felt for the hat and glue it to the top of the other red felt piece.
- Stitch tiny circles for eyes using black embroidery floss and add a cheerful red smile.
- Twist two pipe cleaners together to create Tomte’s arms and glue them to the sides of the body (between the beard and hat).
- Add lots of cotton balls and attach them with glue to create a fluffy border on the hat.
- Glue the two felt pieces together, leaving a small opening at the top.
- Stuff the ornament with cotton balls and then glue the opening shut.
- Tie a loop of string or thread to the top of the hat for hanging.
This is a simple and fun craft that can be enjoyed by people of all ages. You can even get creative and add other details to your Tomte ornaments, such as tiny gifts or pine cones.
Alternative Materials:
- If you don’t have red felt, you can use green or blue felt for a different colored Tomte.
- Instead of cotton balls, try using small pom-poms or faux fur for a different texture.
Japanese Origami Star Ornaments
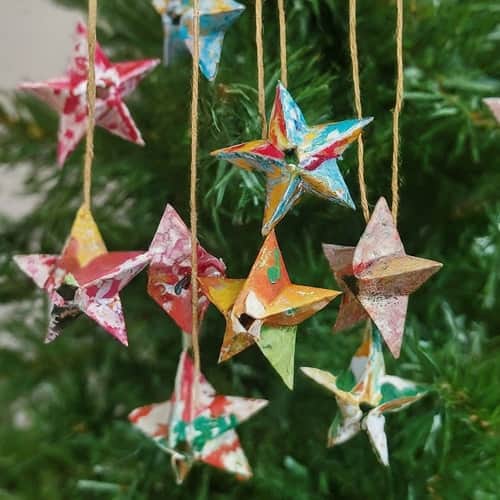
Origami, an ancient Japanese technique of folding paper, offers a creative way to craft stunning and festive Christmas ornaments.
These origami star ornaments are a simple and elegant way to add a touch of Japanese culture to your Christmas tree.
Materials:
- Origami paper (various colors and patterns)
- Scissors (optional)
- String or thread for hanging
Difficulty Level: Beginner to Intermediate
Instructions:
Pick Your Paper: Grab a square piece of origami paper that speaks to your holiday spirit—whether it’s a merry red or a snowflake-patterned delight.
Fold & Fold Again: Fold diagonally to create a triangle that’s as sharp as Santa’s hat. Fold that triangle again to make it even smaller and cuter.
Unfold & Refold Magic: Unfold the last fold, then bring the bottom corners up to meet at the top.Next, fold down the top layers to form smaller triangles on each side (like tiny elf hats).
Mirror the Magic: Repeat those tricky maneuvers on the other side. Symmetry is key, just like matching reindeer socks.
Flatten & Fringe (Optional): Carefully unfold a bit and flatten the layers to reveal the starry shape. Feeling fancy? Grab scissors and snip little notches or create fringe along the edges for an extra jolly touch.
Hang It High: Thread a string or a shimmering thread through a tiny hole at the top point of your star. It’s ready to shine i.e. hang it proudly on your holiday tree or anywhere that needs a bit of Christmas magic.
These origami star ornaments are a fun and easy craft for people of all ages.
You can create a variety of stars using different colored and patterned paper, making your Christmas tree a constellation of origami magic.
Alternative Materials:
- If origami paper isn’t available, you can use any square paper, such as wrapping paper cut into squares, or even plain printer paper colored with markers or crayons.
- Instead of scissors, use a bone folder or ruler to create crisp folds.
Fun Fact: Origami holds deep cultural significance in Japan, symbolizing patience, precision, and the beauty of simplicity. It’s often used to create decorations for celebrations and festivals, including Christmas.
DIY Christmas Advent Paper Houses

Credit: deliacreates.com
Inspired by the charming holiday traditions of Europe, these Christmas Advent Paper Houses will light up your home in the most delightful way.
Imagine a quaint little village, each house unique and festively decorated, counting down the days to Christmas.
You can craft these adorable houses using free templates from Delia Creates.
Simply download files, cut out the houses with a Silhouette cutting machine, and assemble them with a low-temperature glue gun.
Personalize with paint, glitter, or colored paper for a festive touch.
Place a small treat or a flameless tea light inside each house to reveal a daily surprise.
For detailed instructions and free templates, head over to Delia Creates and start building your own paper holiday village.
Difficulty Level: Intermediate
Alternative Materials:
- If you don’t have a Silhouette cutting machine, you can print the templates on cardstock and cut them out by hand, using scissors or a craft knife.
- Instead of a low-temperature glue gun, use craft glue or double-sided tape for assembly.
DIY Christmas Cone Craft

Credit: fynesdesigns.com
Channel your inner crafty Canadian with these whimsical DIY 99¢ Christmas Tree Cones.
Imagine turning kitchen funnels from your local dollar store into charming Christmas trees.
Stack them up, stabilize with a Styrofoam ball, and decorate to your heart’s content.
Whether you adorn them with ruffled ribbons, beads, or even pinecones, these trees are as versatile as they are budget-friendly.
It’s the perfect craft to engage kids in a festive project that combines creativity with a bit of holiday magic.
For the full tutorial and a treasure trove of decorating ideas, head over to Fynes Designs and get ready to be amazed at how easy and fun this Christmas craft can be.
Difficulty Level: Beginner
Alternative Materials:
- If kitchen funnels aren’t available, try using rolled-up poster board or cardboard cut into cone shapes.
- Instead of Styrofoam balls, use crumpled newspaper or tissue paper for stability inside the cones.
Ukrainian Spiderweb Christmas Ornaments

In Ukrainian Christmas tradition, spiders and webs symbolize good luck and prosperity in the coming year. These unique straw ornaments adorned with intricate spiderwebs are a beautiful representation of this tradition.
Materials:
- Straw (dried and flattened)
- Scissors
- Glue gun
- White thread or yarn
- Embroidery floss (optional: gold or silver)
- Beads (optional)
Difficulty Level: Intermediate
Instructions:
Snip & Snuggle: Grab your trusty straw collection and cut them into strips of similar lengths (think tiny twigs for your crafty forest).
Circle of Creativity: Start small but dream big! Arrange the straw strips into a snug circle and secure them with a dab of hot glue from your magical glue gun. Like making a mini campfire, but with more webs.
Layer It On: Layer up those straws, slightly overlapping them to spin your web into a mesmerizing design. More straws, more web (adjust to your spookiness level).
Thread the Tale: Take your white thread or yarn and weave it through the straw maze, securing it with glue at key points. Think of it as threading your way through a haunted hedge maze.
Glitz & Glam (Optional): Feeling fancy? Sprinkle in some embroidery floss in glistening gold or silver to give your web a touch of midnight shimmer. It’s like adding starlight to a moonlit night.
Spin a Spider: Time to introduce the star of your web show i.e. a tiny black bead spider or one crafted from black embroidery floss wrapped around a toothpick. Shape it with care, because every spider deserves to be spooky yet stylish.
Center Stage: Secure your creepy crawler in the heart of the web using more trusty glue.
These delicate spiderweb ornaments add a unique touch to your Christmas tree and showcase a beautiful Ukrainian Christmas tradition.
Alternative Materials:
- If you don’t have access to straw, try using thin wooden sticks or even paper strips for a similar effect.
- Instead of a glue gun, use craft glue or a strong adhesive tape for assembling the ornaments.
Japanese-Inspired Makedo Christmas Ornaments

Credit: Instructables.com
Transform your leftover gift wrapping paper into stunning Christmas ornaments with a touch of Japanese ingenuity.
Designed by Tanaka Satoshi, Makedo’s master maker from Japan, these ornaments are a fun and eco-friendly project for kids.
Start by cutting old wrapping paper into strips, then use Makedo re-pins and re-clips to assemble your creation.
Punch holes, fan out the strips, and shape your ornament by pinching the ends (You can even add marbles for a bit of flair).
Once complete, hang these colorful ornaments around the house or on your Christmas tree.
For detailed instructions and to share your creative masterpieces, visit Instructables and get inspired by the simplicity and beauty of Japanese design.
Difficulty Level: Beginner to Intermediate
Cultural Significance: Japanese design principles emphasize minimalism, functionality, and eco-consciousness. This project not only repurposes materials but also reflects Japanese ingenuity in creating beauty from simplicity.
Alternative Materials:
- If you don’t have Makedo re-pins and re-clips, try using paper clips or small brads to secure the strips of wrapping paper.
- Instead of old wrapping paper, use colorful magazine pages or scrapbooking paper for a different look.
Polish Wigilia Christmas Eve Wafer Ornaments

Opłatek, a thin unleavened wafer bread, is traditionally shared during Wigilia, the Polish Christmas Eve dinner. These beautiful ornaments made from Opłatek dough are a unique way to incorporate this tradition into your Christmas decorations.
Materials:
- Opłatek wafers (available online or at Polish grocery stores)
- Water
- Small cookie cutters (optional)
- Rolling pin
- Craft knife or x-acto knife
- Doilies (optional)
- String or ribbon for hanging
Difficulty Level: Intermediate
Instructions:
Begin by dipping a clean paintbrush or sponge into water, lightly brushing one side of your delicate Opłatek wafer.
This gentle touch prepares it for the artistic journey ahead.
If you’re feeling inspired, while the wafer remains slightly damp, delicately press a cookie cutter into the dough to create charming ornament shapes.
Alternatively, use your creativity with a craft knife, carefully cutting out traditional designs like stars, angels, or nativity scenes.
For an extra touch of elegance, consider placing the damp Opłatek over a dainty doily and pressing gently to leave a decorative imprint.
Once your Opłatek ornaments are shaped to perfection, allow them to dry completely, ideally overnight on a flat surface (This step ensures they’re ready to sparkle with holiday spirit).
When dry, delicately punch a small hole at the top of each ornament.
Thread a string or ribbon through the hole for hanging, transforming your handcrafted creations into cherished decorations for the season.
Alternative Materials:
- If Opłatek wafers are unavailable, you can use thin sheets of unleavened bread or edible rice paper as a substitute.
- Instead of doilies, use textured fabrics or embossed paper to create decorative imprints on the ornaments.
Cultural Significance: Opłatek wafers hold deep religious significance in Polish Christmas traditions, symbolizing the breaking of bread and sharing of blessings during Wigilia, the Christmas Eve supper. Crafting ornaments from Opłatek dough not only decorates the tree but also honors this meaningful ritual.
DIY Christmas Bon Bon (Australian Style)

Credit: homestolove.com.au
Bring a bit of Aussie charm to your holiday table with these DIY Christmas Bon Bons.
Instead of the usual store-bought crackers filled with forgettable trinkets and cheesy jokes, make your own personalized bon bons that the whole family will love.
Start by collecting cardboard tubes from kitchen paper rolls, then add a Christmas cracker snap inside.
Wrap the tube in your favorite festive paper, leaving a little extra on the ends, and secure with double-sided tape.
Fill the bon bons with treats or small gifts, and tie the ends with curling ribbon or string.
These handmade bon bons not only add a personal touch to your table but also keep the budget in check.
For more detailed instructions, head over to Homes To Love and get cracking on this fun holiday project.
Difficulty Level: Beginner
Alternative Materials:
- If cardboard tubes from kitchen paper rolls aren’t available, use toilet paper rolls or cut wrapping paper tubes to size.
- Instead of double-sided tape, use glue sticks or glue dots for securing the festive paper around the tubes.
Cultural Significance: In Australia, Christmas bon bons, also known as crackers, are a beloved part of holiday celebrations. They bring a sense of fun and camaraderie to the dinner table, often containing small gifts and jokes that add to the festive spirit.
DIY Scandinavian Style Christmas Decor

Credit: awilson.co.uk
There’s absolutely no doubt that Scandinavians are the masters of winter.
From their cozy candlelit breakfasts to their knack for making the indoors a haven during harsh winters, they’ve got it down.
Inspired by a trip to Norway, where breakfast by candlelight became a thing, I decided to bring some of that Scandinavian charm into my home with DIY Christmas decorations.
These Scandinavian-style felt baubles are just what you need to capture that cozy, snowy vibe.
All you need is some red and white felt, ribbon, and basic sewing supplies.
Draw and cut out your templates, then assemble the decorations by sewing the pieces together (or use glue if sewing’s not your thing – I won’t tell!).
These charming baubles will make your home feel like a Scandinavian winter wonderland.
For the full tutorial and templates, head over to the original post at awilson.co.uk.
Alternative Materials:
- If red and white felt isn’t available, try using other Scandinavian-inspired colors like muted greens or blues.
- Instead of sewing, use fabric glue or even double-sided tape for assembly to simplify the process.
Difficulty Level: Beginner to Intermediate
DIY Wooden Village Decor for Christmas (Scandinavian Style Decor)

Credit: woodshopdiaries.com
Ever thought about crafting your very own Scandinavian Christmas village? This DIY wooden Christmas village by Shara from Woodshop Diaries is perfect for adding that charming, minimalist vibe to your mantle.
Inspired by the simple elegance of Scandinavian decor, these adorable wooden houses are budget-friendly (under $20) and can be customized for any holiday or season.
All you need is some plywood, a few basic tools like a jigsaw and a sander, and a bit of creativity.
The steps are straightforward i.e. cut your plywood to size, assemble the houses, and add your finishing touches like roofs and chimneys.
You can even personalize each house with different sizes and window designs.
These wooden houses are not only festive but versatile enough to use all year round.
For the full tutorial and detailed instructions, visit the original post at woodshopdiaries.com.
Difficulty Level: Intermediate to expert
Alternative Materials:
- If plywood isn’t available, try using recycled wood from pallets or sturdy cardboard for a temporary display.
- Instead of a jigsaw, use a craft knife or utility knife for cutting thinner materials like cardboard.
Mexican Papel Picado Christmas Lanterns

Papel Picado, meaning “perforated paper” in Spanish, is a beautiful Mexican folk art tradition that involves intricate paper cutouts. Traditionally used for festive decorations, they can be transformed into lovely Christmas lanterns.
Materials:
- Tissue paper (various colors)
- Scissors
- Pencil
- String or yarn
- Hole punch (optional)
Difficulty Level: Beginner
Instructions:
Begin with a sheet of tissue paper, folding it neatly in half. Imagine it as unfolding a holiday surprise.
Next, let your inner artist sketch half of a merry design (think poinsettias, twinkling stars, or ringing bells) right along the folded edge.
Keep it symmetrical for that perfect holiday symmetry.
With steady hands, carefully cut out your design while the paper remains folded.
To amplify the holiday cheer, repeat these steps with different hues of tissue paper and varied designs. Layer them together to create a vibrant array of lantern panels.
Once you’ve stacked your paper cutouts in a joyful tower, bind them together at the top with string or yarn (It’s like tying a ribbon on a holiday gift).
For a whimsical touch, grab a hole punch and sprinkle small holes along the top or bottom edge of your lantern.
Thread a string or yarn through them, turning your creations into radiant ornaments ready to hang with festive flair.
Fun Fact: Papel Picado is a cherished Mexican folk art tradition that dates back to the 19th century. It’s used extensively during celebrations like Christmas, adding a colorful and festive atmosphere to homes and streets across Mexico.
Alternative Materials:
- If tissue paper isn’t available, try using thin colored craft paper or even recycled gift wrap for a similar effect.
- Instead of a hole punch, use a sharp needle or pin to create intricate patterns or designs in the paper.
DIY Fabric Origami Christmas Star Ornaments (Japanese Trend)

Credit: ashleemarie.com
Imagine crafting beautiful fabric origami stars for your Christmas tree, inspired by a creative journey in Japan.
Ashlee Marie shares her delightful experience of making these ornaments with Japanese fat quarter squares, turning them into elegant decorations full of nostalgia and craftsmanship.
To create these stars, Ashlee used fabric stiffener to give the squares structure before cutting them into large hexagons.
Following a method similar to origami, she folded them into pentagons, ensuring to maintain the fabric’s stiffness.
Although the exact instructions aren’t available, she recommends using a paper pentagon template for cutting and following a helpful video guide for folding.
After folding, Ashlee lightly sprayed the stars to set the folds, secured them with paper clips to dry, and embellished them with seed beads and sturdy upholstery thread for hanging.
For a heartfelt touch of handmade charm on your tree, check out Ashlee’s original tutorial at ashleemarie.com.
Difficulty Level: Intermediate
Alternative Materials:
- If fabric stiffener isn’t available, try using a mixture of white glue and water to stiffen the fabric squares.
- Opt for thin ribbon or embroidery floss instead of upholstery thread to hang the ornaments.
DIY Gnome Ornament: A Festive Touch for Your Holiday Decor

Credit: singlegirlsdiy.com
These whimsical gnomes, larger than your palm, are versatile decorations perfect for adorning your Christmas tree, hanging on door knobs, topping presents, or even accenting a wreath.
To make these charming ornaments, you’ll need wool yarn for the beard, felt sheets in festive colors, a small wood ball for the nose, and decorative wooden circles or buttons.
The process involves crafting a fluffy pom-pom beard, shaping a cone-shaped hat from felt, and assembling the gnome’s features with hot glue.
For detailed instructions and the free printable gnome hat pattern, visit Single Girls DIY.
Difficulty Level: Beginner to Intermediate
Alternative Materials:
- If wool yarn is unavailable, try using faux fur or cotton batting for the beard to achieve a fluffy texture.
- Instead of decorative wooden circles or buttons, consider using small pom-poms or beads for embellishing the gnome’s features.
Aussie Christmas Seashell Ornaments

Australia’s coastal landscapes are blessed with some of the planet’s most awe-inspiring beaches.
These Christmas ornaments utilize seashells, a natural treasure from the Aussie coast, to create a beautiful and beachy Christmas decoration.
Materials:
- Assorted seashells (cleaned and dried)
- Acrylic paint (various colors)
- Paintbrushes
- Glitter (optional)
- Glue gun (optional)
- Googly eyes (optional)
- String or ribbon for hanging
Difficulty Level: Beginner
Instructions:
- This craft is perfect for using a variety of seashell shapes and sizes. Make sure your seashells are clean and dry before decorating.
- Paint the seashells with acrylic paints in various colors. You can paint the entire shell or create designs and patterns. Let the paint dry completely.
- (Optional) Add a touch of sparkle with glitter. You can use a paintbrush to apply glitter glue to specific areas of the seashell or sprinkle loose glitter over wet paint.
- (Optional) Use a glue gun to attach small googly eyes to the seashells, creating a whimsical look.
- Secure a piece of string or ribbon through a discreet hole at the top or back of the seashell, providing a practical and elegant solution for hanging.
Alternative Materials:
- If acrylic paint isn’t available, try using spray paint designed for outdoor use to ensure durability on seashells.
- Instead of googly eyes, consider using small beads, tiny shells, or even dried starfish for embellishments.
Also Read: 9 SeaShell Ornament Crafts You Can Make at Home
Final Thoughts
I highly recommend trying some of these projects with children to broaden their cultural awareness while creating lasting memories.
The Swedish Tomte ornaments and Japanese origami stars are particularly accessible for younger kids, while the Ukrainian spiderweb ornaments offer a unique challenge for older ones.
I especially love the eco-friendly approach of the Makedo ornaments and the personalized touch of DIY bon bons.
For those seeking a minimalist aesthetic, the Scandinavian wooden village is perfect.
Overall, incorporating these global-inspired crafts can add depth and meaning to our holiday decor, fostering a sense of connection to diverse traditions and encouraging creativity in our celebrations.
You May Also Like
- 13 Christmas Crafts for KIDS that are as good as Decor
- 13 Christmas Crafts for KIDS That Are Surprisingly Easy
- 16 Budget Friendly Christmas Crafts That Look Expensive
- 20 Fantastic Last Minute Christmas Crafts To Make And Sell
- 17 Easy DIY Christmas Gift Ideas to sell under $10.00
- 15 Cool Christmas Crafts to Sell (Beginner Friendly)


