Planning keepsakes for a baby shower is one of those moments where your hands get messy, your creativity kicks in, and before you know it – you’re proudly showing off something made of clay.
That’s exactly why Clay Baby Shower Keepsakes feels so special. Clay has this charm that instantly turns simple ideas into heartfelt clay craft treasures.
And trust me, a little clay decor around a baby shower always sparks smiles.
These keepsakes are easy, cute, and yes – totally doable even if you’re not the crafty type. Ready to make something that lasts longer than the cake? Let’s jump right into it.
1. Baby Footprint Clay Disc

A classic, right? And honestly, still one of the most emotional pieces you can make for new parents. All you need is air-dry clay, a rolling pin, and a round cookie cutter.
Roll the clay to about ½ inch thick. Gently press the baby’s foot into the clay – don’t overthink it, tiny feet always look adorable.
Smooth edges with a bit of water and punch a hole at the top if you want to hang it later. Let it dry for 24 hours and seal it with a matte varnish.
Want to personalize it? Use alphabet stamps for the baby’s name or birth date. Simple and beautiful.
2. Mini Clay Baby Blocks With Initials

This one feels like building a tiny alphabet kingdom. Shape small 1-inch cubes out of air-dry clay. Keep the edges crisp – use a ruler if you want that clean look.
Once shaped, press alphabet stamps into the front of each cube. I like painting the letters after they dry, but you can also leave the natural clay color for a minimalist vibe.
These make adorable table decor or even cake-table accents. And if you’re giving them as favors? Wrap each block in tissue paper and tie with twine. It looks fancy without doing anything fancy.
3. Clay Baby Name Banner Charms

Think mini charms that spell out the baby’s name – super cute to hang on a wall, gift bag, or baby shower backdrop. Roll out clay into a thin slab.
Cut small circles, hearts, or simple rectangles. Press alphabet stamps to create letters. String them together with cotton cord once they’ve dried. Want to get fancy? Use two clay colors for a soft contrast.
It’s fun, quick, and looks like you put way more effort into it than you actually did. Always a win.
4. Tiny Clay Baby Rattle Charms
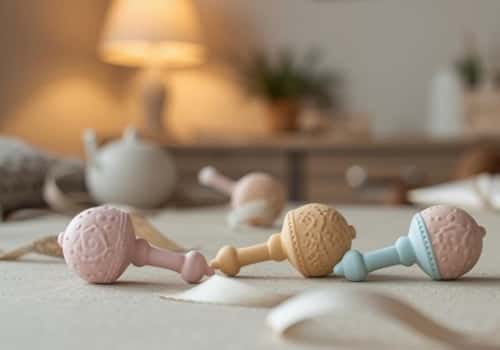
Don’t worry – these aren’t real rattles. Just adorable miniature clay versions that look sweet on gift boxes or as centerpieces.
Roll a small ball of clay, then attach a tiny clay handle. Smooth the seam by dipping your finger in water.
Add simple embossed dots or lines for texture. Paint them pastel once dry.
These look cute as a set of three tied with ribbon. Guests always pick them up and go, “Wait, you made these?” Yes. Yes, you did.
5. Clay Baby Onesie Gift Tags

These always get a “awww” reaction. Shape small onesie cutouts using either a cutter or a paper template you trace around.
Keep the clay about ¼ inch thick so they don’t snap. Smooth the edges, press little textures like dots or stripes using a toothpick, and add a hole at the top for a string.
After drying, you can leave them plain or paint tiny details like collars and buttons. They look adorable tied to baby shower favors, diaper cakes, or even photo frames.
6. Clay Baby Handprint Heart
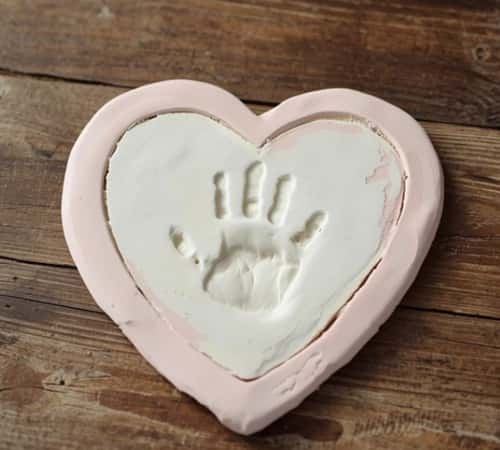
This one always turns into a “wow” moment because a tiny handprint inside a heart shape feels like peak cuteness.
Start by rolling your clay to about ½ inch thick. Use a heart-shaped cutter or trace a heart template with a knife.
Gently press the baby’s hand into the center – don’t force it because little palms tend to curl anyway, and that imperfect print actually looks more adorable.
Smooth out the edges with water and punch a hole at the top if you want to hang it.
Once dry, brush the edges with soft pastel paint for a sweet contrast. Makes a lovely keepsake for nursery walls or shadow boxes.
7. Personalized Clay Baby Shower Magnets

These are ridiculously easy and surprisingly thoughtful.
Roll out your clay and cut simple shapes – circles, little clouds, stars, whatever matches the baby shower theme.
Press in tiny designs: initials, polka dots, or a tiny rainbow using a toothpick.
Once dry, paint the details or leave them natural for a minimalist look. Flip them over and glue small magnets to the back.
These make adorable favors because guests actually keep them instead of tossing them in a drawer. Stick them on the fridge and boom – the memory lives on every time someone reaches for cold water.
8. Clay Baby Animal Mini Figurines
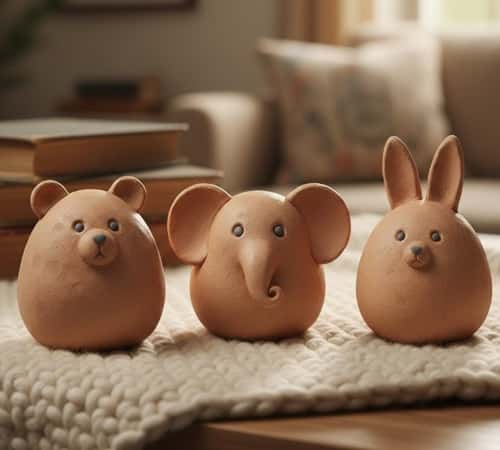
If you like the idea of something playful but not overly complex, tiny clay animals are perfect.
Stick to simple shapes: a round ball for the head, a slightly bigger ball for the body, and tiny triangles or circles for ears.
Think baby bear, elephant, or bunny. Keep details minimal – just use a toothpick to mark eyes or little lines.
Let them dry completely before adding color because wet clay and paint love to fight.
These look adorable on baby shower tables or gifted as a set. And because they’re small, you don’t need sculpting skills to make them cute.
Slightly wonky animals just look more charming – trust me.
9. Clay Baby Milestone Tokens

These are perfect for parents who love monthly milestone photos.
Cut 3-inch circles from rolled-out clay. Keep them about ¼ to ½ inch thick so they’re durable. Use alphabet stamps to mark “1 Month,” “2 Months,” etc.
Or write them in with a pointed tool if you want a hand-drawn feel. Smooth edges, let dry, and paint tiny accents like stars or dots. Package them as a set tied with twine. They look professional but take very little effort.
Plus, they’re practical – new parents love anything that makes those first-year photos easier.
Final Thoughts
Clay keepsakes have a special charm because they’re handmade, personal, and surprisingly simple once you get the hang of the basics.
But here’s something I always tell people – don’t chase perfect. Clay looks better when it shows a bit of character.
A slightly uneven edge or a tiny fingerprint? That’s the magic.
If you want your keepsakes to last longer, always seal them with a matte varnish once dry.
And store leftover clay in an airtight bag so it doesn’t dry into a sad brick.
Whether you’re crafting for yourself or gifting someone else, these little clay moments become stories that stay around for years, not just during the shower.


