I’ve played with clay pots more times than I can count. Some worked beautifully. Some didn’t, and thats okay.
Clay Pot Craft projects are forgiving like that. You don’t need fancy tools. You don’t need perfect hands.
You just need a table, a little patience, and the urge to make something with your own hands.
In this list, I’m sharing Clay Pot DIY Projects I either made myself or helped my kid finish on a lazy afternoon.
You’ll see Home Decor Ideas With Clay Pots, a bit of mess, and a lot of fun. Ready? Let’s get into it.
1. Clay Pot Face Planter (Cute + Slightly Silly)
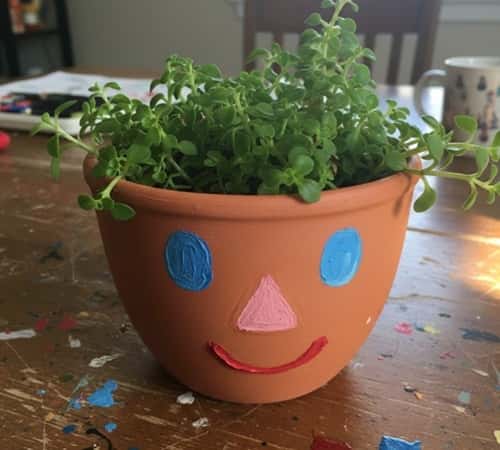
This one always gets reactions. Kids laugh. Guests ask where I bought it. I didn’t buy it.
What you need
- One medium clay pot
- Acrylic paints (skin tone, black, white, pink)
- Paint brushes (one flat, one thin)
- Pencil
- Clear sealant (optional but helpful)
- Small plant or faux greenery
How I made it
First, wash the clay pot and let it dry completely. Clay dust ruins paint, trust me.
Turn the pot upside down. This is the face area.
Lightly sketch eyes, nose, and lips using a pencil. Don’t stress if it looks odd. Faces always do at first.
Paint the base skin color and let it dry. Takes around 20 minutes.
Add eyes, lashes, blush dots, and lips. Change expressions if you want. I once gave it sleepy eyes and it looked funny but cute.
Seal the paint if the pot will go outdoors.
Flip it upright and place the plant so it looks like hair.
This is one of my favorite Clay Pot Art Ideas because it feels personal. No two faces ever look the same.
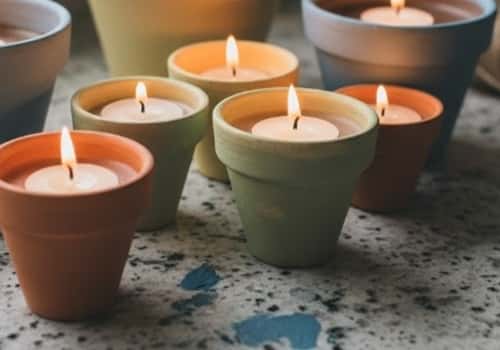
2. Mini Clay Pot Candle Holders (Cozy Without Effort)
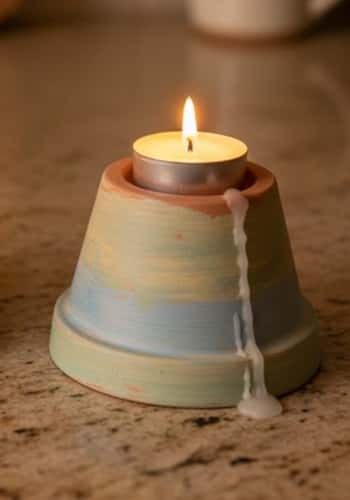
I made these during a power cut evening. Zero planning. Full vibe.
What you need
- Small terracotta pots
- Tea light candles
- Acrylic paint or chalk paint
- Sponge or brush
- Sandpaper (optional)
Steps
- Lightly sand the pot edges if they feel rough.
- Paint the outside only. Inside stays raw clay, looks better.
- Let it dry fully. Don’t rush this part, or paint peels later.
- Place a tea light inside. Done.
You can distress the edges by rubbing sandpaper after paint dries.
These Small Clay Pot Crafts work beautifully for balconies, shelves, or bathrooms.I’ve used them during festivals, birthdays, and normal Tuesdays too.
This falls under Decorating Clay Pots but without overthinking it.
3. Clay Pot Bell Wind Chime (Sound + Style)
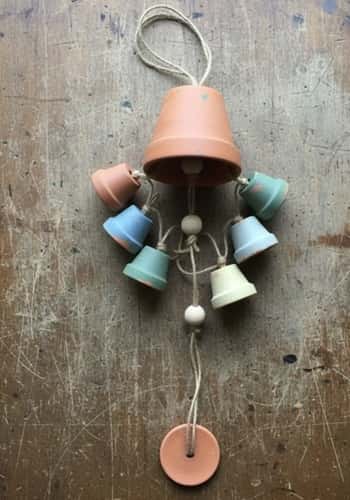
This one surprised me. I didn’t expect it to sound so calming.
What you need
- 3 to 5 small clay pots
- Strong twine or jute rope
- Beads or wooden pieces
- Paint (optional)
- Nail or skewer
How to make
- Paint the pots first if you want color. Let them dry fully.
- Use the drainage hole to thread twine.
- Tie knots under each pot so they hang at different lengths.
- Add beads between pots for spacing.
- Tie all strings together at the top.
- Hang near a window or balcony.
The sound is soft, not loud. Very pleasant.
This is one of those Diy Clay Pots Crafts that feels more expensive than it is.
Also works well for Clay Pot Crafts Garden setups.
4. Upside-Down Clay Pot Ladybug Decor (Instant Smile Maker)
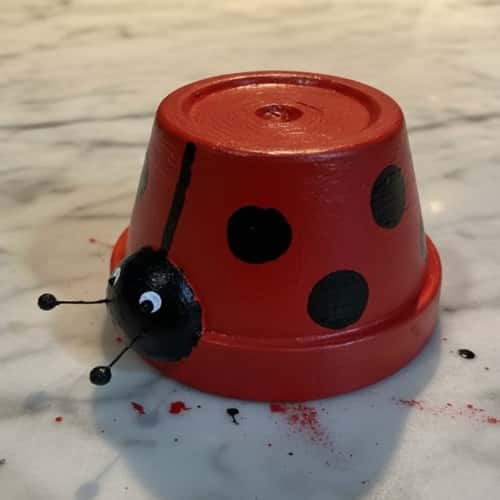
This is one of those Clay Pot Art Ideas that looks harder than it actually is. I made two in one sitting, one turned out better, the other still cute.
What you need
- One medium clay pot
- Red, black, white acrylic paint
- Paint brushes (round + thin liner)
- Pencil
- Clear sealant
How to make it
- Wash the pot and dry it well. Flip it upside down.
- Paint the entire pot red. Two coats works best, don’t rush it.
- Once dry, draw a straight line down the middle for wings.
- Paint black dots randomly. Nature isn’t symmetrical, so relax.
- Add a black half-circle near the rim for the head.
- Tiny white dots for eyes.
- Seal it if placing outdoors.
I place these near plants or door corners.
This is a fun answer to What To Do With Clay Pots when you want decor, not planters.
5. Clay Pot Tiered Jewelry Stand (Unexpected but Useful)
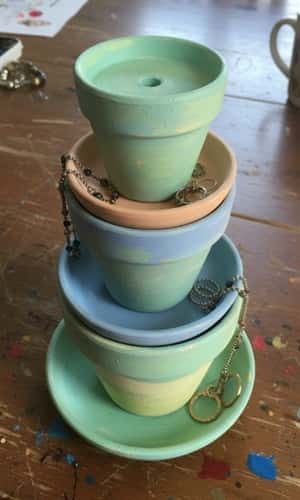
I wasn’t sure about this one. Then I used it daily.
What you need
- 3 clay pots (small, medium, large)
- 2 saucers
- Strong adhesive
- Spray paint or acrylic paint
Steps
- Paint all pots and saucers first. Let them dry completely.
- Place the largest pot upside down as base.
- Glue a saucer on top. Let it set.
- Add the medium pot upside down, glue another saucer.
- Finish with the smallest pot on top.
Let it cure overnight. Don’t touch it early, I learned that the hard way.
Perfect for rings, earrings, bangles.
This fits beautifully under the Home Decor Ideas With Clay Pots theme.
6. Mini Clay Pot Animal Pots (Kids Go Crazy For These)
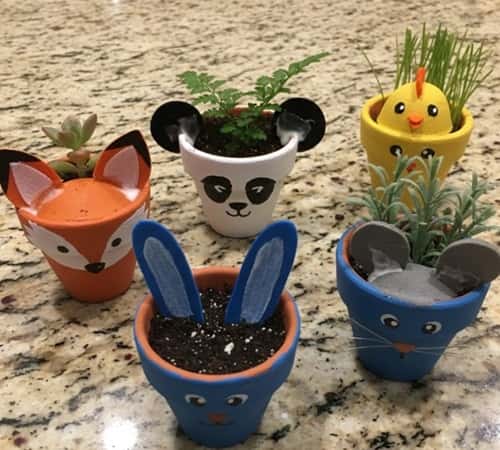
I won’t lie. Kids love this more than adults. But adults secretly enjoy it too.
What you need
- Small Terracotta Pots Crafts size
- Acrylic paints
- Foam sheets or paper
- Glue
- Googly eyes
How I do it
- Paint the pot base color first. Let it dry.
- Glue ears using foam or paper near the rim.
- Stick googly eyes or paint them.
- Draw nose and mouth.
- Add a small plant or fake grass on top.
These are perfect Clay Pot Craft Ideas For Kids.
Even if paint goes outside lines, it still looks adorable.
This clearly fits under Small Clay Pot Crafts and Creative Flower Pot Crafts.
7. Clay Pot Fairy House (Whimsical Home Decor)
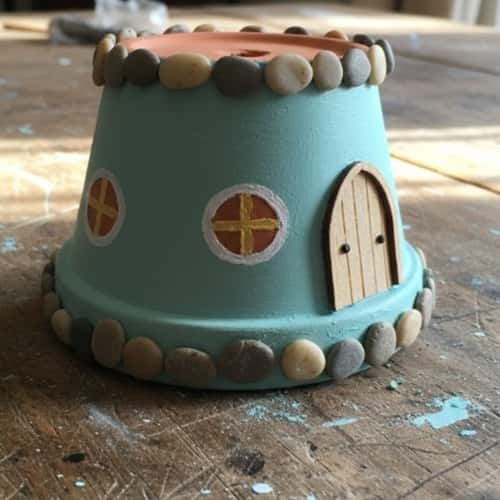
This is one of those Amazing Craft Projects that instantly feels magical. It’s detailed, but not complicated.
What you need
- 1 large clay pot
- Small clay pot (optional for chimney)
- Acrylic paints
- Fine paint brush
- Glue
- Small pebbles or mini decor pieces
How to make it
- Turn the large pot upside down. This becomes the house.
- Paint the base color and let it dry fully.
- Draw windows and doors lightly with a pencil.
- Paint details slowly. Thin layers work better than thick paint.
- Glue pebbles around the base to create a pathway.
- Attach the small pot sideways on top as a chimney if you want extra charm.
This fits beautifully under Terracotta Clay Pots Craft themes that suit both kids and adults .
Place it on shelves, balconies, or garden corners.
8. Stacked Clay Pot Snowman (Seasonal but Reusable)
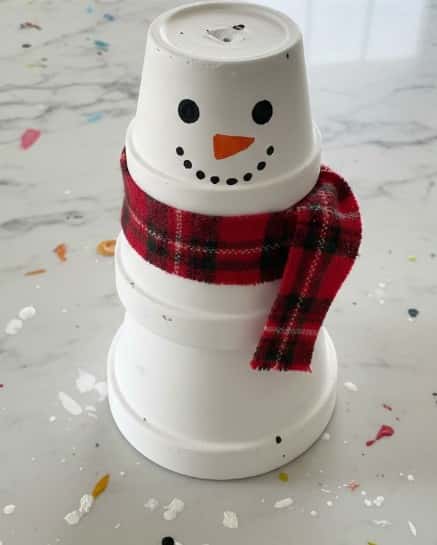
This works best for winter decor, but honestly looks cute year-round indoors.
What you need
- 3 clay pots (graduated sizes)
- White acrylic paint
- Black and orange paint
- Glue
- Fabric scrap or ribbon
Steps
- Paint all pots white and let them dry fully.
- Stack them upside down from largest to smallest using glue.
- Paint eyes and buttons using black paint.
- Add a carrot nose shape in orange.
- Tie a ribbon or fabric around the “neck” area.
This is a classic from Terracotta Pot Crafts DIY collections.
It answers What To Do With Clay Pots when seasonal decor feels boring.
9. Hanging Clay Pot Herb Holder (Small Space Friendly)
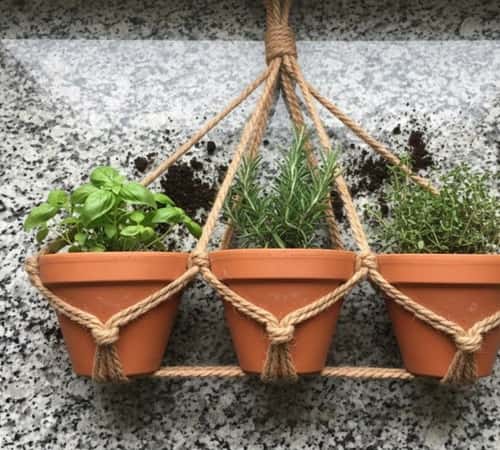
This one is very practical. Especially if counter space is limited.
What you need
- 3 to 4 Small Terra Cotta Pot Crafts size pots
- Jute rope or metal chain
- Wall hook or rod
- Herbs or faux plants
How to assemble
- Thread rope through drainage holes.
- Tie secure knots under each pot.
- Space them evenly.
- Hang vertically on a wall or balcony.
- Add soil and herbs once fully stable.
No fancy tools needed, just patience.
10. Mosaic Clay Pot (Artistic Flair)
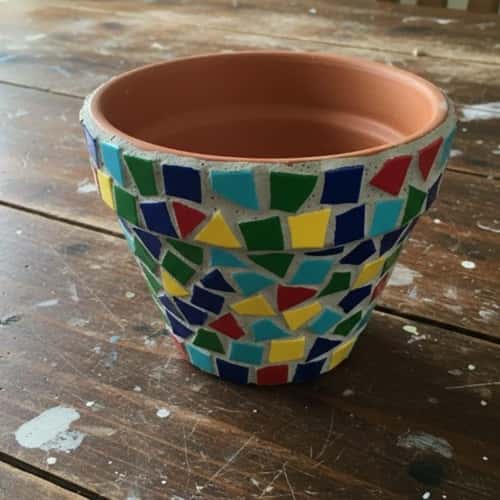
If you like color and texture, this is a standout Clay Pot Crafts DIY Project idea. Mosaic designs add a playful or elegant touch depending on your style.
What you need
- One medium clay pot
- Broken tiles, beads, or glass pieces
- Strong adhesive or tile glue
- Grout
- Paint (optional)
How to make it
Start with a clean, dry pot.
Plan your mosaic layout loosely before gluing. You can arrange patterns randomly – it adds charm.
Glue pieces carefully, leaving tiny gaps for grout. Let dry completely.
Apply grout over all spaces, wipe off excess with a damp cloth.
Let it cure. Optional: paint the rim or base for contrast.
It’s great for patios, window sills, or even as a gift.
11. Clay Pot Animal Pencil Holders (Desk Upgrade)
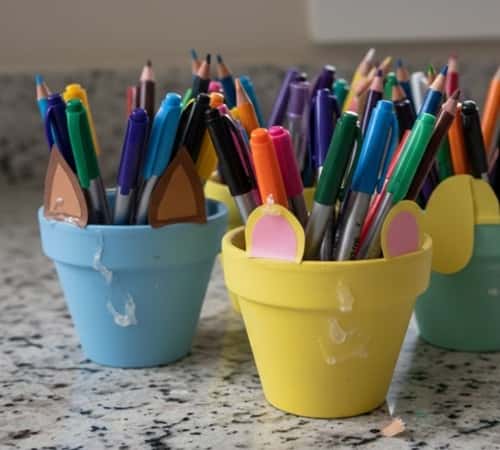
It’s a perfect clay Pot Craft Idea For Kids or anyone wanting a quirky desk accessory.
What you need
- Small clay pots
- Acrylic paints
- Glue
- Foam, paper, or felt for ears
- Googly eyes or small painted eyes
How to make it
- Paint the pot base first and let dry.
- Attach ears or other facial features with glue.
- Paint nose, mouth, and any extra details.
- Use it to store pens, brushes, or small tools.
This is one of those Small Clay Pot Crafts that’s practical but also decorative. You could make multiple animals for a full desktop scene.
12. Clay Pot Hanging Bird Feeder (Garden Friendly)

This is actually an easy Clay Pot Crafts Garden idea tailor made for beginners. Birds love it, and it’s perfect for small outdoor spaces.
What you need
- One medium clay pot
- Strong twine or rope
- Small wooden perch (optional)
- Bird seed
How to make it
- Thread twine through the drainage hole.
- Tie a secure knot under the pot. If you want a perch, attach a small stick with glue below the rim.
- Fill the pot with bird seed.
- Hang from a tree branch, hook, or balcony.
13. Clay Pot Tealight Garden (Twinkle Magic)
This is a charming Clay Pot Crafts DIY idea for evenings in the garden or balcony. It’s simple, yet has a big impact.
What you need
- Several small clay pots
- Tea light candles or LED tealights
- Acrylic paint (optional)
- Twine or ribbon (optional)
Steps
- Paint the pots if you want color. Let dry completely.
- Place tea lights inside each pot.
- You can hang a few with twine for a vertical display or cluster them on a table.
- Mix painted and raw pots for a rustic, cozy look.
This project fits perfectly under the Diy Clay Pots Crafts, Creative Flower Pot Crafts, and Small Terracotta Pots Crafts theme.
It’s also a perfect answer to Flower Pots Crafts that aren’t just planters.
14. Personalized Name Clay Pots (Gift + Decor)

This one is a fun Clay Pot Craft Project for gifts, weddings, or just sprucing up a desk or shelf.
What you need
- Small to medium clay pots
- Acrylic paints or permanent markers
- Clear sealant
- Optional: small decorative beads or ribbons
How to make it
- Clean and dry the pot first.
- Write names or initials on the pot using a marker or thin brush.
- Add simple patterns, dots, or flowers around the name.
- Seal with clear coat if you want longevity.
- Place small plants, flowers, or even candy inside for a thoughtful gift.
This is perfect if you are looking for Small Clay Pot Crafts, Diy Clay Pots Crafts, and Home Decor Ideas With Clay Pots.
It’s easy to customize and adds a personal touch anywhere.
Final Thoughts
Clay pots aren’t just for plants – they’re a canvas for creativity.
These projects show how versatile they are, from Small Terracotta Pot Crafts to larger Terracotta Pots Crafts.
You can mix painting, mosaics, and functional ideas like herb holders or tealight gardens.
And remember, imperfections aren’t failures – they’re character.
Even the simplest pot can become a statement piece with a bit of imagination.
The next time you wonder “What To Do With Clay Pots”, think beyond soil and water – think art, storage, whimsy, and gifts. Every scratch, paint blot, or uneven line adds charm.


