I keep getting asked about clay pot painting ideas that actually feel doable at home.
Not the perfect Pinterest stuff. The real kind. Messy table. Cheap terracotta pots.
I’ll be honest first. I haven’t personally tried any of these myself.
But I’ve researched, watched, observed, failed-in-my-head already.
And I know exactly how I would do it if I sat down today. These ideas are beginner friendly, forgiving, and very homemade looking.
1. Chalkboard Label Clay Pots
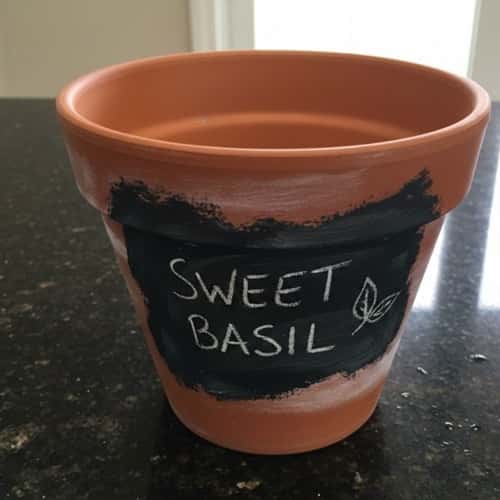
This one is practical and slightly cute. Also very hard to mess up, which I like.
What you need:
- Plain terracotta clay pot (any size works)
- Acrylic chalkboard paint (black or dark green)
- Normal acrylic paint for base (optional)
- Flat brush + small round brush
- Chalk or chalk marker
- Sealer (matte spray or brush-on)
How I would do it:
First thing, wipe the clay pot with a dry cloth. Dust hides everywhere, trust me.
If the pot feels very rough, lightly sand it. Not perfect sanding, just enough.
Now paint the entire pot with a base color if you want. White, beige, sage looks nice.
Let it dry fully. Please wait. Rushing ruins everything.
Next, paint a rectangle or band using chalkboard paint.
One coat looks patchy. That’s okay.
Add a second coat after 30 to 40 minutes.
If edges are uneven, leave them. Handmade charm right there.
Once fully dry, seal the whole pot lightly.
After sealing, write plant names using chalk.
If you mess up, wipe it. That’s the beauty.
This works great for herb pots, indoor plants, balcony gardens.
Also kids can help, though it will get messy fast.
2. Whitewashed Rustic Clay Pots
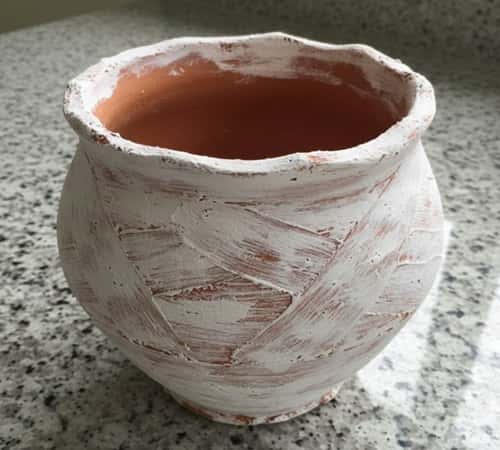
This one is calm. Soft.
Very forgiving too.
It works great if you like neutral home decor and slightly aged looks.
I haven’t made this myself, but I know exactly how this should be done, step by step.
What you need:
- Plain terracotta clay pot
- White acrylic paint
- Water
- Old rag or paper towel
- Flat paint brush
- Clear matte sealer
Step-by-step how to do it:
Step 1: Start by cleaning the clay pot with a dry cloth.
No water. Clay absorbs it fast and then paint behaves weird.
If the pot has flakes or rough bumps, lightly sand it. Not perfectly, just enough.
Step 2: Now mix white acrylic paint with water.
Ratio should be about 1:1.
If it feels too thick, add few more drops of water.
You want a milky consistency, not solid paint.
Step 3: Dip the brush and paint the pot quickly.
Don’t aim for full coverage.
Immediately take a rag and wipe random areas.
Some spots should stay more white, some more terracotta.
This unevenness is the whole point.
Step 4: If it looks too white, wipe again.
If it looks too plain, add another thin layer.
Let it dry for at least one hour. Acrylic dries fast but clay holds moisture, so wait.
Step 5: Once dry, seal it lightly with matte sealer.
One coat is enough.
Gloss will ruin the rustic feel, please don’t use gloss.
Step 6: These pots look beautiful with green plants, dried flowers, or even empty on shelves.
They fit farmhouse, boho, minimal and Indian homes very nicely.
And if brush marks show, good. That means it’s real.
3. Mandala Dot Painted Clay Pots
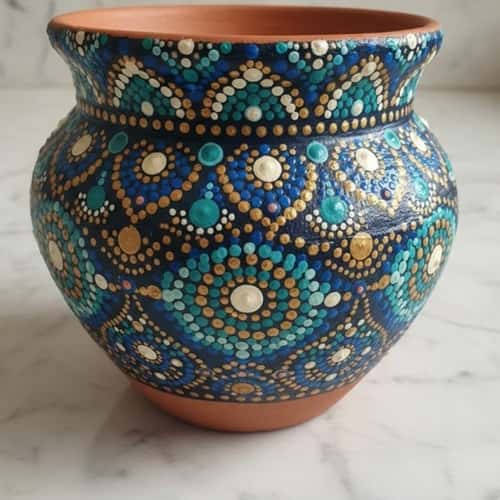
This one looks advanced.
But it’s slow, not hard.
Patience matters more than skill here.
I haven’t personally tried this, but I’ve studied enough mandala work to know how it should be approached.
What you need:
- Terracotta clay pot
- Acrylic paints (white + 2–3 colors)
- Dotting tools or toothpicks
- Pencil
- Clear sealer
Step-by-step instructions:
1. Clean the pot using a dry cloth.
If the surface is very porous, apply one thin coat of white acrylic paint as a base.
Let it dry fully. This step helps dots stay crisp.
2. Lightly mark the center point using a pencil.
Don’t press hard. Clay cracks easily.
Start with the smallest dot in the center using a toothpick.
Dip once, dot once. Reload paint every time.
3. Work in circular patterns.
Small dots first, then bigger ones.
If paint spreads, wait few minutes before continuing.
Rushing ruins dot symmetry, and symmetry matters here.
4. Let the mandala design dry for at least 2 hours.
Seal gently using spray sealer.
Brush sealer can smudge dots if you’re careless.
These pots work well as accent planters or festive decor.
They’re perfect for living rooms, pooja corners, or balcony shelves.
4. Ombre Gradient Clay Pots

This one is smooth and modern.
Also surprisingly easy if done right.
Blending is the key. Not perfection.
What you need:
- Clay pot
- Acrylic paints (same color in 2–3 shades or white + color)
- Sponge or soft flat brush
- Palette or plate
- Sealer
Step-by-step instructions:
Step 1: Start by wiping the pot clean.
Apply a base coat of the lightest shade.
Let it dry completely. This helps blending later.
Step 2: Now take the medium shade.
Paint the lower half of the pot.
Don’t worry about harsh lines yet.
Step 3: Immediately use a damp sponge to blend upward.
Light tapping works better than brushing.
Add darker shade at the bottom if needed.
Blend again while paint is still wet.
Step 4: If gradient looks patchy, wait for it to dry.
Add another soft layer.
Overworking while wet creates streaks, I’ve seen it happen.
Step 5: Once fully dry, seal with matte or satin sealer.
Gloss makes it look plastic, not clay.
These ombre clay pot painting ideas suit indoor plants, work desks, and shelves.
Soft colors work best. Loud ones scream too much sometimes.
5. Warli-Inspired Clay Pot Painting
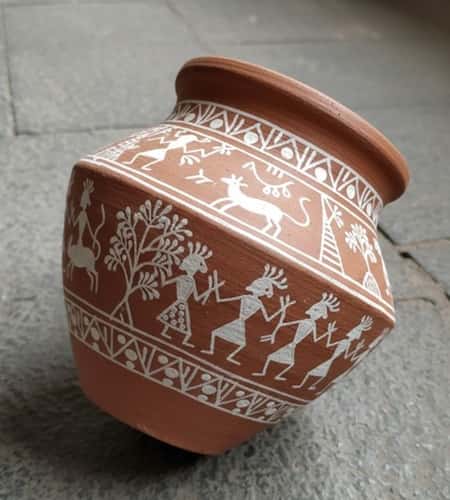
This one feels cultural.
Earthy.
Very rooted.
I haven’t painted this myself, but I understand the flow and symbols well enough to guide it properly.
What you need:
- Terracotta clay pot
- White acrylic paint
- Thin round brush or toothpick
- Pencil
- Matte sealer
Step-by-step instructions:
Step 1: Start by cleaning the pot with a dry cloth.
If the surface is too dark or uneven, apply one thin base coat of diluted brown or beige paint.
Let it dry fully. This helps white designs pop.
Step 2: Lightly sketch Warli figures using pencil.
Stick to simple shapes.
Triangles, circles, lines.
Don’t overcrowd the pot. Warli needs breathing space.
Step 3: Dip the brush lightly into white acrylic paint.
Paint slow.
Step 4: Short strokes work better than long ones.
If a line wobbles, leave it. Warli art is never perfect.
Step 5: Allow the design to dry for at least one hour.
Seal using matte sealer only.
Gloss kills the tribal feel completely.
These clay pot painting ideas look beautiful in balconies, entryways, or ethnic decor corners.
Even a single pot stands out.
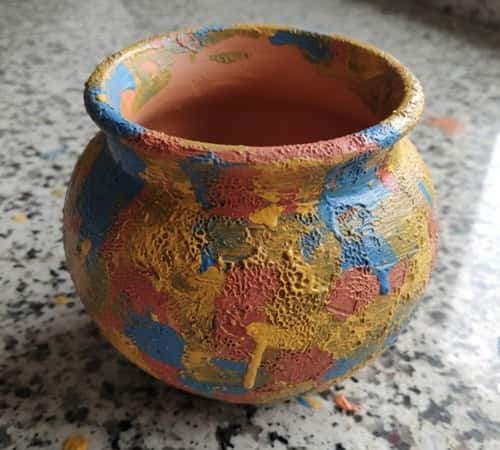
6. Textured Clay Pots Using Baking Soda
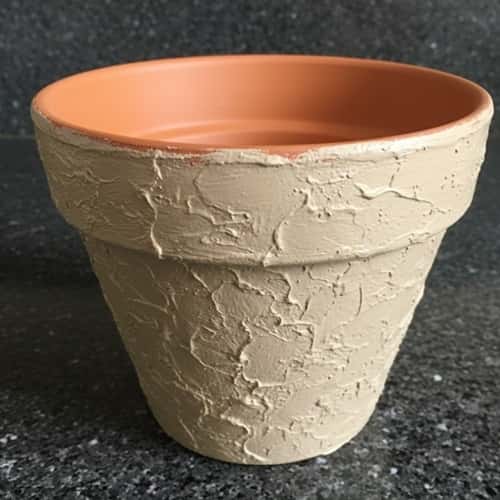
This one is fun.
Also messy.
Texture lovers will enjoy this a lot.
I haven’t tried it personally, but the method is very straightforward.
What you need:
- Clay pot
- Acrylic paint (any color)
- Baking soda
- Palette knife or old spoon
- Sealer
Step-by-step instructions:
Step 1: Clean the clay pot first.
No water washing.
Dust only.
Step 2: Mix acrylic paint with baking soda.
Ratio should be roughly 2 parts paint, 1 part baking soda.
It should feel thick and grainy.
If it’s runny, add more baking soda.
Step 3: Use a spoon or knife to spread the mixture onto the pot.
Don’t smooth it out.
Random texture looks better than controlled patterns.
Step 4: Cover the pot unevenly.
Let some areas thicker, some thinner.
This inconsistency gives depth.
Step 5: Allow it to dry completely.
This can take 2 to 3 hours.
Once dry, seal lightly.
Too much sealer flattens texture.
Step 6: These pots work well for neutral decor, boho shelves, and minimal homes.
They look expensive but are very DIY.
7. Sunflower Clay Pot Painting
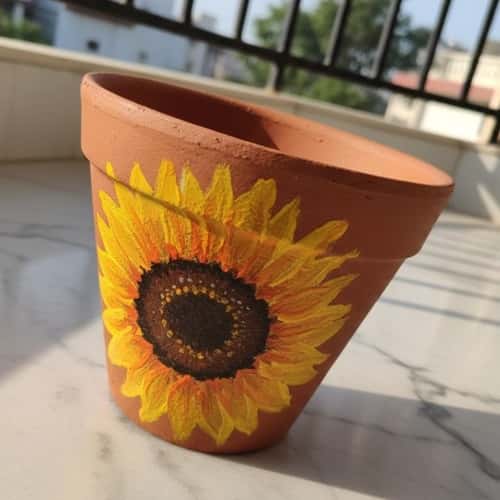
This one feels cheerful.
Bright but not childish.
It works really well for kitchens and balconies.
I haven’t painted this myself, but the steps are simple and beginner safe.
What you need:
- Terracotta clay pot
- Yellow, brown, green acrylic paint
- Medium round brush + thin detail brush
- Pencil
- Sealer
Step-by-step instructions:
Step 1: Clean the pot using a dry cloth.
Apply a base coat of white paint if your pot is very dark.
Let it dry fully.
Step 2: Lightly sketch large sunflower shapes with a pencil.
Keep them big. Small flowers get messy fast.
Don’t aim for symmetry. Real flowers aren’t perfect.
Step 3: Paint the petals using yellow acrylic paint.
Two thin coats are better than one thick coat.
Let each coat dry before adding another.
Step 4: Paint the center using brown.
Use small tapping motions for texture.
Add a few uneven dots. Perfect circles look fake.
Step 5: Paint leaves and stems only if space allows.
Too much green makes it busy.
Seal once fully dry.
These clay pot painting ideas work great with real plants inside.
The sunflower theme adds warmth instantly.
8. Minimal Line Art Face Clay Pots
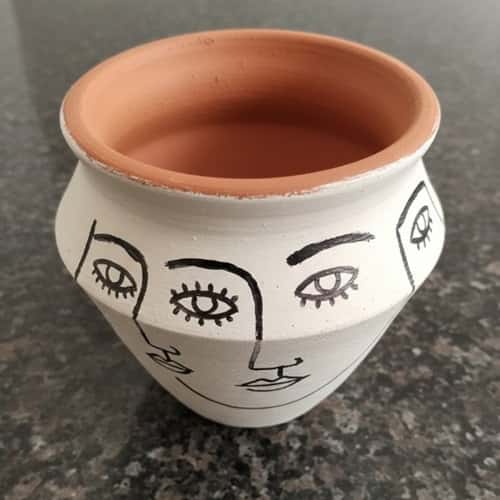
This one is modern.
Quiet.
Very Instagram-looking but still handmade.
I haven’t made it myself, but line art rules are easy to follow.
What you need:
- Clay pot
- White or beige base paint
- Black acrylic paint or paint pen
- Thin brush
- Sealer
Step-by-step instructions:
Step 1: Clean the pot properly.
Apply one thin base coat in white or beige.
Let it dry completely.
Step 2: Lightly sketch a face using pencil.
One continuous line works best.
Eyes, nose, lips. Keep it simple.
Step 3: Paint over the pencil lines using black paint.
Use slow strokes.
If a line breaks, don’t panic. Broken lines still look artistic.
Step 4: Let the design dry for at least an hour.
Erase visible pencil marks gently.
Seal lightly using matte sealer.
These pots look beautiful on shelves, desks, and bedside tables.
They pair well with snake plants or dried grass.
9. Moroccan Tile Pattern Clay Pots
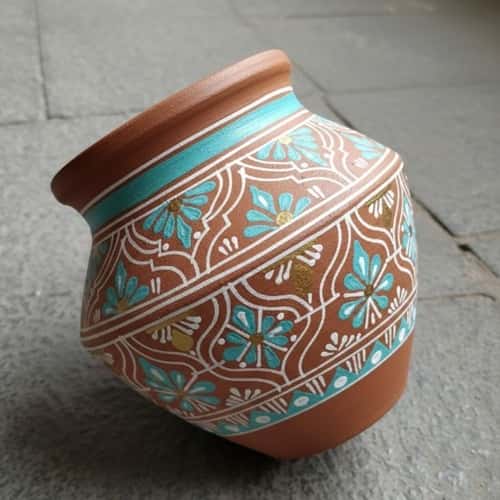
This one feels detailed.
Very decorative.
But still manageable if you go slow.
I haven’t tried it myself, but pattern-based painting is more about repetition than talent.
What you need:
- Terracotta clay pot
- Acrylic paints (blue, white, teal, or earthy tones)
- Flat brush + thin detail brush
- Pencil
- Sealer
Step-by-step instructions:
Step 1: Clean the clay pot using a dry cloth.
Apply a base coat in white or light blue.
Let it dry fully.
Step 2: Lightly draw geometric shapes using pencil.
Simple diamonds, arches, or floral tiles work best.
Avoid very tiny patterns. They get messy.
Step 3: Paint one section at a time.
Let each color dry before adding another.
If colors bleed, stop and wait. Patience fixes most problems.
Step 4: Repeat the pattern around the pot.
Minor mismatches are okay. Handmade work never aligns perfectly.
Once fully dry, seal gently.
Use matte or satin finish only.
These clay pot painting ideas look great for patios, balconies, or festive decor.
They pair well with bright green plants.
10. Sponge Painted Abstract Clay Pots
This one is easy.
Very beginner friendly.
Perfect if painting scares you a bit.
I haven’t done it myself, but sponge techniques are forgiving.
What you need:
- Clay pot
- Acrylic paints (2 to 3 colors)
- Kitchen sponge
- Plate or palette
- Sealer
Step-by-step instructions:
Step 1: Clean the pot first.
Apply a light base coat if you want softer colors.
Let it dry.
Step 2: Dip sponge lightly into paint.
Dab excess paint off on a plate.
Now gently tap the sponge onto the pot.
Step 3: Don’t drag the sponge.
Dabbing gives texture.
Layer colors slowly.
Let one color dry before adding another.
Step 4: Rotate the pot as you work.
Stop before it gets too busy.
Overdoing ruins the abstract feel.
Step 5: Seal once dry.
Matte finish keeps it natural.
These pots work great for kids rooms, study corners, or casual decor spaces.
No two will ever look same.
11. Face Planter Clay Pot Painting
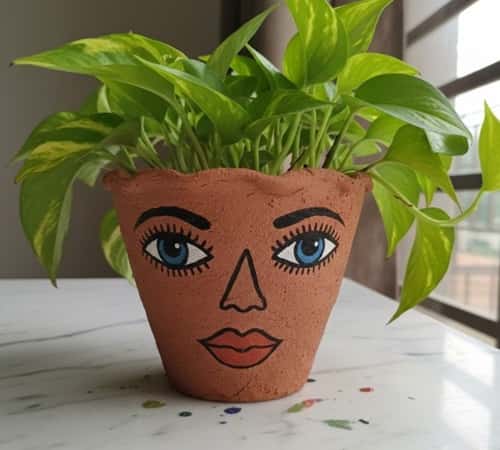
This one is playful.
A little quirky.
And surprisingly popular right now.
I haven’t painted this myself, but the steps are very clear if you break it down.
What you need:
- Medium or large terracotta clay pot
- Acrylic paints (white, skin tone, black, pink)
- Pencil
- Medium round brush + thin brush
- Sealer
Step-by-step instructions:
Step 1: Clean the clay pot with a dry cloth.
Apply a base coat in white or light skin tone.
Let it dry fully. This makes facial features easier to paint.
Step 2: Turn the pot upside down.
Yes, upside down.
This helps you visualize the face better.
Step 3: Lightly sketch eyes, nose, and lips using pencil.
Keep features simple.
Big eyes look better than realistic ones.
Step 4: Paint the eyes first.
Let them dry.
Then paint nose and lips.
Use minimal details. Too much shading makes it creepy.
Step 5: Once dry, seal lightly.
When you place a plant inside, the leaves become the hair.
That’s the magic part.
These clay pot painting ideas are perfect for shelves, kids rooms, or gifting.
And if the face looks weird, plants fix everything.
12. Boho Arch Pattern Clay Pots
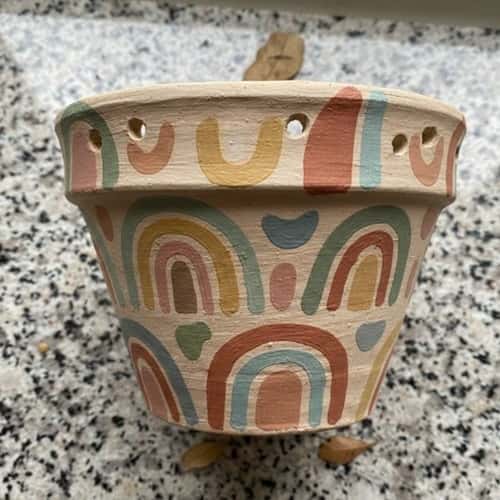
This one is calm.
Neutral.
Very aesthetic without trying too hard.
I haven’t made it personally, but boho patterns are easy once you simplify them.
What you need:
- Terracotta clay pot
- Acrylic paints (beige, brown, rust, white)
- Pencil
- Flat brush + thin brush
- Sealer
Step-by-step instructions:
Step 1: Clean the pot thoroughly.
Apply a base coat in beige or off-white.
Let it dry completely.
Step 2: Using pencil, draw repeated arch shapes around the pot.
Keep spacing uneven.
Perfect symmetry kills the boho feel.
Step 3: Paint arches one color at a time.
Let each color dry before moving to next.
If paint bleeds slightly, don’t fix it. It adds softness.
Step 4: Outline arches lightly if needed.
Not bold.
Subtle lines work best.
Step 5: Once dry, seal with matte sealer.
Gloss will ruin the earthy look.
These clay pot painting ideas fit modern Indian homes, boho decor, and minimal shelves.
They look especially good with dried plants.
13. Night Sky Galaxy Clay Pot Painting
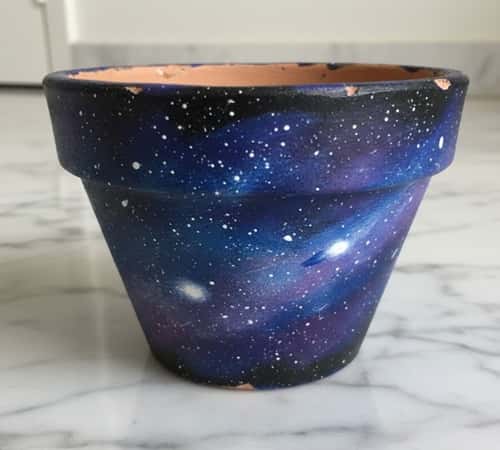
This one is dramatic.
Moody.
And honestly looks way harder than it actually is.
I haven’t painted this myself, but galaxy painting follows a very repeatable logic if you don’t overthink it.
What you need:
- Terracotta clay pot
- Acrylic paints (black, navy blue, purple, white)
- Sponge
- Old toothbrush
- Flat brush
- Sealer
Step-by-step instructions:
Step 1: Start by cleaning the pot with a dry cloth.
Apply one solid base coat of black acrylic paint.
Let it dry fully. This step matters a lot, don’t rush it.
Step 2: Take a sponge and dab navy blue randomly over the black base.
Don’t cover everything.
Leave black patches visible. Space needs darkness.
Step 3: Now dab purple lightly in few areas.
Very lightly.
Too much purple ruins the galaxy vibe, trust me.
Step 4: Using a flat brush, softly blend edges where colors meet.
No harsh lines.
Soft tapping motions work best.
Step 5: Once dry, dip toothbrush in white paint.
Flick paint gently over the pot to create stars.
Step 6: Cover surrounding area or your floor will hate you.
If stars look too many, you went bit extra but it’s fine.
Let everything dry completely.
Seal using satin or matte sealer.
Gloss makes it look fake sometimes.
These clay pot painting ideas look amazing in low light corners, balconies, or bedrooms.
They feel artistic without being loud.
Final Thoughts
Clay pots don’t need talent. They need time and a bit of courage.
Terracotta is forgiving, which most people don’t realise.
Mistakes sink in, blend, or simply become texture.
That’s why these clay pot painting ideas work so well for regular homes.
One important thing many skip is sealing.
Clay breathes, paint doesn’t. Without a sealer, colors fade fast and water stains appear weirdly.
Also, acrylic paint behaves differently on every pot because clay quality changes.
So if one pot looks different from the next, that’s normal, not failure.
Treat these pots like practice, not projects.
The more imperfect they look, the more real they feel.


