Whenever I play around with a new Cornstarch Clay Planter idea, I’m always surprised by how forgiving this stuff is.
It bends, shapes, dries, and somehow still looks like something you’d proudly tuck into your shelf or garden corner.
And if your heart lies in garden crafts, consider this your effortless passport to transforming humble plants into personal statements, all while forgoing expensive outlays.
You can leave it elegantly minimal, make it a vibrant statement, or transform it into a whimsical adventure for little hands.
Whether you’re chasing earthy clay decor, want a soothing clay craft session, or just enjoy experimenting with cornstarch clay crafts, each idea here is genuinely useful – not the kind that sits in a drawer forever.
1. Mini Pinch-Pot Herb Planter
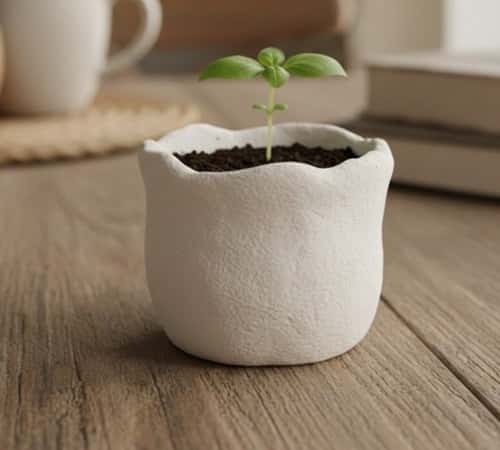
This one is the easiest way to dip your hands into cornstarch clay.
Just roll a ball, press your thumb into the center, and gently pinch the sides upward until you get a small bowl shape.
Make sure the base is flat so it doesn’t wobble. Let it dry completely, then seal it with any waterproof wood glue mixture or a clay sealant so real soil won’t damage it.
These tiny pinch pots are perfect for mint, basil, or even small succulents. And honestly, they look adorable tucked beside your main planters. Simple, earthy, and no fancy tools needed.
2. Leaf-Imprint Cornstarch Clay Planter

I love this because nature literally does half the work. Grab any leaf with deep veins – guava, rose, or even a big money-plant leaf – and press it into rolled clay.
Wrap the clay around a small bowl or cup to shape it into a planter, then remove the leaf. You’ll get a beautiful natural imprint that looks fancy but takes only minutes.
Dry it, sand the edges lightly, and paint it moss green or keep it raw for a rustic look. This one gives your garden shelf a quiet, botanical vibe without you needing sculpting skills.
3. Rustic Hanging Clay Cup Planter
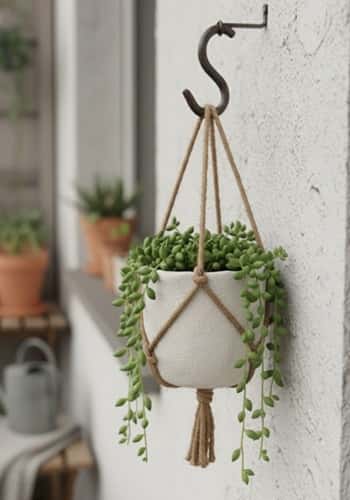
If you’ve ever wanted a mini hanging garden but didn’t want to buy overpriced macramé pieces, this is your crafty shortcut. Shape clay into a cup with slightly thick walls.
Poke two holes near the rim before drying. Once hardened, thread jute rope through both holes and knot it securely.
Seal the clay, add a trailing plant like money plant or string of turtles, and let it hang from any hook.
It’s light, cute, and perfect for small spaces. Plus, the rustic vibe works indoors and outdoors.
4. Stamped Pattern Cylinder Planter
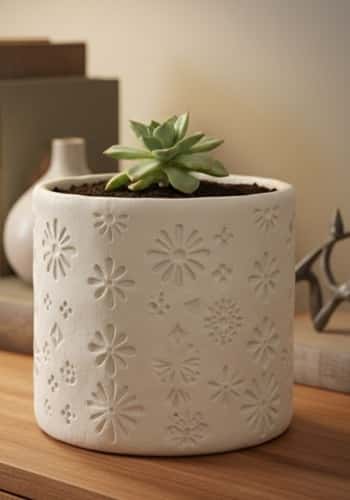
This is basically clay meets creativity. Roll your clay into a rectangle, wrap it around a cylindrical jar, and press anything textured onto the surface – buttons, old jewelry, a woven basket, even the back of a spoon.
When you remove the texture, you get these charming patterns that look handcrafted in the best way. Dry it, remove the jar, and seal it.
Use it as a planter cover for small nursery pots so you don’t worry about waterproofing. It instantly lifts any dull corner.
5. Speckled Modern Clay Bowl Planter

If you like minimalist looking decor, try this.
Shape the clay into a smooth bowl, then flick tiny dots of black acrylic paint after it dries to get that trendy speckled finish.
Seal it, add pebbles at the bottom for drainage, and plant a tiny succulent or jade plant.
This works beautifully on office desks or bedside tables because it looks modern without trying too hard. And the best part? You can make three in under an hour and create a matching set.
6. Pebble-Texture Garden Tray Planter
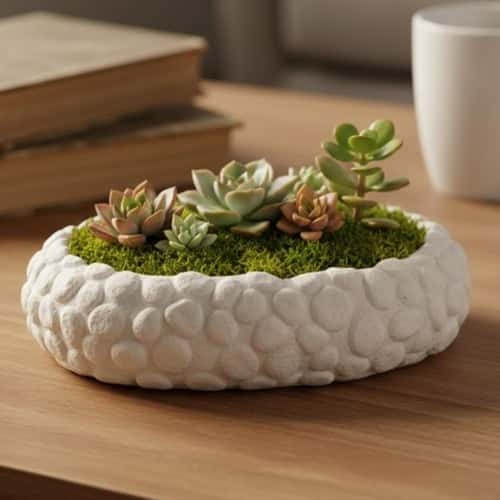
If you want something that looks straight out of a boutique plant shop, try a shallow tray planter.
Roll out the clay into a flat oval and gently raise the edges. Now grab a handful of small pebbles and press them randomly into the surface to leave textured impressions.
Remove the pebbles before drying so the surface stays smooth but patterned.
Once dry, paint it stone-grey, seal it, and add soil with low-water plants like moss or mini succulents.
It becomes this calming “micro-garden” you can keep anywhere – even on a coffee table.
7. Garden Marker Planter Set
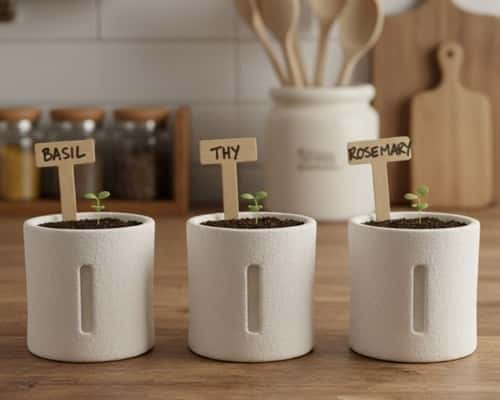
This is functional and surprisingly fun. Shape small cylindrical planters and, while the clay is still soft, press a popsicle stick or craft knife lightly into the front to create a little slot.
Once dry, you can slide in a handmade plant marker.
Paint each planter in different earthy shades or keep them raw for a farmhouse vibe.
Slip in tiny herb seedlings and label them – mint, tulsi, coriander. It’s a simple clay craft that instantly organizes your kitchen garden and doubles as cute clay decor.
8. Swirl-Pattern Clay Planter (Kids-Friendly)
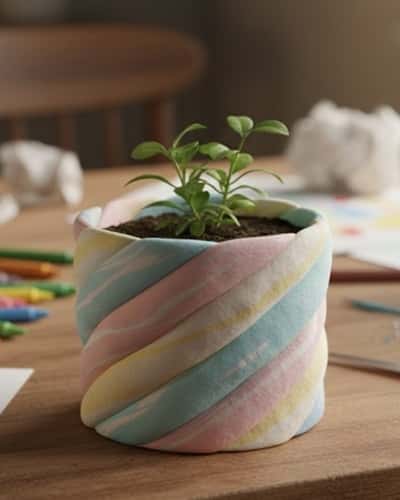
If you’re doing this as a kids craft, this idea is gold. Divide your clay into two parts – one plain and one tinted with food coloring.
Roll each into ropes, twist them together, and coil them into a cup shape.
The colors create a soft marble-like swirl when smoothed. Kids love watching the colors blend, and adults love that it doesn’t create a mess
Let it dry, seal it, and use it for tiny plants or faux greenery. The swirls look store-bought even though it takes barely ten minutes.
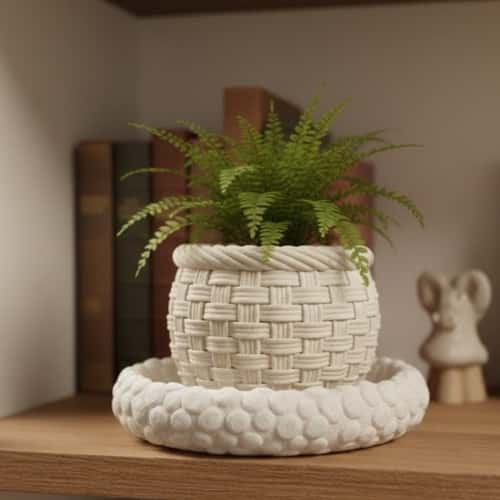
9. Textured Basket-Weave Clay Planter

This one looks much harder than it actually is. Roll out thin strips of clay and weave them over a cylindrical object – just like a basket.
Press gently so they stick to each other. After drying, remove the base object and seal the planter.
You get this beautiful woven texture that looks elegant in any indoor garden corner.
It holds small faux plants or soil-based ones if sealed properly. And trust me, it becomes a centerpiece without you spending a rupee extra.
10. Clay Pebble Drainage Dish
Every planter needs a drainage buddy. Shape a small shallow dish – just wide enough to hold a planter.
Press real pebbles, beads, or even lentils into the clay to leave cute little texture dots.
Remove them before drying if you want impressions or leave them embedded if you want a bumpy look.
Once done, paint it terracotta or leave it chalky white. Pop your planter on top and it catches excess water beautifully while adding charm to your plant setup.
11. Tiny Animal-Themed Planter (Simple & Cute)

If you’ve ever wanted a planter that makes people smile, this one does the job instantly.
Roll the clay into a cup shape, smooth the sides, and then add tiny features – two small ears, a little snout, or round cheeks.
Keep it super simple so the design stays clean and easy to replicate. Once dry, paint only the details: eyes, nose, maybe a blush of pink.
These little planters are perfect for air plants or mini succulents, and they fit beautifully on work desks. You get all the charm without any complicated sculpting.
12. Clay Slab Wall Pocket Planter

This looks like a décor piece you’d buy from a craft fair. Roll your clay into a flat rectangle, fold the bottom half upward, and press the sides together to form a pocket – almost like a little envelope.
Smooth the edges and use a straw to make a hole at the top for hanging. Dry it flat so it keeps its shape.
Once ready, paint it in earthy tones and pop in faux vines or dried flowers. It’s lightweight, easy to mount, and perfect when you want plant décor without taking up shelf space.
Final Thoughts
Cornstarch clay has this magical way of turning simple ideas into pieces that actually feel personal and intentional. The best part? You don’t need fancy tools or hours of free time – just your hands, some clay, and a little patience.
Try mixing textures, playing with colors, or sealing them differently to see what style matches your space.
And don’t forget to reuse objects you already have at home as molds or texture tools.
When you explore freely, these small projects become your go-to creative breaks – quick, calming, and surprisingly useful across your garden and home.


