Sometimes, DIY means turning the ordinary into something extraordinary, like a decor piece that also tucks away savings.
Imagine a dinosaur hand puppet, not just as a toy, but as a quirky piggy bank adding charm to my living room.
Crafting unique DIY items can be surprisingly simple, sparking creativity and even padding your wallet a bit.
Below, you’ll find easy-to-follow step by step instructions along with pics for creating this charming addition to any space, proving that saving money can also enhance your home’s appeal.
Without wasting any time let’s dive right into the process by taking a quick look at the requirements first.
Step 1: Quick look at the list of items used
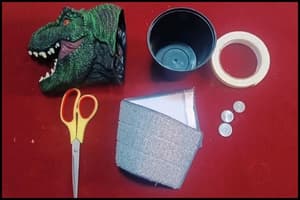
- Dino Hand Puppet: I’ve used an old dinosaur hand puppet toy. It seems kids have had enough of fun with it and had kept it away in the storage box (So I used it).
- A plastic Container: I’ve used a plastic container as the base or the collection box. The container I used was received from a nearby restaurant to deliver my online order for dinner.
- A piece of cloth: I’ve used the piece of cloth to mask the container from the outside to enhance its appearance or to add a touch of decor.
- Double sided Tape: To fix the piece of cloth to the container I will be using a double sided tape.
- Scissor: It was required to cut the tape and draw a hole gap for coins.
Step 2: Measure and stick the tape
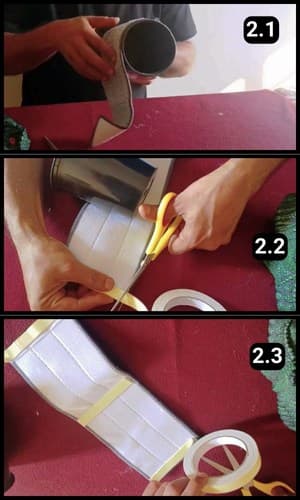
First up, I checked if the cloth was long enough to cover the container, and it was just right.
Then, I lined the back of the cloth with three strips of double-sided tape.
I made sure to place one strip along each edge and another down the center, just like you see in image 2.3.
This ensured the cloth would stay put, wrapping the container snugly and just how I needed it to be.
Step 3: Wrapping the container
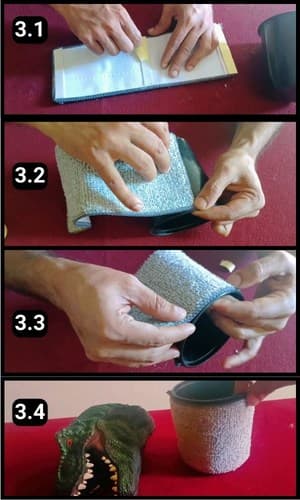
Next, I carefully lined the cloth up with the container, it’s a step that needs a gentle touch to get everything just right.
And voila, the cloth hugged the container perfectly in place as seen in image 3.4 above.
Step 4: Fixing the Dino to the container
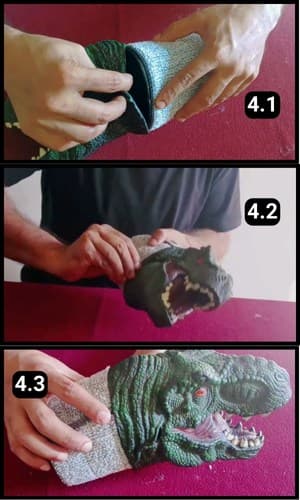
Now, for the fun part i.e., attaching the dinosaur puppet toy to the container.
I’ve slightly stretched its opening end, that is the backside part and pulled it over the container’s mouth.
With a bit of care, I ensured it wrapped around the container snugly, looking great from every angle as seen in image 4.3 above.
Step 5: Drawing a hole for coins
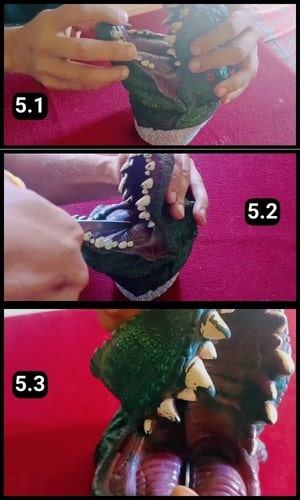
In step 5, I decided it was time to make a small opening in its mouth for the coins.
Using a kitchen knife, I carefully made a tiny slit, cautious not to cut too deeply and risk damaging the toy.
To make sure the gap was just the right size for coins, I tested it by slipping one through, and it fit perfectly.
At this point, the dinosaur piggy bank was almost ready. Yet, I couldn’t resist adding a few more coins to my DIY creation, which I tackled in the following step.
Step 6: Putting coins to the piggy bank
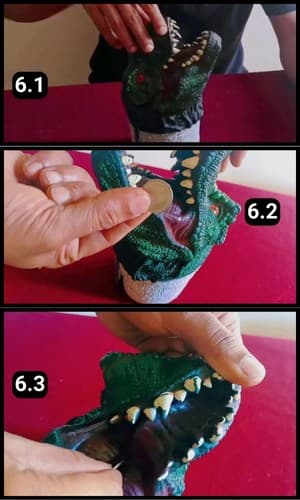
Slipping coins into it turned out to be quite enjoyable, and I filled it up nicely on its very first day.
Since it doubles as a delightful piece of decor, I was keen on finding the perfect spot for it in my living room, more on that in the next step.
Step 7: Finding The Placement Spot
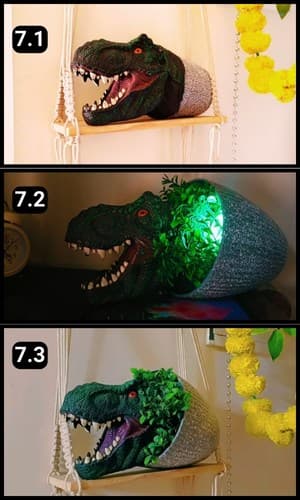
I placed it in my living room over a hanging decor and it looked amazing and an eye catching piece of decor.
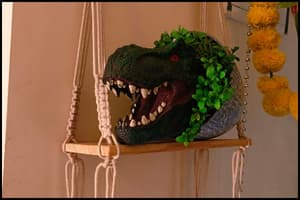
Eager to boost its charm further, I nestled it in an empty planter and draped some faux greenery around its neck.
It looked just like a real dinosaur lurking in a lush jungle, ready to pounce on its prey.
Here’s how the final completed project looks like.
For Video Handholding of this project, you can watch the below video:
Final Thoughts
You’ve just witnessed the magic of turning everyday objects and playful toys into a unique piggy bank that also serves as home decor.
This project shows you can create your own DIY piggy banks that not only save money but add a touch of personality to your space.
For a closer look at how I brought this idea to life, I’ve included a video walkthrough above.
This tutorial takes you through each step, ensuring you can easily replicate this fun and functional decor piece in your own home.
It’s all about bringing creativity into the everyday, transforming the mundane into something special and practical. So, why not give it a try and see what unique creations you can come up with?
Frequently Asked Questions
What other materials can I use if I don’t have a dinosaur hand puppet?
If you don’t have a dinosaur hand puppet, feel free to get creative with other toys or materials you have at home. Any plush toy, fabric-based figurines, or even thick socks can be modified into a piggy bank cover. I have also made a piggy bank out of monkey teddy here, you can take inspiration. Just ensure whatever you choose can be securely attached to the container and has room for a slit to insert coins.
Can I use a different type of container if I don’t have a plastic one? What are some alternatives?
Absolutely! Any sturdy container will do i.e. Metal tins, glass jars, wooden boxes, or even thick cardboard boxes can be great alternatives. Just ensure the container you choose is durable enough to hold the weight of the coins and can be securely closed or covered by the decorative exterior.
If the double-sided tape loses its adhesiveness, what are some long-lasting alternatives for attaching the cloth?
For a more durable solution, you can use fabric glue, hot glue, or even velcro strips for a non-permanent but secure attachment. These alternatives provide a stronger bond, ensuring the cloth stays in place over time, even with regular handling.
Can this DIY piggy bank be opened to retrieve coins, or do I need to destroy it to access the savings?
This piggy bank can be opened to retrieve the coins, just detach the head from the glass to access the coins. Design your DIY piggy bank with retrieval in mind by choosing a container with a removable lid or using a flexible material like rubber or a soft plush toy that can be cut and resewn. For containers without a removable top, consider cutting a flap that can be lifted or designing the bottom to be detachable, possibly with velcro or magnets, to access your savings without destruction.
How long did it take to complete this Aesthetic Dinosaur Piggy Bank Project?
It took just 30 minutes to complete this project. That being said it may take longer or less time depending on the crafting skills you have.


