As I strolled through my room, a forgotten monkey teddy caught my eye, tucked away in a corner, almost invisible.
It sparked an idea in me, why not breathe new life into this adorable plush? As someone who loves a good DIY project, the thought of transforming it into something both charming and practical excited me.
So, I decided to turn it into a piggy bank that wouldn’t just save coins but also serve as a cute decor item for my living room.
The journey from a neglected toy to a stunning decor piece was thrilling, and I’m thrilled to share how I did it.
Let’s take a quick look at the list of things I used to make this practical plush toy cum piggy bank.
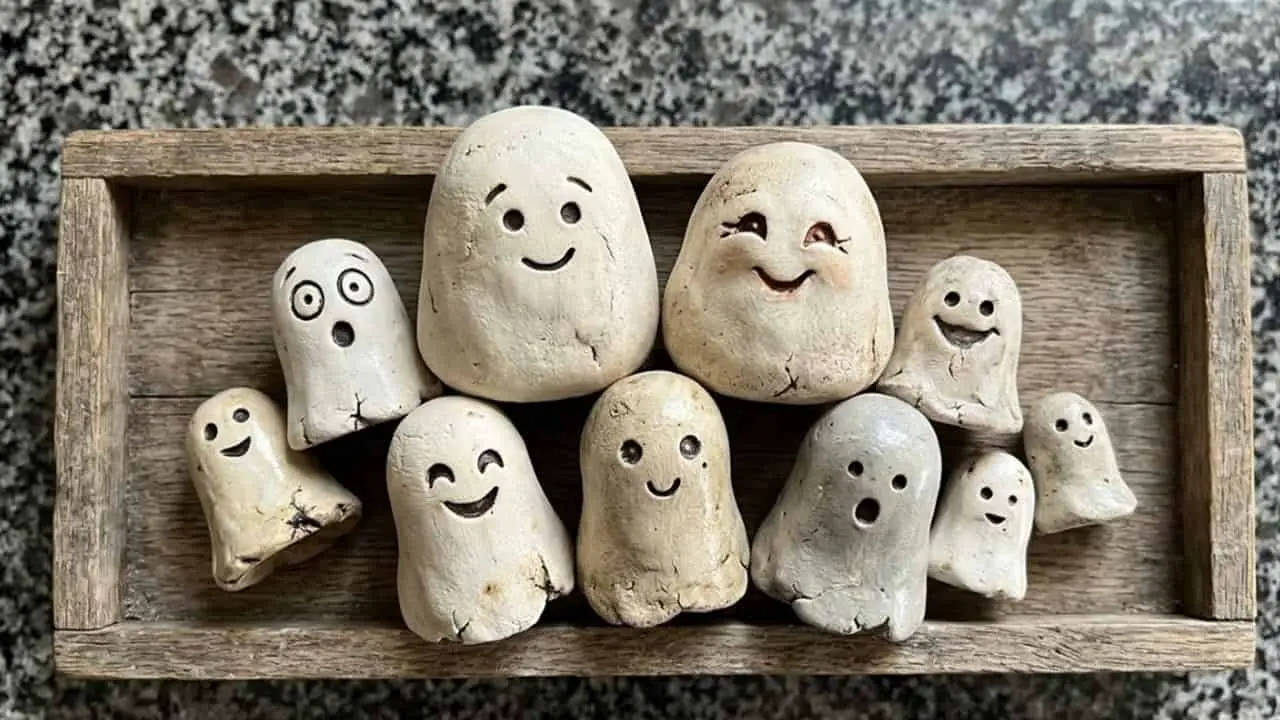
Step 1: Quick Look At things I’ve Used
- Monkey Teddy: If you look at the image above I’ve used the monkey teddy which was looking lifeless. It must have been put away by the kids (I grabbed it for my DIY project).
- Plastic Glass: I’ve used a plastic glass that perfectly fits into the monkey’s body. It will be used to collect the coins or cash.
- Hair band: A black color hair band will be used to fix the monkey’s head to the glass as an extender.
- Needle and sewing thread: A needle and thread will be used to sew the hairband to the monkey’s head.
- Scissor: I’ve used a scissor to cut the required elements.
With all the required items ready let’s proceed with the steps below.
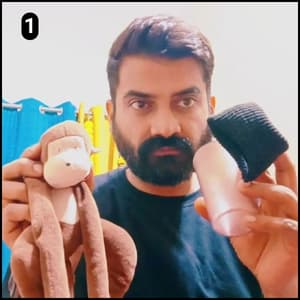
Step 2: Cutting off the toy’s head
Staring at my monkey teddy, I knew the first step was a bit daunting i.e. taking its head off to make room for a plastic glass inside.
So, with a pair of scissors in hand, I carefully snipped the stitches around the neck.
Bit by bit, the head came off, then, I gently pulled out a bit of cotton from the body.
It felt odd, but creating space for the glass was essential. This prep work was crucial for what I had planned next.
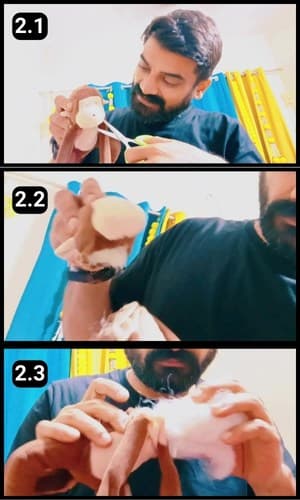
Step 3: Inserting the glass
With the cotton out, there was just enough room to nestle the plastic glass into the monkey’s body.
I carefully positioned the glass as shown in image 3.2, making sure it fit snugly.
The next step felt like bringing my project to life i.e. attaching the head back on, but this time, securing it to the top of the glass (it all came together beautifully).
Step 4: Fixing the head

Fitting the head back on wasn’t as straightforward as I’d hoped, so I had to think on my feet.
A stretchable hair band caught my eye, perfect for acting as an extender.
I grabbed a needle and thread to attach it securely to the head.
This moment was all about flexing my creative muscles, refusing to let a small hiccup derail my vision.
That’s when the idea to use a hairband as an extender really saved the day.
Step 5: Sew the head bottom
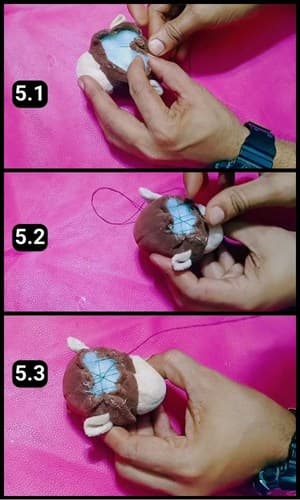
Next, I focused on the bottom of the monkey’s head, stitching it up to make sure the fluffy cotton stayed in place and didn’t end up inside the plastic glass.
I added plenty of stitches, making certain nothing would slip through.
This step ensured my monkey would keep its charming, plush appearance without any mishaps.
Step 6: Sewing the hair band to the head
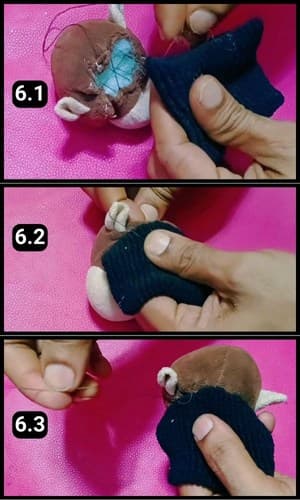
Now, it was time to attach the hairband to the monkey’s head.
I made sure to sew them together carefully, ensuring they were securely fastened.
This was a crucial step to keep everything in place, making my monkey not just cute, but also sturdy.
Step 7: Creating the arm gap
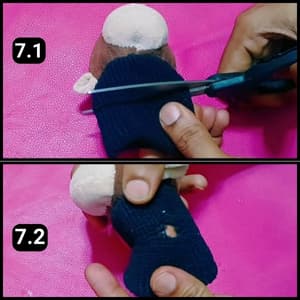
I snipped the sides of the hair band, creating openings just the right size for the monkey’s arms to slide through.
A simple, swift cut with the scissors was all it took to make it work perfectly, this little adjustment added so much charm to the overall look.
Step 8: Fixing the hair band to the body
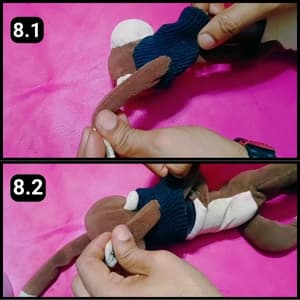
I then secured the hair band to the top of the glass, stretching it over to embrace the monkey’s body snugly.
Following that, I gently pulled the monkey’s arms through the openings I had created earlier.
This not only added to the aesthetic but also ensured the monkey looked as if it was hugging the glass, ready for its new role.
Step 9: Adding the vision
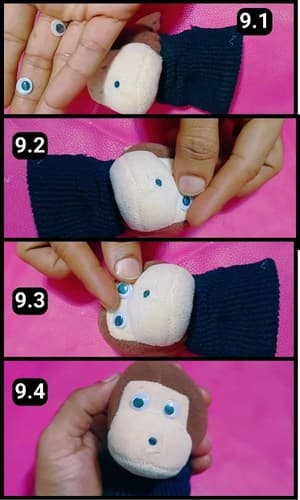
The monkey’s face looked a bit gloomy, missing its eyes, so I decided to give it a spark of life.
I found some googly eyes (left from my previous projects) and glued them on where they belonged, instantly brightening up its expression (I used a hot glue gun for a secure fit).
If you prefer, drawing the eyes with a marker or cutting out shapes from paper to stick on are fun alternatives.
This small change made all the difference, bringing a cheerful vibe to the room.
Step 10: The Piggy Bank touch
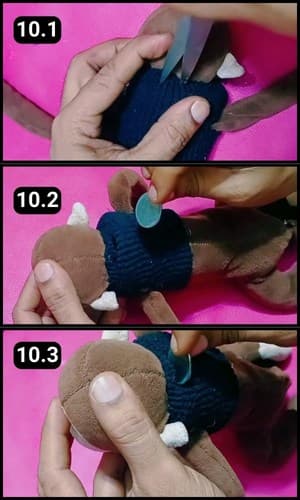
I modified the hair band to make a slot for coins, picking the back of the monkey’s neck as the perfect spot to drop them in.
After cutting, I tested it by slipping in a coin, just to be sure it worked smoothly.
And just like that, my DIY Aesthetic piggy bank was complete.
It was a simple touch, but it transformed my monkey into a functional and adorable saving spot.
Step 11: The Perfect Placement
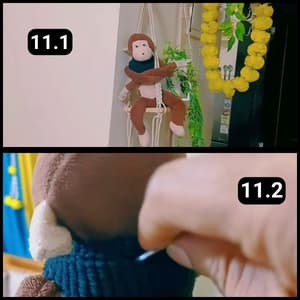
The monkey’s long arms made it a breeze to hang alongside my other decor.
After finding the perfect spot in my living room, I dropped in another coin, marveling at how it seamlessly blended in.
It wasn’t just a piggy bank, it had become a striking piece of decor with a secret function.
Plus, its versatility means I can move it anywhere in the living room, adding a touch of charm wherever it goes.
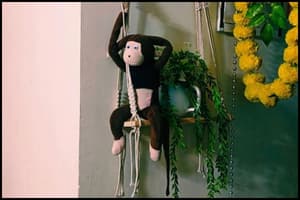
It catches the eye of everyone who visits my home, becoming an instant conversation starter.
For a video walkthrough of this project, follow the below video:
Final Thoughts
So, there you have it, a simple yet creative way to give old toys a new lease on life, turning them into charming decor.
Transforming an overlooked monkey teddy into a unique, functional piggy bank not only gave it a new purpose but also added a whimsical touch to my living room.
This monkey soft toy which was once thrown and discarded now serves not just as a decor item but also as a secret piggy bank.
So, before discarding any soft toys, think twice as it can potentially be used elsewhere.
Frequently Asked Questions
How is the plastic glass secured inside the monkey’s body?
After making room by removing some cotton, nestle the plastic glass snugly into the monkey’s body. Ensure it’s positioned well so it stays in place.
What if I’m not skilled at DIY projects? Can I still attempt this Aesthetic Piggy Bank?
Absolutely! This project is designed to be accessible for DIYers of all skill levels. The steps are straightforward, and the materials are simple to work with. Plus, the end result is rewarding, making it a great project for beginners and seasoned crafters alike.
What’s the best way to clean or maintain my DIY piggy bank?
Since it’s a combination of fabric and plastic, spot cleaning the fabric parts with a damp cloth is best. Avoid submerging it in water to prevent damaging the internal components like the plastic glass. For the plastic parts, a mild soap and water solution can be used for cleaning. Always dry thoroughly after cleaning.
Can the DIY Aesthetic Piggy Bank actually save a substantial amount of coins?
Yes, depending on the size of the plastic glass you use and the size of the coins, your DIY piggy bank can hold a decent amount of savings. It’s not only a decorative piece but also a functional way to collect loose change.
How can I ensure the piggy bank is safe for children?
To make the piggy bank child-friendly, ensure all small parts, like the googly eyes, are securely attached to prevent choking hazards. Also, smooth out any sharp edges created during the DIY process, and regularly check the piggy bank for wear and tear.