Crafting a DIY Bird Feeder is a fun and creative way to bring birds into your space.
Apart from a reliable food source for our feathered friends, it will also add a touch of charm and personality to any outdoor space.
Plus, it’s easy on the wallet and can be tailored to fit the tastes of our local bird population.
You don’t need to be a craft wizard, with some basic items and a dash of creativity, anyone can do it.
I’ve put together one myself and am excited to walk you through the process.
Ready to create a cozy spot for all sorts of birds to flock and feast? Let’s get started.
Step 1: Gather your supplies

- Popsicle Sticks: I have used popsicles also called icecream sticks, a few bamboo, and cubicle crafting sticks to make the DIY Bird feeder.
- Pencil and Geometrical Ruler: To measure and mark the required sizes for the feeder you will need a ruler and a pencil.
- Glue: I’ve used wooden glue to fix the wooden sticks firmly.
- Wooden cutter: I have used a handy wooden saw to cut the sticks as per their required sizes.
- Rope: I have used a decor rope strong enough to tie and hang the bird feeder.
Step 2: Sticking the popsicle sticks
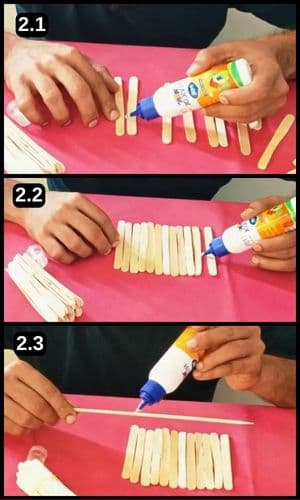
To kick things off, I glued popsicle sticks together to form the feeder’s base.
Simple, right? Then, it was time to add bamboo sticks on top, securing them with more glue to the popsicle foundation.
It’s like building a tiny stage for our bird friends, using nothing but these everyday items and a bit of patience.
Step 3: Add strength to the base
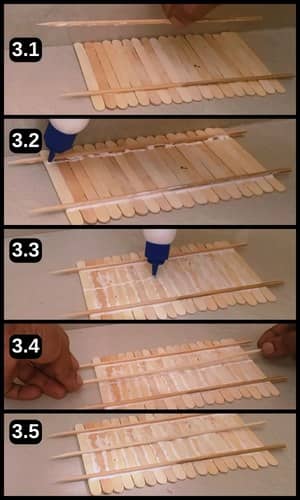
To give the bird feeder a sturdy base, I attached three long bamboo sticks.
But here’s the fun part: you can choose to use two, three, four, or even five sticks, depending on what feels right to you.
I made sure to use plenty of glue on those sticks to ensure the base was solid and durable.
It’s all about making it strong enough to welcome our bird guests without any wobbles.
Step 4: Dry it under sunlight

Wood glue works its magic quicker in the sunshine, and luckily, my window balconies get plenty of it.
I left the bird feeder base out there for about an hour, though it turns out 30 minutes was all it really needed in that sunny spot.
No worries, it was stuck firmly just as required.
Step 5: Measure and cut cubicle sticks
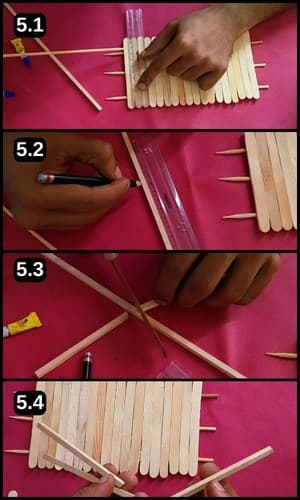
Next up, I sized up the base to figure out how to cut the sticks for the feeding area above the base.
A pencil and ruler were my go-to tools for getting the measurements and markings just right.
Then, with a wood cutter in hand, I trimmed off the excess.
With that, I had the three sides prepped. I’m going for a similar size for the roof of the feeder to keep everything looking neat and coordinated.
Step 6: Base and roof

If you look at the image no. 6.1 above, you’ll see that I’ve attached the sticks to the base, ensuring they’re perfectly aligned (do the same in your case too).
Now, it’s time to find sticks of the same size for the roof.
Just like shown in image 6.2, I placed three sticks in position and then, as you can see in images 6.3 and 6.4, I secured popsicle sticks on top to craft the roof.
Step 7: Fixing The Structure

Next, I’ll attach four support sticks to secure the roof onto the feeder’s base.
For this, a strong adhesive is key, and a Hot Glue Gun is my hero here.
It’s quick and ensures a strong bond so I’ll dab glue on the corners of the roof’s base and carefully place each stick, following the steps shown in images 7.2 and 7.3 above.
And just like that, all four support sticks are solidly in place, ready to hold the roof steady.
Step 8: Fixing the feeder’s body

In step 8, I’ve secured the rooftop to the feeder’s base with the hot glue gun.
Next up, I’ll add some popsicle sticks to the back, just like shown in images 8.2 and 8.3 above.
Right now, it kind of resembles a horse stable, but we’re nearly at the finish line of our DIY project.
Step 9: Applying a touch of nature
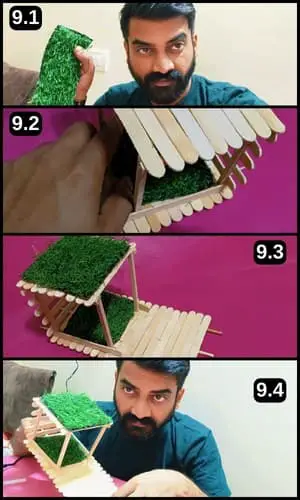
Birds love a bit of nature, so I decided to give the feeder a natural twist.
I found a piece of artificial grass from an earlier project.
As someone who loves DIY, I always save little decor pieces for moments just like this.
After measuring and a bit of trimming, it fits perfectly on both the base and roof, as you can see in the pictures above.
To be honest, it looks beautiful even before the project is completed.
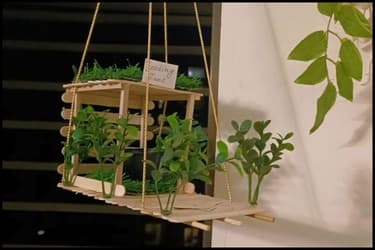
Step 10: The final touch

Next, to add even more charm, I’ve attached artificial plants around the edges.
Then, I nestled a feeding bowl inside and topped it off with a cute signboard on the roof.
It’s all set now, and I’m buzzing with excitement to hang this gorgeous decor piece in my space.
Take a peek at the image below, it’s hung at the window of my living room and it’s truly stunning!
I am sure, the next morning there will surely be a visit by my feathered friends.
They usually show up at sunrise or just around that time. But before heading to bed, I made sure to fill the feeding pot with their favorite treats.
For Video Handholding of this project, follow video instructions below:
Final Thoughts
Wrapping up this DIY bird feeder project, let’s remember it’s more than just building something, it’s about sparking creativity, learning through doing, and making a welcoming space for birds.
This project pushes us to be resourceful, using what we have in new ways, and to think about the little visitors our creations will attract.
Different birds have different needs, so a bit of research can make your feeder an even more popular spot.
Lastly, sharing your project can motivate others to try their hand at DIY, spreading the joy of crafting and showing compassion towards nature.
Frequently Asked Questions
Can I customize the bird feeder?
Absolutely! Feel free to adjust the number of bamboo sticks used for the base and explore different arrangements for the popsicle sticks. Adding personal touches like artificial grass or plants can enhance its appearance.
How do I ensure the bird feeder is safe for birds?
Periodically verify that there are no loose pieces or sharp edges and regularly clean the feeder to prevent the spread of diseases among birds. Fill it with appropriate birdseed to attract a variety of species.
What’s the best way to hang the bird feeder?
Use a sturdy decor rope to hang your feeder from a tree branch, balcony, or window where you can easily observe the birds. Ensure it’s securely fastened and positioned away from predators.
Can I use recycled materials for the bird feeder?
Yes, using recycled materials is encouraged. Items like old wooden spoons, twigs from your garden, or even repurposed plastic containers can work well. Just ensure they’re clean and safe for birds.
How do I protect the bird feeder from squirrels and other pests?
Consider hanging the feeder from a smooth pole with a baffle or placing it in an area difficult for squirrels to access. Using squirrel-proof feeders or adding a weight-sensitive perch can also deter them.
Is there an optimal time of year to put out my bird feeder?
Bird feeders can be used year-round, but they’re especially helpful during winter when natural food sources are scarce. During spring and summer, they can supplement birds’ diets and attract parents feeding their young.
How can I make my bird feeder weather-resistant?
Apply a weatherproof sealant to the wood to protect it from rain and sun damage. Regular maintenance, like checking for wear and refreshing the protective coating, will extend its life.


