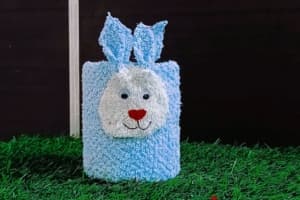
This Easter, I wanted to surprise my son with something fun and useful while he was at school.
Watching him juggle his pencils, pens, paintbrushes, scissors, and other stationery without a proper place to store them sparked an idea.
Why not craft a cute stationery holder? It seemed like the perfect solution to keep his desk tidy and bring a smile to his face.
So, I began searching for bits and pieces around the house to create a DIY holder for his pens, pencils, and other bits.
After gathering everything needed, I put together this cute and functional stationery holder.
In this article, I’ll handhold you with step-by-step instructions along with pics to guide you through making one of your own. It’s a simple, fun project that’s sure to organize any desk in style.
Step 1: Things I’ve Used (Quick Look At Requirements)
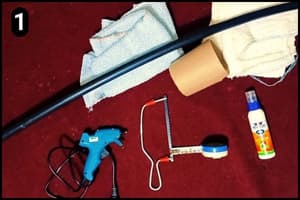
- Cardboard Ring: I’ve used a round (cylindrical) shaped cardboard piece which was the base of the tissue paper roll.
- PVC pipe: I recently got some electrical work done in my home and a piece of black PVC pipe was left over which I have used in this project.
- Mini Saw: To cut the pvc pipe as per desired lengths I’ve used a mini Saw.
- Old Towels: To wrap the pen holder and to shape the bunny face I’ve used some old Towels.
- Glue: To stick the required elements I’ve used a glue which is ideal for sticking paper, wood, cardboard sheets, and even pieces of cloth.
- Scissor: To cut the required shapes and other elements I’ve used a scissor.
- Pencil and a measuring device: I’ve used a carpenter’s measurement tape and a dark shade pencil to mark the shapes and measurements.
- Acrylic Paint and a paintbrush: To offer a touch of shades to the edges of the pvc pipes I’ve used white and red acrylic paint.
Step 2: Cutting the pipe
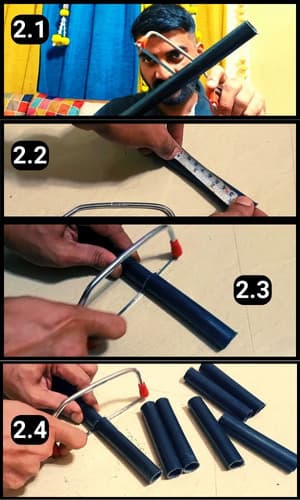
I measured and cut the pipe into 4-inch pieces, ensuring they matched the height of the cardboard round box perfectly.
With a carpenter’s tape, I marked off the exact lengths needed.
Then, grabbing my mini saw and carefully began cutting the pipe into segments.
Step 3: Smoothen the edges
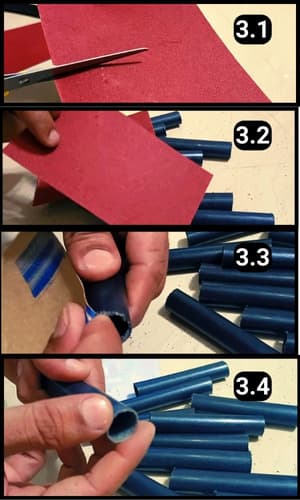
Next, I grabbed some sandpaper and cut it into a small sheet.
The edges of the PVC pipes were rough from cutting, so I used the sandpaper to smoothen them out.
Then, I carefully worked on each edge, particularly those on the outer end of the pen holder.
It was a bit tricky, as the gaps were small and hard to reach with my fingers. But by folding the corners of the sandpaper, I managed to do it.
Step 4: Shading the edges
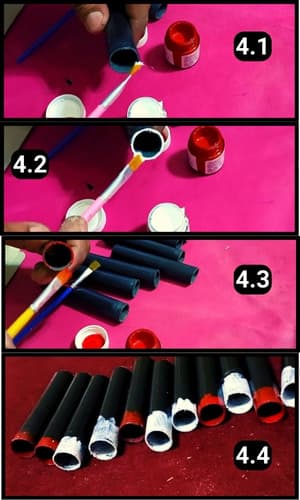
Next, I decided to add some color to the pipe ends to give them a unique look and disguise the fact they were PVC pipes.
Using acrylic paints and a regular brush, as shown in the images, I chose white and red shades for a striking contrast.
I painted some ends white and others red, focusing only on the tips that would be visible.
This approach meant I didn’t need to paint the entire pipe, just the parts that would catch the eye. After painting, I set them aside to dry for a few minutes.
Step 5: Making the base of the pen holder
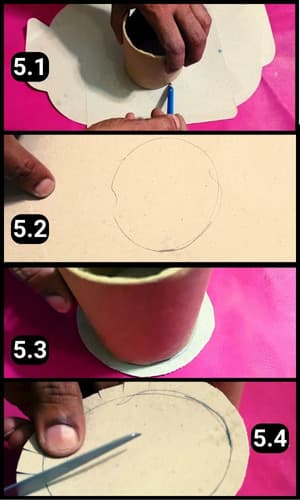
In this step, I tackled making the base of the pen holder to prevent the pipes from falling out and to keep the items inside secure.
I took a piece of cardboard, traced the shape I needed, and cut it out, making sure it was slightly larger than necessary.
This extra size allowed me to fold and glue the edges inside the round cardboard box for a snug fit.
Then, I trimmed the edges of the base just right to attach it securely to the pen holder.
Step 6: Fixing the base
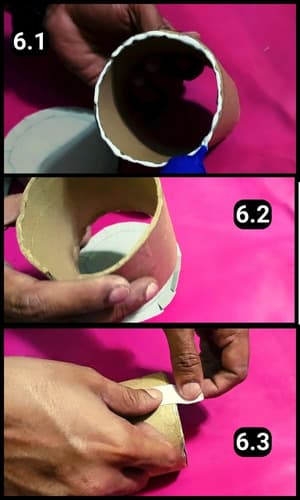
I then applied glue to the bottom of the cardboard and along the edges of the base to bond them together.
To ensure it was firmly attached to the pen holder, I also used paper tape for extra stability, as shown in image 6.3.
Step 7: Wrapping the pen holder
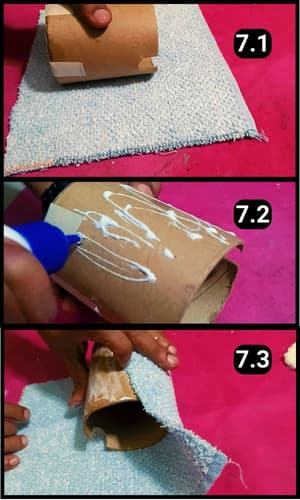
Wapping the towel around the cardboard is a crucial step as this will give the personality to my bunny.
So, I wrapped a soft towel around the pen holder for a cozy touch.
First, I spread glue all over the cardboard sides. Then, I carefully began wrapping the towel around it, making sure it aligned perfectly with the cardboard.
Step 8: Folding the edges
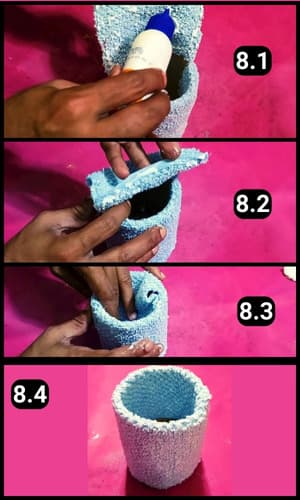
I left extra towel material at the top to fold and glue inside the cardboard.
There was also a bit left over to wrap around the bottom.
So, I made sure to apply glue thoroughly, ensuring everything was securely attached. Then, I set it aside to dry for a few minutes.
Step 9: Making the Bunny Face
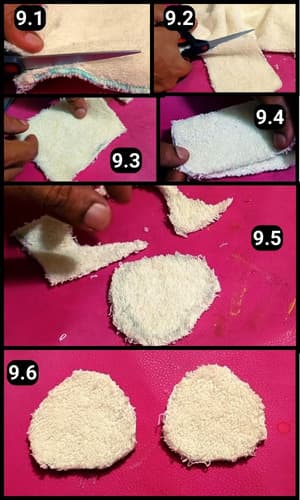
Next, I crafted the bunny’s face from a piece of white plush towel.
I had measured the length needed before wrapping the pen holder, and now was the moment to cut and shape it.
From the white towel, I cut out two oval shapes to serve as the bunny’s face.
Step 10: Shaping the ears

Then, I moved on to creating the ears with a blue towel sheet.
I started by cutting a strip of the towel and dividing it into two equal pieces.
Next, I shaped these pieces into curves, resembling bunny ears. I applied glue to the bottom edge of each piece and rolled them to achieve the right shape.
Step 11: Inserting the pipes
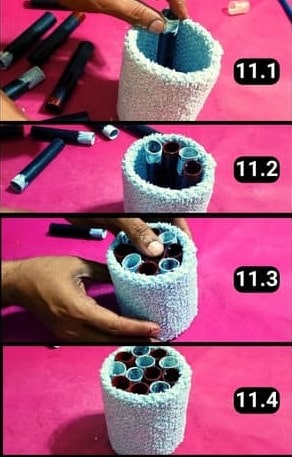
Next, I positioned the pipe pieces inside the holder, one at a time.
I added just the right amount, ensuring they sat snugly in place. With the pipes inserted, it already began to look like a lovely piece of decor.
Step 12: Fixing the face to the pen holder
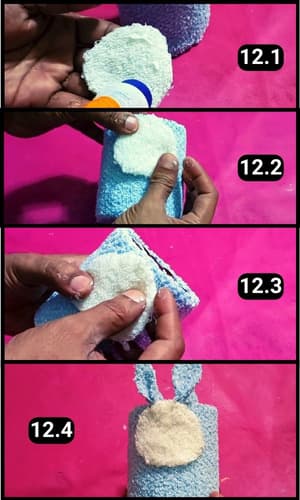
I then attached the bunny’s facial features that I had cut earlier.
I applied glue to them and pressed them onto both sides of the holder. After that, I positioned the bunny ears between the face and the pen holder, just like you see in image 12.4.
Step 13: Giving the Personality (Facial expressions)
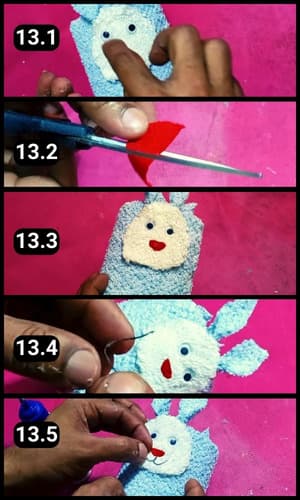
Next, I brought the bunny’s face to life by adding eyes, a nose, and a mouth.
I chose googly eyes for a playful look, securing them with glue.
For the nose, I shaped a piece of red velvet cloth and attached it in place.
The mouth was crafted from a black woolen thread, which I curled and shaped before gluing it on.
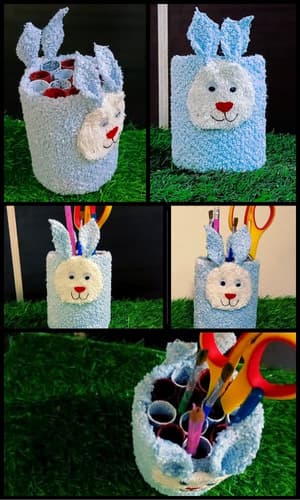
Now complete, it stood ready for use.
Just take a look at the images below (final looks of the project), it turned out incredibly cute, and I’m sure your kids will adore it too.
Video Walkthrough Of DIY Bunny Pen Holder
Final Thoughts
I’m thrilled to have exceeded my own expectations with this project.
It really boils down to unleashing your creativity and giving it your all, as DIY projects are both endlessly enjoyable and rewarding.
To help you recreate this adorable pen holder, I’ve included a video tutorial walkthrough above for this specific DIY gift idea.
Whether you’re looking for a special Easter gift or just a fun project to brighten up a desk, this bunny pen holder is sure to bring smiles and a bit of organized charm to any child’s space.
Frequently Asked Questions
How long did it take to complete DIY easter bunny pen holder?
It took about 45 minutes to make this beautiful pen holder.
Can I use something else instead of a PVC pipe?
Yes, you can use thick origami paper sheets and roll them like the PVC pipes. However, you’ll need to stick the paper sheets thoroughly for firm support.
Can I use fabric other than towels for the bunny parts?
Yes, you can use any fabric that’s easy to handle and glue. Felt is a great alternative because it’s sturdy and doesn’t fray, making it perfect for crafting the bunny’s face and ears. Just ensure the fabric can hold its shape and adhere well to the cardboard.
How can I make the pen holder more durable?
For added durability, consider reinforcing the base with a thicker piece of cardboard or a lightweight wooden disc. Additionally, applying a clear sealant over the painted pipe ends and the fabric-covered parts can protect against wear and tear, making the pen holder last longer.
How can I customize the pen holder for different occasions?
This DIY project is highly customizable, for instance, you can change the bunny theme to fit other occasions by adjusting the colors and facial features. For Halloween, you might create a pumpkin or ghost-themed holder. Use seasonal colors and relevant decorations to tailor it to any holiday or personal preference.
What’s the best way to clean or maintain this DIY pen holder?
Since the pen holder involves fabric and painted elements, it’s best to spot clean it with a damp cloth. Avoid soaking it in water or using harsh cleaning agents. If the holder becomes dusty, a soft brush or a lint roller can help remove dust from the fabric parts without damaging them.


