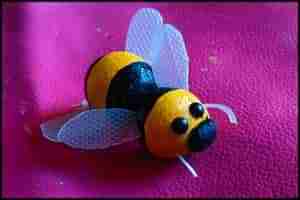
Bumblebee toys have captured the hearts of children everywhere, and I’m no exception.
The charm of these buzzing creatures extends beyond playtime, inspiring countless craft projects for kids.
I’ve found that if you want to create a bumblebee that looks like it might just fly off the page, clay is your best friend.
With some homemade clay and a few other odds and ends, I’ve managed to craft a bumblebee that’s so adorable, it’s almost un-bee-lievable!
In this post, I’ll share a step-by-step guide, complete with images, to help you recreate this adorable project using clay.
So, let’s dive in, starting with the materials I used, followed by the process.
Editor’s note: I have also made another version of Bumble Bee Using LED Bulb Cover Here.
Step 1: Quick Look At The List Of Items Used
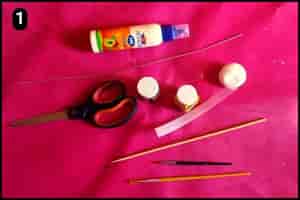
- Homemade Clay: To craft the bumble bee shape I’ve used a lump of homemade clay.
- Acrylic Paint and Paintbrush: To paint the bumblebee figure I’ve used black and yellow acrylic color shades and a regular paintbrush.
- Plastic Strip: To craft its tiny wings I’ve used a piece of plastic strip.
- Scissor: To cut the shape of the Bumble bee’s wings I’ve used a scissor.
- Glue: To stick the elements together I’ve used a multipurpose glue.
Step 2: Shaping the Bumble Bee structure
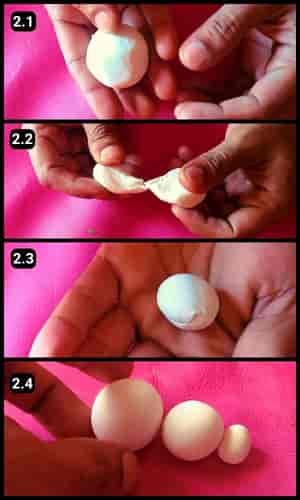
I have used homemade cornstarch clay to craft the bumble bee in this particular project.
I prefer using DIY clay for most of my art and craft projects and for detailed instructions you can check out the complete video here.
Before I began this artistic project, I had already chosen a small lump of clay and carefully divided it into three different parts.
One of these sections was specifically set aside for the bumblebee’s head, and the second was dedicated to its body. A smaller portion was reserved for creating its nose.
Using my hands, I diligently rolled each section into smooth, cohesive clay balls.
Once these three clay balls had been meticulously formed, they were carefully joined together, as shown in image 2.4 above.
Step 3: Sticking the Structures
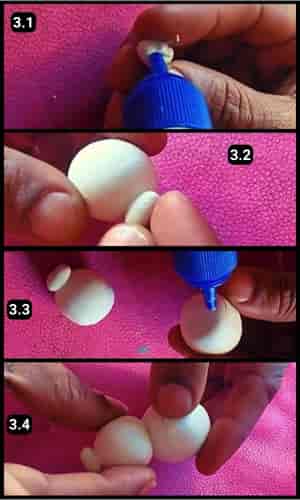
Next up, it was time to stick the clay balls together, and I used PVA glue for this purpose.
I started applying clay between each clay ball and fixed them one by one, as seen in the images above.
Finally, I let them dry, and to speed up the process, I placed them under direct sunlight.
Step 4: Shaping the Wings

To craft the tiny wings of the bumblebee, I used a piece of plastic strip.
I started by cutting the strip to the appropriate lengths. Next, I began shaping them by cutting through the edges.
I made a total of 4 wings for the perfect bumblebee structure. However, I kept them aside to fix later, after painting the bumblebee structure.
Step 5: Paint them Black
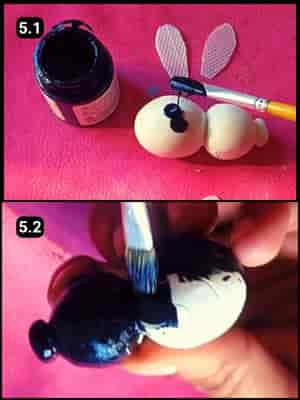
First, I painted the entire structure in black using acrylic color.
Next, I left it to dry before applying the other shades.
The yellow shades appeared bright over the black background, hence the reason I first covered the structure with black color.
Step 6: Applying Yellow Shades
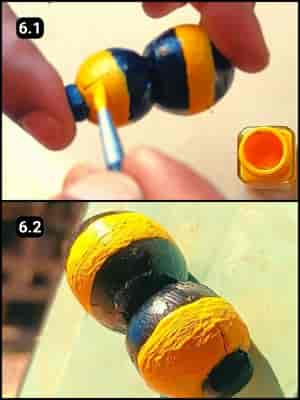
To complete the look, I applied yellow shades to the structure of the Bumblebee.
Adding two layers of yellow shades gave it the perfect appearance.
And to speed up the drying process, I placed it under direct sunlight.
Luckily, the windows provided access to sunlight, so I didn’t have to go outside or onto the terrace.
Step 7: Fix the tiny wings

The paint had dried, so I proceeded to attach the tiny wings to the Bumblebee’s structure.
Next, I carefully pressed each wing around its body.
Since the clay wasn’t too dry, I easily pushed the plastic strips into place and aligned them.
To ensure durability, I applied glue along the edges of the wings and the clay surface.
Step 8: Fixing the Bumblebee Eyes
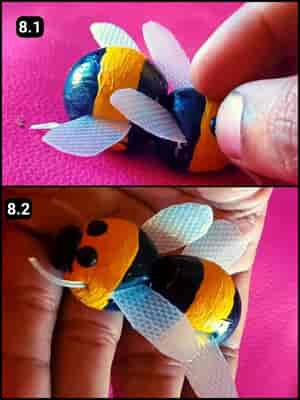
At last, it was time to give the Bumblebee structure its sight by fixing the eyes.
I used black stones for the eyes and carefully pushed them into place, one by one.
A gentle pressure ensured they were securely fixed.
For added strength, a bit of glue around the eyes did the trick.
Now, it was ready to go hunt for honey.
Step 9: Final Structure

Look at how lifelike she appears, and positioning her among the bunch of flowers enhances the realism of the final structure.
The wings are also perfectly crafted with the piece packaging plastic strip.
At one point it looked as if it would fly off if I left it free LOL.
Video Walkthrough Of DIY Clay Bumble Bee
Final Thoughts
You can similarly craft multiple bumblebees and use them as a piece of decor in your living spaces.
They look adorable, playful, and real with the use of clay and bright acrylic colors.
Whether displayed as a standalone piece or incorporated into a larger art project, this DIY clay bumblebee is sure to capture the hearts and imaginations of all who behold it.
Also, if you let it dry for about 24 hours the clay used for bumblebee structure will harden and take its shape perfectly.
I’ve also shared a video walkthrough of our Clay based DIY Bumble Bee above for your reference.
So, gather your materials and let your creativity take flight.
Frequently Asked Questions
How long did it take to craft a clay bumblebee?
It took 40 minutes for me to craft the bumblebee using homemade clay. However, it includes the drying time of the glue and the acrylic paints.
Are there any alternative materials that can be used for crafting the wings?
While plastic strips are recommended for crafting the wings due to their flexibility and ease of shaping, you can explore other materials such as paper or fabric if you prefer. Just ensure that the material you choose is lightweight and easy to manipulate.
How durable is the finished clay bumblebee?
When properly crafted and handled with care, the finished clay bumblebee can be quite durable. However, it’s essential to avoid dropping or mishandling it, especially since clay can be somewhat fragile.
Is it necessary to use acrylic paint for painting the bumblebee figure?
Acrylic paint is recommended for painting the bumblebee figure as it provides good coverage and durability. However, you can experiment with other types of paint if desired, keeping in mind that acrylic paint tends to work best on clay surfaces.
How can I ensure that the clay bumblebee maintains its shape while drying?
To maintain the shape of the clay bumblebee while drying, avoid placing it in a humid environment and support any delicate parts with props or structures until the clay is fully dry.
Are there any safety precautions I should take while crafting with clay?
It’s essential to wash your hands thoroughly after handling clay, especially if you’re using homemade clay that may contain ingredients like cornstarch. Additionally, avoid ingesting the clay and ensure adequate ventilation when working with paints and adhesives.


