As Easter rolls around, I felt a buzz to spruce up my home, especially with guests on the horizon.
While I’ve always leaned towards the classic eggs and bunnies, this year called for a fresh twist.
My eyes landed on carrot-themed decor at the dollar tree store, and it just clicked.
These carrots aren’t just on trend, they brought a unique charm to my crafting table.
And let me tell you, the end result was even more fabulous than I imagined.
To be very honest, I can’t wait to see the smiles on my guests’ faces as they take in the festive vibe.
I’ve laid out the whole process, of creating this DIY Dollar Tree Easter Carrot step by step, with photos to guide you.
So, let’s dive right into it by taking a quick look at the list of items I’ve used first.
Things You’ll Need To Make DIY Dollar Tree Easter Carrot

Here are the things I’ve used for this particular project:
- Piece of Cloth: I have used a piece of satin cloth to craft DIY Easter Carrots for decor.
- Needle and Thread: To sew the structure I have used a needle and thread.
- Plush Cotton: I’ve used plush cotton to fill the Carrot Shapes.
- Pencil and Scissor: To draw the Carrot shape over the cloth I’ve used a dark pencil and a scissor to cut the shapes.
- Bamboo stick: I’ve used a bamboo stick to fill the plush cotton inside the carrot figure.
- Other Decor: To enhance it further I have used a few artificial green decor.
Once you have all the things ready you can proceed with the first step.
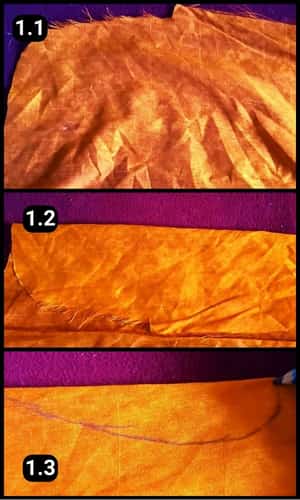
Step 1: Marking the Carrot Shape
Everyone’s chatting about making cloth carrots, and it’s easy to see why.
They’re a hit online! But don’t worry, I’ve got the simplest method to whip one up.
I grabbed some orange satin cloth to start. Then, I folded it and sketched half a carrot shape on one side.
When I unfolded it, voila, a perfect carrot outline appeared.
This step is a game-changer, making the process smooth and fun. Trust me, once you see how I do it, you’ll be crafting these carrots in no time.
Step 2: Cutting the Shape
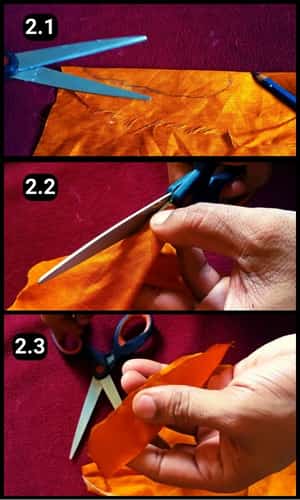
Next up, it’s time to grab a pair of scissors and cut along the outline.
Holding the fabric tight ensures the cut is neat and even. And just like that, I’ve got the perfect carrot shape.
Step 3: Preparing the Sewing Materials
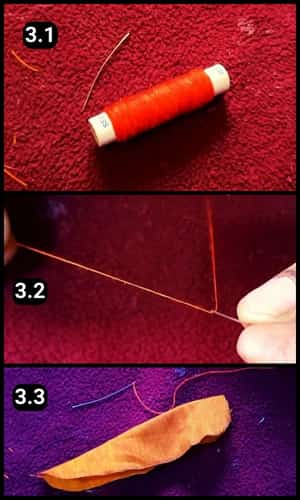
Luckily, I found some sewing thread at home that matched perfectly.
Threading the needle and knotting the end was my next step, getting it ready for sewing.
Step 4: Sewing the Carrot Shape
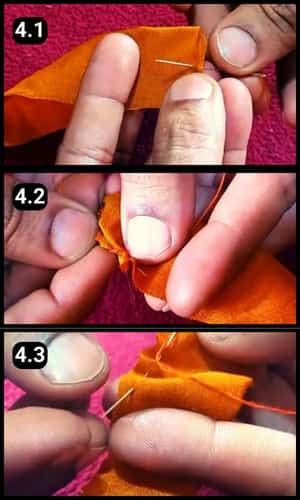
I started at the top, leaving a small gap to flip the fabric inside out later.
This same space was perfect for stuffing in the plush cotton.
After tying a knot at the bottom, I began sewing in reverse order.
For those who prefer, a sewing machine could really speed things up here.
Once it all looked good and felt sturdy, I secured it with a few final knots. It turned out just right, firm and ready for the next step.
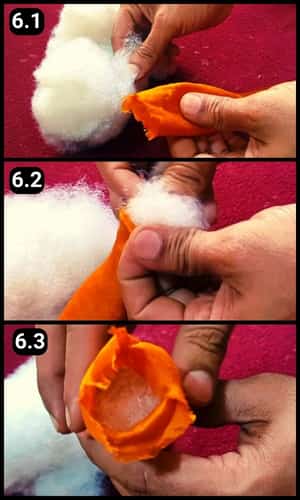
Step 5: Roll it inside out

Now, it was time to flip it inside out, hiding the stitches.
I did this gently to avoid pulling the threads or tearing the fabric.
A little trick I used was a wooden stick to nudge it along, just like in the picture 6.2 above. And there you have it, flipped successfully and looking great!
Step 6: Filling the Plush cotton
I began stuffing the carrot’s shape with plush cotton, initially pushing it in with my fingers.
To get the cotton all the way inside, I switched to using a bamboo stick, a neat little trick to make sure it filled out evenly.
Care was key to ensure it looked uniform from every angle. Once it looked just right to me, I was ready to move on to the next steps.
Step 7: Fixing the Green edge
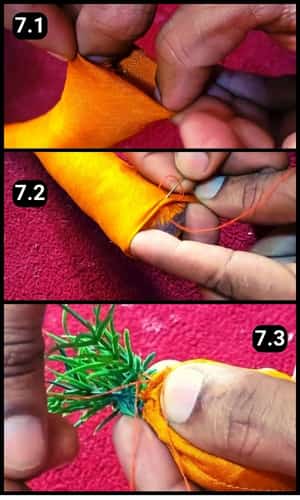
For the carrot’s top, I opted for an artificial bush, just like the one you see in the image 7.3 above.
If you prefer, a green cloth or craft paper shaped similarly would work too.
To attach it, I first tucked the edges in, then took up my needle and thread.
Sewing around the edges, I inserted the green bush into the opening and tightened the thread to secure it in place.
Once it was fixed in place, I tied off the thread and guess what the result was truly outstanding.
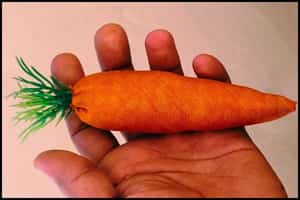
Just look at the image above it looks fantastic.
Step 8: Crafting multiple Carrots
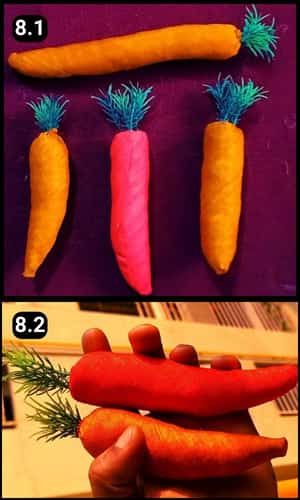
I went on to make a few more carrots using the same steps for my DIY Easter decor.
Honestly, these turned out to be the real stars of the show, and I couldn’t help but get excited to craft even more.
Step 9: Using Decor Items
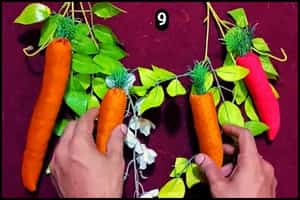
Then, I mixed in other decor pieces, carefully choosing their spots.
I incorporated hanging bushes with artificial leaves and attached the carrots to them.
After hanging them in various spots around my living area, they just seemed to fit perfectly everywhere.
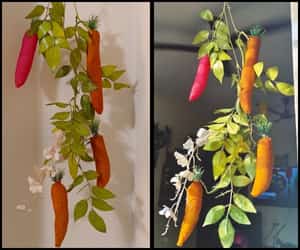
If you look at the above images I’ve hung them outdoors and even indoors.
They turned out to be incredibly striking and adorable additions to my living space.
Video Walkthrough of DIY Dollar Tree Carrot For Easter
Final Thoughts
And there you have it, a stunning piece of Easter decor, all from following these easy steps.
Everything I used was right here at home, proving you don’t need much to create something beautiful.
I’ve also put together a video walkthrough above to guide you through each step.
Remember, it’s all about adding your personal touch.
Feel free to experiment with colors and sizes. Easter decor is not just about following traditions, it’s about creating something that brings joy and warmth to your home.
So, dive in, enjoy the crafting journey, and make this Easter memorable with your unique creations.
Frequently Asked Questions
How long did it take to complete the entire DIY Dollar Tree Inspired Easter Carrot project?
It took about an hour and the time will vary depending on the number of Carrots you want to craft. However, you can reduce your time by using a sewing machine to stitch the carrot structures.
What else can I use instead of plush cotton for this DIY Dollar Tree Inspired Easter Carrot project?
You can use standard cotton or simply shape a sponge and cover it with the cloth.
Is there an alternative to plush cotton for stuffing this DIY Dollar Tree Inspired Easter Carrot?
Yes, you can use a variety of materials for stuffing. Scrap fabric pieces, old t-shirts cut into small pieces, or even rice for a weighted feel. Just be mindful of the texture and weight you want to achieve.
What if I don’t have a bamboo stick for stuffing the cotton?
No worries! A long pencil, the back of a paintbrush, or any sturdy, slender object can work just as well to push the stuffing into tight spaces.
Can these DIY Dollar Tree Inspired Easter Carrots be used outdoors?
They can, but consider the material’s durability and weather resistance. Satin might not fare well in wet conditions, so for outdoor use, materials like waterproof fabric or a protective spray might be better choices.
Are there any safety considerations for this DIY Dollar Tree Inspired Easter Carrot when crafting with kids?
When crafting with children, make sure to supervise any use of scissors and needles. Also, consider using child-friendly materials and maybe even fabric glue or a sewing machine to avoid sharp objects.


