Ever wanted to freshen up your space without breaking the bank? Well, I did just that.
Recently, I whipped up a charming door hanging that’s perfect for greeting guests or adding a cozy touch to the living room.
The inspiration struck while eyeing similar, pricey pieces at the store.
Guess what? I crafted mine for less than half the price, and it only took me about 30 minutes! And having done this process already I’m thrilled to walk you through the process, complete with easy-to-follow steps and helpful pictures.
Ready to give your home a personal, affordable upgrade? without wasting any time let’s get right into the nitty-gritty.
Step 1: Gather the supplies
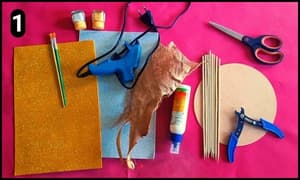
To make our door hanging decor, I have used below materials:
- Glitter papers: I have used self-adhesive glitter papers in gold, silver, and red colors.
- Bamboo sticks: I will stick the heart shaped cutouts to the edges of the bamboo sticks for decoration.
- Tree bark: I’ve used the bark of a tree that was left from my previous DIY project to cut a few heart shapes.
- Paintbrush and colors: I have used golden and silver color to paint the cut outs from the tree bark and a few Bamboo sticks.
- Pencil, Scissor and a Cutter: To draw heart shapes I have used a pencil and to cut the shapes I have used a scissor. The cutter will be used to cut the bamboo sticks as per the required sizes.
- Round shape Cardboard: I have used a round shaped cardboard as the base of the decor. This particular cardboard is actually the base of a cake which I had ordered for my birthday. These cardboard base sheets are quite sturdy and can be used for DIY projects, so think twice before throwing them away.
So, once you have all the supplies ready you can follow the below steps to make this beautiful decor.
Step 2: Mark and draw lines
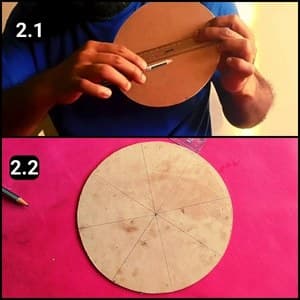
I sketched out a few lines to guide my cutting and align the pieces just right.
Step 3: Trim the bamboo sticks
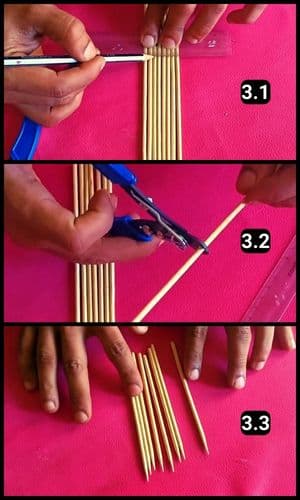
Next up, I measured and marked the exact size on the bamboo sticks to fit the back of our decor.
Grabbing my cutter, I’m all set to trim them down, one by one.
It’s a bit like preparing ingredients for a recipe, where precision leads to perfection.
Step 4: Heart shapes out of tree bark
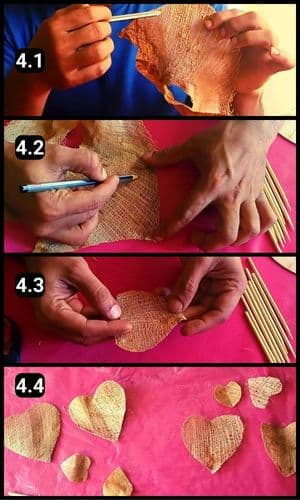
In step 4, I gave new life to some leftover tree bark from my last project, aiming for that natural vibe.
I sketched out heart shapes directly on the bark with a pencil.
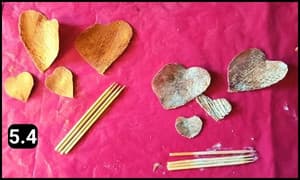
Then, with a pair of scissors, I carefully cut out the designs i.e., Eight pieces in total, mixing two sizes for variety.
Check out image 4.4 to see how they turned out.
Step 5: Paint them Gold and Silver
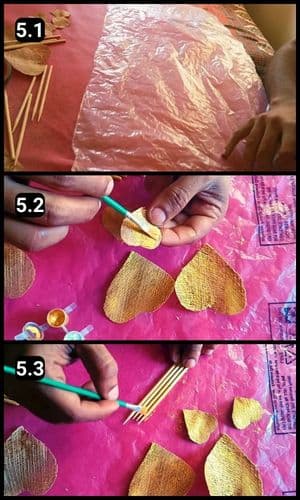
In step 5, I covered my desk with a plastic sheet to keep those pesky color spills at bay.
Then, with my paintbrush in hand, I began to bring the shapes to life, painting two small and two large ones in a shimmering gold, while the others got a silver makeover.
I didn’t stop there, I gave the bamboo sticks a splash of color too, making sure everything matched our theme perfectly.
If you look at the image 5.4 above, and you’ll see everything’s set and drying. I gave them about 10 to 15 minutes to make sure they were completely dry.
Step 6: Shaping glitter to the base
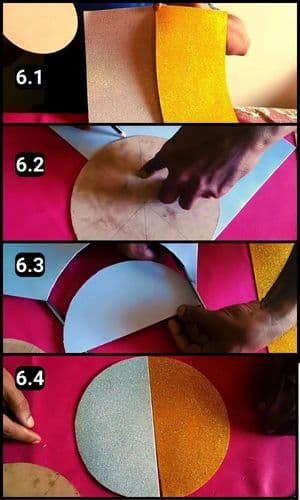
Heading into step 6, we’re diving into the base of our decor.
I’m starting with a round cardboard sheet and some sparkly glitter papers.
By following the markings on the back of the cardboard, I’ll cut the glitter papers into semi-circles, both silver and gold.
Check out images 6.2 and 6.3 above to see how it’s shaping up. Next up, these semi-circles are all set for a bit more trimming.
Step 7: Sticking the glitter sheets
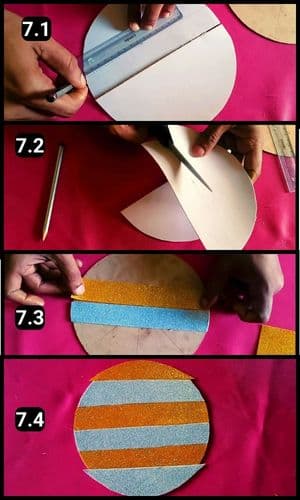
I sliced the gold and silver sheets into stripes to layer them onto the base, boosting the decor’s overall charm.
Thanks to their self-adhesive nature, all it took was peeling off the backing and sticking them on, making sure each piece was perfectly aligned.
I took my time to ensure they laid down in straight lines for an even stick. Now, it’s all set and pleasing to the eye already.
Step 8: The heart candies
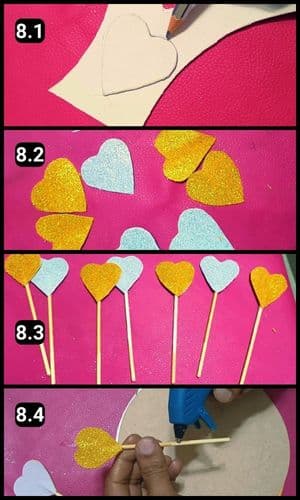
Next up, I’m crafting heart shapes, cutting out eight pieces from the glitter sheets i.e, four golden and four silver.
After cutting them out, I’ve attached them to the bamboo sticks, just like you can see in image 8.3.
Now, with all the heart-shaped pieces ready, they’re set to be added behind the cardboard.
I’ll be using glue on the sticks to secure them to the back of our round cardboard base.
Step 9: Sticking things together
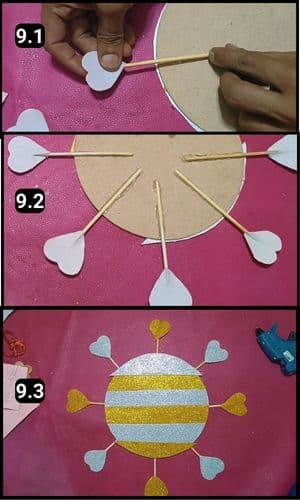
Now, I’m going to attach the heart pieces behind the cardboard, making sure each one is placed carefully.
It’s important that the glittery side is facing forward. I’ll align them just right, ensuring there’s equal spacing between each heart.
With all of them securely in place, it’s finally time to add some flair to the base of our creation.
Step 10: Paste Tree bark cut outs

Alright, the next step is to paste those gold and silver heart shapes we cut from the tree bark.
They’re all in place now, and truly, they’ve made the decor pop just as I hoped they would.
Now, it’s time to add a personal touch with a message, which you can see in the final image below.
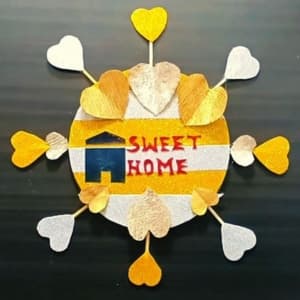
I’ve cut out letters from a red glitter sheet to spell “Sweet Home” and attached them, along with a cute house-shaped cutout.
Feel free to personalize yours with any message or design that speaks to you.
Now, it’s proudly displayed on my door, catching the eye of anyone who passes by.
Just incase you want a video walkthrough, I have it below:
Final Thoughts
The theme that I’ve used can be shuffled according to the background of your walls or doors.
By repurposing overlooked everyday materials like tree bark and cardboard, I crafted a unique door hanging that adds warmth to my space without breaking the bank.
Remember, the most meaningful decorations are those that reflect who we are. So, make your area genuinely your own by embracing your imagination.
Frequently Asked Questions
How long does it take to complete DIY Door Hanging?
The project typically takes about 30 minutes to complete, making it a quick and enjoyable DIY endeavor.
How sturdy is the finished door hanging?
The door hanging is quite sturdy, especially with the round-shaped cardboard base providing support. However, it’s best to handle it with care to ensure longevity.
Is the door hanging suitable for outdoor use?
While the door hanging can withstand some outdoor conditions, it’s best suited for indoor use to ensure its longevity and preserve its appearance.
How can I hang the finished door hanging?
You can hang the finished door hanging using a hook or adhesive strips, depending on the surface of your door or wall. Ensure it’s securely fastened to prevent it from falling.


