Ever felt stuck on how to spruce up your home for Easter without breaking the bank? Well, you’re not alone.
Today, I’ll walk you through a simple DIY Easter wreath project that’s close to my heart.
Everything I used was right under my nose at home, and chances are, you’ve got similar bits and bobs lying around too.
As someone who loves getting crafty, the idea of buying decorations just doesn’t sit right with me.
Why spend a fortune when you can create something unique and personal? I’ve laid out all the steps and snapped some pictures to guide you along.
Plus, I’ve listed everything I used to make it easy for you to follow along.
Without any further ado, let’s get creative together and craft a special easter wreath under budget!
Step 1: Quick Look At The Things I’ve Used
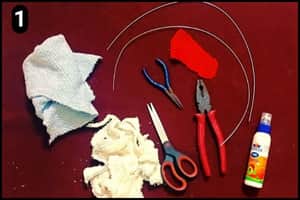
- Fencing Wire: To make the base of the decor I’ve used fencing wire. It will be shaped accordingly as we progress with the project.
- Plier: A plier is a handy tool when it comes to folding or bending the fencing wires.
- Pieces of soft towel: To wrap the Fencing wire after shaping it. I’ve used a few pieces of soft towels. Another piece of towel (with blue shades) is used to craft the bunny ears.
- Red Cloth: I have used a piece of red cloth to highlight the Bunny’s ears.
- Glue: I used a multipurpose glue to apply it to the towel while wrapping it over the fencing wire and while crafting bunny ears.
- Scissors: I have used a scissor for garment cutting.
Step 2: Getting the right sizes
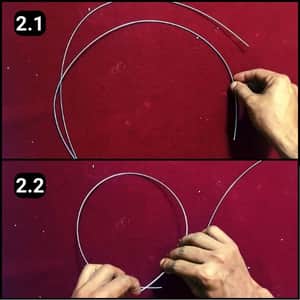
First, I’ve made sure the fencing wires are of appropriate sizes.
I have also left some space to join the edges after forming the circle.
You will need to make sure one of the circles is smaller than the other (You’ll understand why in the subsequent steps).
Step 3: Bending the edges

Next up, I used a plier to bend the thick wire’s edges.
To be honest, it felt like a mini battle, but guess what? I won.
Rolling and locking those edges in place was my little victory.
A word of caution though: Go slow with this part. Those fencing wires are no joke, they can turn into little sneaky ninjas ready to poke. I learned it the hard way but managed not to hurt my fingers (Patience is key here).
Step 4: Aligning the Circles

So, at this stage I have got the two circles ready and the next step is to align them properly.
I have aligned them through their joints and stuck a tape over it so that they are fixed together.
Now that we’ve successfully executed step 4, let’s move onto the next step i.e. wrapping the towels.
Step 5: Wrapping The First Circle with Towel Pieces

Next up, I dabbed some glue on the towel piece and began wrapping it from where the circles meet.
I took my time here, making sure the wrap was just right. Slow and steady does it, ensuring everything looks neat and tidy.
Step 6: Wrapping The Other circle
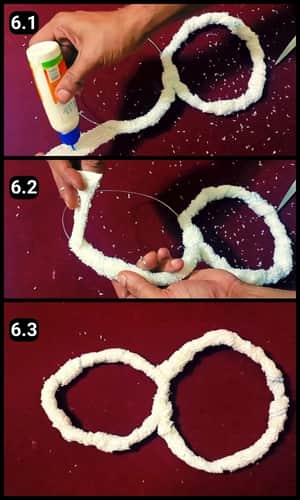
Then, I shifted my focus to the second circle, continuing the wrapping process after slathering the base of the towel pieces with glue.
You can catch a glimpse of this in images 6.1 and 6.2 above. Once fully wrapped, I set it aside to dry for a bit.
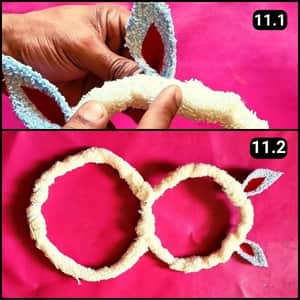
Step 7: Crafting the Bunny’s Ears

Moving onto the next step, it was time to make the bunny’s ears. I chose a piece of blue towel for this.
First off, I cut a long strip right from the towel sheet.
Step 8: Cut The Towel Strip Into Two

The next step is to cut the towel strip into two, so I folded the strip of towel in half to split it into two.
With scissors in hand, I snipped them into equal pieces as seen in image 8.3 above.
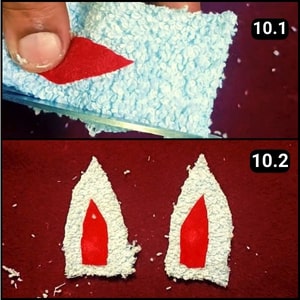
Step 9: Shading the ears

Then, I grabbed a piece of red cloth to attach to the ears.
I folded the cloth, cutting out identical shapes for both ears.
After that, I slathered on some glue and pressed them into place (as seen in image 9.3 above).
Step 10: Let The Ears And Other Parts Dry
I carefully pressed down to ensure that the glue adhere firmly to the ears.
It was important to let them rest until the glue fully set.
I would say wait for another 5 to 10 minutes so that the glue gets to stick properly (Including the glue that was attached to the body and the wire).
Step 11: Stick them to the Wreath
After that, I attached the ears to the Easter wreath and tied a thread between them for hanging.
Once in place, I got creative with decorations, adding ribbons and flowers to suit my taste.
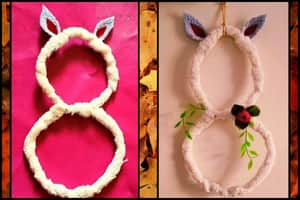
Looking at the second image, you’ll see I added just a bit of decor, and it really brought the whole thing to life.
I also shaped the upper ring into an oval by gently bending the sides. Thanks to the fencing wires, this was a breeze.
Just like that, you can whip up several pieces and hang them around your living space. They’re perfect for brightening up any area.
A complete video walkthrough Of DIY Easter Wreath Outdoor Hanging decor
Final Thoughts
To be honest, I didn’t spend a dime on craft supplies, everything I needed was already around my home.
I had a vision for this project, but the outcome was even more stunning than I imagined.
I went on to create five more pieces, gifting them to people close to me.
They were thrilled to learn these were DIY decor pieces I made.
You too can create beautiful decorations with what you have at hand.
Plus, I’ve uploaded a video walkthrough (above) of this DIY Easter wreath project for you to follow along.
Frequently Asked Questions
How long did it take to make DIY Easter Wreath Outdoor Decor?
I was able to make this DIY Easter Wreath within 30 minutes, however, if you are a beginner it may take 10 minutes more.
What can I use instead of fencing wires?
You can use similar ring-like items if available, or you can draw and cut rings over cardboard sheets and use them.
Can I use materials other than towels for wrapping?
Absolutely! Feel free to get creative with materials you have at home. Fabric scraps, yarn, or even colorful paper can work just as well. The key is to use something you can easily wrap and glue.
What if I don’t have fencing wire for the base?
No worries! Any sturdy wire that can hold its shape will do. Coat hangers or thick craft wire are great alternatives. Just ensure it’s bendable enough for you to shape.
Is there a specific type of glue you recommend for this DIY Easter Wreath?
I used a multipurpose glue for this project. It’s strong enough to hold the materials together. However, fabric glue or hot glue guns could also be great options, especially for heavier decorations.
What’s the best way to hang the wreath outdoors?
A thread or fishing line works great for a seamless look. If you’re hanging it on a door, a wreath hanger is handy. Just make sure whatever you use is sturdy enough to support your wreath’s weight.
How long does the glue take to dry?
It usually takes about 5 to 10 minutes for the glue to set, but this can vary based on the glue type and how much you use. For the best result, give it enough time to dry completely before hanging.
Do you have any tips for cutting the towel and cloth neatly?
Sharp scissors are a must for clean cuts. For the towels, a straight cut works fine. For the cloth, especially if it frays, you might want to outline your cut with chalk before snipping. This helps in getting those clean, bunny-ear shapes.


