The Kalash has always held a special place in my heart.
It’s beautiful and it’s a symbol of prosperity and good fortune, used in so many Hindu rituals, festivals, and ceremonies here in India (and even in other cultures around the world).
Lately, I’ve seen some amazing Kalash decor ideas for special occasions.
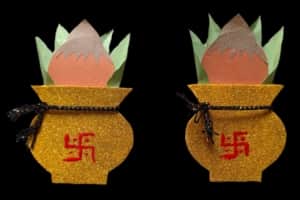
It got me thinking, what if we could bring a touch of tradition into our homes? We could create DIY Kalash decorations that blend spirituality with stunning aesthetics.
So, I decided to give it a try and make a 3D kalash using easily available materials.
Without wasting any time, let’s take a quick look at the steps I followed to make my own Kalash.
Step 1: Things I’ve used for the decor
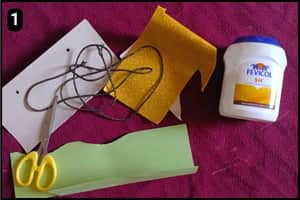
- Cardboard Sheet: For the Kalash and coconut shapes I’ve used a sheet of cardboard.
- Glitter Paper Sheet: To stick it over the Kalash cutout I’ve used a sheet of golden glitter paper.
- Origami Papers: To stick over the coconut shape and to make the mango leaves I’ve used origami papers resembling the color of the elements.
- Decor Thread: To tie it around the Kalash I’ve used a decor thread which is typically used for designer garments.
- Acrylic Paint and Paintbrush: To draw the Holy Swastik Sign I’ve used a paintbrush and red acrylic paint.
- Scissor: To cut the required shapes you will need a standard craft scissor.
- Pencil: To draw the shapes of the Kalash and half coconut shell I’ve used a pencil.
Once you have the above items handy, simply follow the below steps to make your Kalash.
TIP: This Kalash can be an excellent decor idea for below occasions.
- Ugadi Festival
- Diwali
- Navratri
- Durga Puja
- Ganesh Chaturthi
- Varalakshmi Vratham
- Hindu New Year
Step 2: Cutting the required Shapes
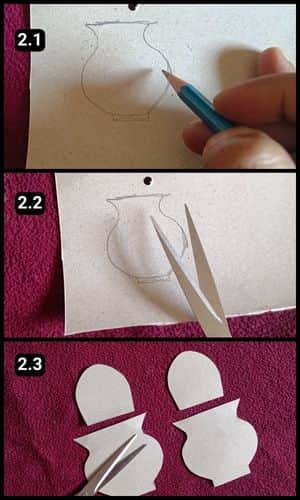
First things first, I started by tracing the shapes I needed onto cardboard.
This includes the Kalash itself and a half coconut shell.
I used a pencil for this step, so you can easily erase any mistakes.
Next, grab your scissors and carefully cut out the traced shapes.
We’ll need two of each i.e. a Kalash cutout and a half coconut shell cutout (For a visual reference, check out the images above).
Step 3: Sticking the desired color papers
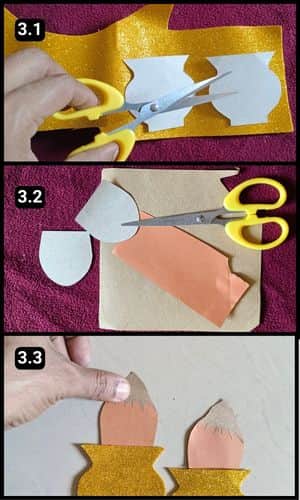
Next, I added some color to the cutouts.
I used sheets of sparkling gold glitter for the Kalash shapes, and for the coconut shell cutouts, I chose two different shades.
After carefully gluing them together, everything was ready and looked fantastic.
You can see the half finished product in image 3.3 above.
Step 4: Crafting the Mango Leaves
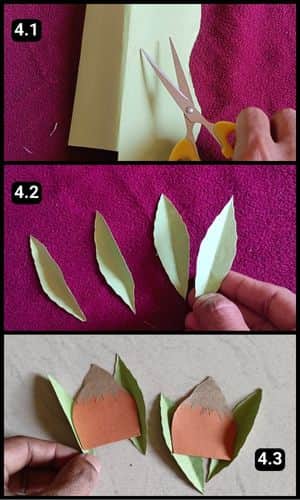
Traditionally, mango leaves are arranged around the coconut on a Kalash.
It’s a beautiful symbol used in many Indian festivals and pujas.
To capture that essence, I cut out some mango leaf shapes from green craft paper.
Then, I carefully arranged and glued them around the coconut cutout.
Step 5: Knotting the Decor Thread
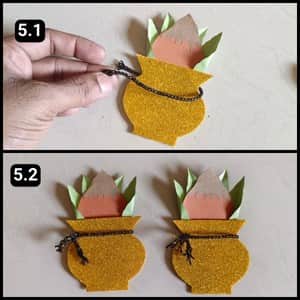
To complete the look, I wrapped a decorative thread around the top of the Kalash.
First, I measured out the right amount and cut two pieces of thread.
Then, I carefully wrapped each piece around the Kalash neck and tied a secure knot.
You can see the finished effect in the images above, they look fantastic.
Step 6: The Holy Swastika Symbol
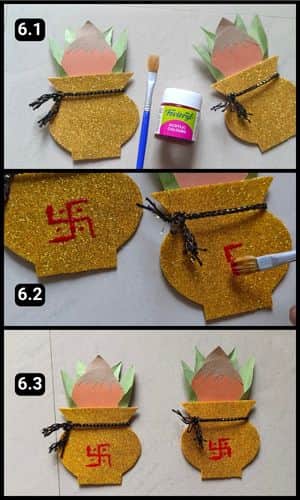
Many cultures around the world use ancient symbols to represent well-being.
In Hinduism, a common symbol is ‘Shubh Labh’ (meaning auspiciousness and prosperity).
I decided to incorporate this symbol onto my Kalash using a paintbrush and acrylic paint.
It can be a bit tricky to get right, so I took my time and focused on creating clean lines.
I’m happy with how the final symbols turned out, they add a touch of tradition to this versatile decorative piece.
Step 7: Placement Ideas
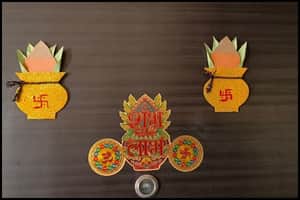
I proudly displayed my finished Kalash decorations by my door to welcome guests during the festivities.
But these beauties are so versatile, feel free to place them around your office entrance, shop doorway, or anywhere you want to add a touch of festive cheer (indoors or outdoors, the choice is yours).
Video Walkthrough of DIY Kalash Decor
Final Thoughts
This DIY Kalash project offers a beautiful and meaningful way to bring a touch of Indian culture and festivity into your home.
The use of readily available materials makes it accessible for crafters of all levels, while the step-by-step instructions ensure success.
For your reference I have shared a complete video walkthrough of the DIY Kalash decor on our YouTube channel.
Frequently Asked Questions
How long did it take to make this DIY Kalash Decor?
It took 30 minutes for me to make this DIY Kalash decor.
Where can I use this Kalash as a decoration?
You can use it anywhere around your living space, especially at festival occasions or if you startup a new business or buy a new space for living.
Can children participate in making this Kalash decoration?
Yes, this is a great project for families to do together. Adult supervision is recommended for younger children when using scissors and cutting tools.
How can I make the mango leaves look more realistic?
After cutting out the leaves, use a pen or blunt tool to gently trace lines along the center and edges to create a veiny texture.


