Tired of those boring key holders everyone seems to have? Well, ditch the store-bought trinkets and unleash your creativity!
Today, I’ll show you how to craft a fantastic key holder using everyday household items, perfect for keeping yourself organized or surprising a loved one with a unique, DIY gift.
In this DIY project you’ll just need cardboard, acrylic paint, glue and with few odds and ends, you’ll create a personalized key holder that’s both functional and fabulous.
Let’s take a quick look at the list of items I used to make this DIY Keyholder followed by easy to follow step-by-step instructions.
Step 1: Quick look at the list of items I’ve used for this DIY KeyHolder Project
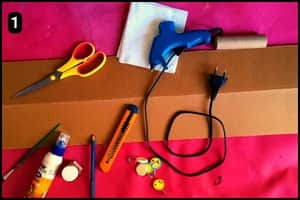
- Cardboard Sheet: I had ordered a parcel online and I have used the same cardboard sheet in which it came packed.
- Glue: I’ve used a hot glue gun and also a multipurpose PVA glue to stick the elements as required.
- Tissue Paper: I’ve used tissue papers to wrap over the base of the keychain holder to offer a rough surface.
- Acrylic Paint and Paintbrush: To paint and offer shade over the surface of the keychain holder I’ve used acrylic paints.
- Self Adhesive Hooks: I’ve bought a pack of self adhesive hooks to stick over the holder’s panel. It will be used to hang the keys.
- Pencil and Scissor: To mark and cut the accurate sizes I’ve used a pencil and scissor.
Step 2: Measuring The Required Sizes
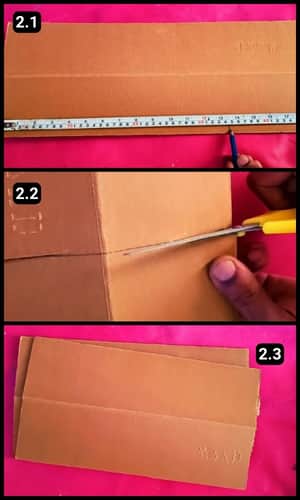
I had this long sheet of cardboard leftover from a box, you know, the corner piece with the fold
First, I measured it in half and cut it accordingly, post which I had the two pieces of sheets ready.
It’s not mandatory for you to cut the sheets into half, instead, you can trim them to match the available sizes or your specific requirements.
Step 3: Stick them Together
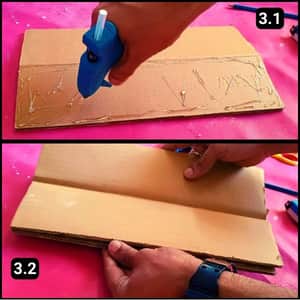
I have used a hot glue gun to stick the two sheets one over the other.
Then, I stuck them together to make a shelf at the center of the multipurpose key holder.
Doing this will allow me to place some items over the shelf and just below the shelf I will be fixing the keyholder hooks (to hang the keys).
When it comes to sticking cardboard sheets together, sometimes hot glue guns may not work. So, you can use multipurpose PVA glue to stick them together.
That being said, it might take some time to dry but it’s worth the wait.
Step 4: Cut the side supports
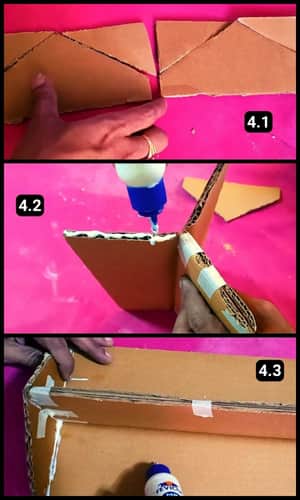
The next step is to cut the two side supports and stick them with proper alignment.
I did this for both sides and it’s important to mark the proper size before cutting and fixing them.
Step 5: Sticking The Tissue
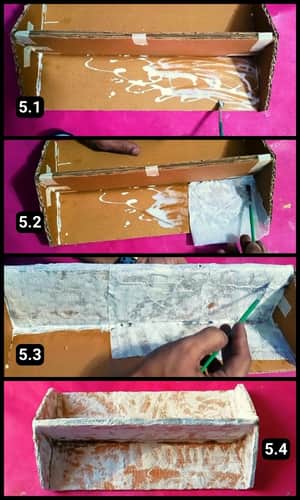
This was one of the most time-consuming steps in the entire process, so I made sure to tackle it patiently and carefully.
I covered its front areas with tissue paper, and then I let it dry. If you have access to direct sunlight, just place it there to speed up the drying process.
Once dried, it looked strong and durable enough to move forward. The surface also had a rough texture, ready for painting.
Step 6: Painting the Multipurpose Holder
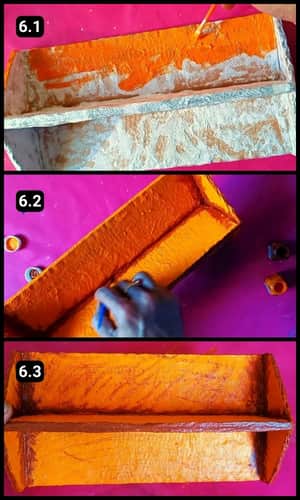
I used acrylic colors to paint the multipurpose keyholder.
Opting for orange and brown shades, I painted the item, but feel free to choose colors that suit your taste.
Starting with the front, I covered the entire surface in orange and later added brown shading to the edges.
There’s no need to paint the back since it will be against the wall.
However, if you prefer, you can either paint it or attach a sheet of origami paper for a decorative touch.
Step 7: Fixing the Hooks
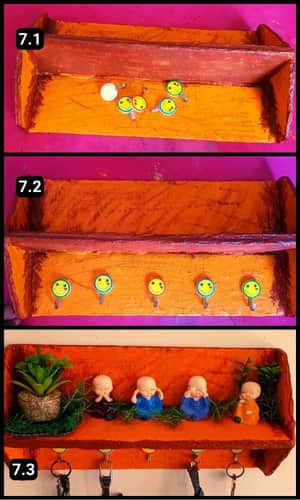
With paint dried, it was time to secure the hooks beneath the shelf.
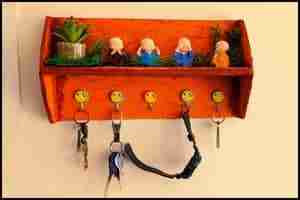
I opted for self-adhesive hooks, as shown in the image above. They proved sturdy enough to support the weight of a bunch of keys.
To enhance its appearance, I added a few items, turning it into a striking piece of decor.
Pleased with the placement and decor, I decided to surprise my partner. I installed it in her room and neatly aligned her keys onto it as seen in the image below.
This DIY Multipurpose Key holder can be mounted using strong double sided tape or you can also mount it with screws.
Video Walkthrough of Multipurpose Key Holder using Cardboard Waste
Final Thoughts
From measuring and cutting to the intricate task of applying tissue paper, patience and care is the key.
Also, the vibrant acrylic colors and self-adhesive hooks not only adds functionality but also offers a personalized touch thus making this project an excellent DIY Gift Idea.
Additionally I have also made a video walkthrough of this project (above), for you to follow.
Frequently Asked Questions
How long did it take to make the Cardboard Keyholder?
It took three hours to make this DIY cardboard keyholder. Majority of the time was consumed while sticking the tissue paper and letting it dry completely.
How did you fix this DIY cardboard keyholder to the wall?
I’ve fixed it using a strong double sided adhesive tape. However, you can also fix it by screwing it using POP screws to the walls.
What if I don’t have self-adhesive hooks to make DIY key holders using cardboard?
You can use traditional hooks and attach them securely. Ensure they are strong enough to hold the weight of keys.
Can I use a different method to mount the key holder?
Certainly! You can use strong double-sided tape or screws based on your preference and the wall type.
Is this DIY cardboard key holder sturdy enough to hold items other than keys?
Yes, The shelf design allows you to place various items, making it versatile enough to serve as both a functional key holder and a decorative shelf.
What if I want a glossy finish on the key holder?
You can achieve a glossy finish by applying a clear varnish or gloss sealer after painting. Make sure the paint is completely dry before adding the gloss.


