Mahashivratri is just around the corner, and what better way to welcome Lord Shiva into our homes than with a touch of creativity?
I decided to craft a DIY Lord Shiva Symbol, perfect for adding a spiritual vibe to our space.
This project isn’t just about home decoration, it’s about feeling closer to Lord Shiva during this sacred time.
I’m excited to walk you through how I made it, using simple materials and easy-to-follow steps.
Whether you’re looking for home decor craft inspiration or a new way to celebrate, this home decor craft will surely add a special touch to your Mahashivratri celebration.
So, without wasting any time let’s dive right into this creative journey together starting with taking a quick look at the list of things required for this Home Decor DIY project.
Step 1: Requirements to make DIY Lord Shiva Symbol

- Bamboo Sticks: I’ve used three bamboo sticks as the base support of the decor and will fix popsicle sticks over them. Also, I’ve used a single piece of bamboo stick to make Lord Shiva’s trishul (Trident).
- Popsicle Sticks: The popsicle sticks are used to make the base of the DIY decor project.
- Bottle Cap: I have used my baby bottle cap cover to make the holy Shiv Ling as it had its perfect shape.
- Origami paper: I’ve used a piece of origami paper to design the spikes of the Trident (Trishul).
- Glue: To stick the wooden items I’ve used a pva glue.
- Hot Glue Gun: It is needed to stick a few structures including the decorative elements.
- Pencil and Scissor: I used a pencil to draw the trident’s spikes and the scissor to cut the shape.
- Acrylic colors and paintbrush: I’ve used black, brown, white, red, and golden acrylic colors to paint the elements as desired.
- Pebbles & Artificial Decor: I had a few artificial decor plants and a packet of pebbles, so I used it to add a touch of ambiance.
With all the materials ready, you can start with this DIY craft project to make the occasion of maha shivratri a special one.
Step 2: Crafting the Base

First up, let’s tackle the base so that Shiv ling can sit firmly on the base.
So, I grabbed three popsicle sticks and spread them out on the floor.
Then, it was all about layering more sticks on top, one by one.
A dab of glue at each joint made sure they stayed put.
Now, patience is key, so at this point it’s crucial to let them sit until the glue dries completely.
It’s a simple start, but trust me, it sets the stage for something beautiful.
Step 3: Painting the base support

Now that the base is all set and dry, it’s time to go ahead and paint it.
I chose brown acrylic paint for the job.
Why acrylic, you ask? It’s perfect for wood and dries super fast, which means less waiting and more creating.
Let’s get that color on and bring our project to life!
Step 4: Painting the Shiv Ling

Now, let’s focus on creating the Shiv Ling, a sacred symbol of Lord Shiva.
I picked black acrylic paint for the bottle cap, covering every angle for a uniform look.
No need to worry about the bottom side, it’ll be out of sight once it’s placed on the base.
Once the paint dried, it transformed into something amazing, resembling a real stone piece. It’s fascinating how a simple touch can bring such a spiritual vibe to our space.
Step 5: Application of Tilak

Next up, I added a tilak to the Shiv Ling to infuse it with more sanctity.
I mixed red and white colors to get the perfect hue for the tilak.
The result? Absolutely striking. It’s amazing how a little color brings out the essence of this holy symbol.
Step 6: Preparing the Trishool (Trident) Spikes
Let’s move on to crafting the Trident (Trishool) spikes.
I only need to make the side spikes since the bamboo stick’s sharp end will serve as the middle one.
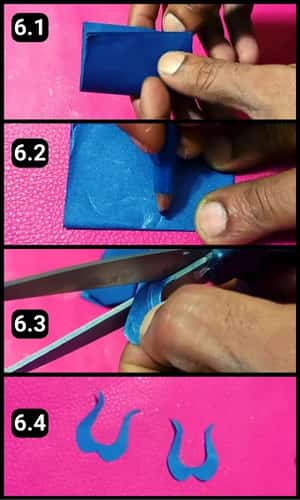
For this, I chose a piece of origami paper, folding it twice to create two matching spikes.
I sketched the spike shape on one side, following the design from image 6.2.
With the perfect shape outlined, it’s time to cut.
Remember, slow and steady wins the race here, especially if you want those spikes to look just right.
Step 7: Fix the Spikes to the bamboo stick
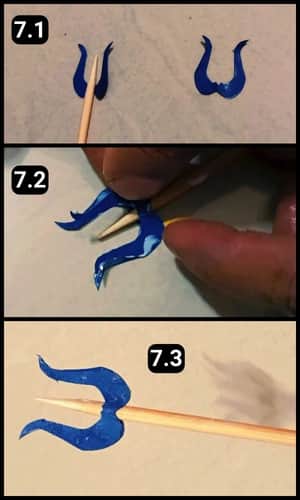
I positioned one cutout piece under the bamboo stick’s edge and the other above it as seen in image 7.1 above.
Next, I’ll dab some glue and stick them just as shown in images 7.2 and 7.3.
They’ve adhered perfectly and don’t need any trimming, which means we’re all set to tackle the next steps.
Step 8: Painting the Trishul (Trident)
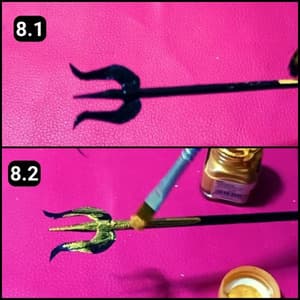
To make the trident appear as one seamless piece, I painted it black.
After the first coat dried, I went in with another layer for that deep, rich look.
Next up, I added some golden highlights to bring it to life.
Once that was done, I kept the trishul aside to let it dry for about 10 minutes. To be honest, it’s shaping up nicely, and I can’t wait to see the final look.
Step 9: Preparing the Structure

I used a hot glue gun to attach the bottom edges of the bottle cap (our Shiv Ling) firmly to the base.
Then, I applied glue to the contact points of the trishul, positioning it just right.
The glue ensures everything stays connected i.e. both to the Shiv Ling and the base, exactly as shown in images 9.2 and 9.3 above.
With the main structure in place, we’re now ready to sprinkle a bit of decorative magic on it.
Step 10: Attaching Pebbles and Other Artificial Decor
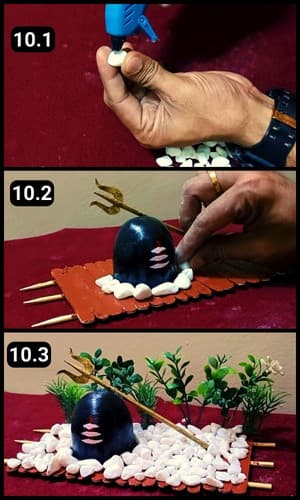
I began by sticking the white pebbles to the base, one at a time.
With the hot glue gun in hand, I carefully placed each pebble around the Shiv Linga.
As the project progressed, my excitement grew with each transformation.
After affixing the right amount of pebbles, I added some artificial decor behind the structure. And just like that, it turned out to be an eye-catching masterpiece.
Here’s a snapshot of the completed project i.e., our Lord Shiva Symbol.
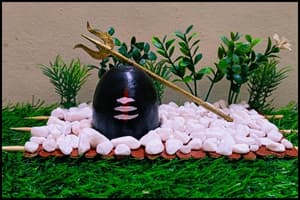
Since I crafted this for Mahashivratri, embodying Lord Shiva’s symbol, I positioned it in my living room following vastu principles.
It’s not just a piece of decor for us, we hold it in reverence too.
My wife suggested placing it near our home temple on a shelf, and honestly, that felt like the perfect spot.
Video Walkthrough of this DIY Shivling Home Decor Project
Additional Tips to elevate your crafting experience
Experiment with Materials
Don’t hesitate to use different materials that you have at home.
For example, if you don’t have origami paper for the Trident spikes, consider using thick paper or cardboard and painting it accordingly.
Safety First
When working with hot glue guns or scissors, always prioritize safety, especially if you’re crafting with kids.
Keep a bowl of cold water nearby when using hot glue, in case of any spills on your skin.
Personalize Your Project
Add elements that are meaningful to you or your family.
For instance, you could write your family name, a special date, or a short prayer on the base of the Shiv Ling.
This makes your DIY project even more special and tailored to your personal devotion or home decor.
Upcycle and Recycle
Search your home for things that can be repurposed, trust me the satisfaction level is unmatched when you create something out of things that are no longer needed.
The bottle cap used for the Shiv Ling is a great example. Not only does this approach save money, but it also promotes sustainability.
Research and Inspiration
Before starting your project, look up various designs and interpretations of the Shiv Ling and Trident.
This research can inspire your work and help you incorporate different artistic elements into your design.
Take Your Time
Rushing through the steps can lead to mistakes or a less satisfying outcome.
Enjoy the process, and allow yourself time to carefully complete each step. Remember, the beauty of DIY projects lies in the care and thought put into them.
Display with Pride
Once completed, choose a prominent place in your home for your DIY decor.
As suggested, placing it near the home temple or in a living room can enhance the spiritual ambiance of your space.
Final Thoughts
Looking at the basic materials I started with, it’s hard to imagine they could turn into something beautiful.
Seeing the symbol now, gracefully placed near our home temple, it’s a reminder of the joy and satisfaction that comes from creating something with your own hands.
Also when comparing this project to similar items online, I saved a bundle, making it for a fraction of the cost.
Plus, I’ve put together a complete tutorial video for you to follow along (above).
It’s amazing what you can achieve with your own two hands.
Frequently Asked Questions
Are acrylic colors good for metal crafts?
Acrylic colors are ideal for most applications including, glass, meta, wood, etc,.
What other symbols can I create if I want to make a series for different occasions?
For a series, consider creating symbols relevant to other festivals or deities such as Ganesha for Ganesh Chaturthi, a lotus for Saraswati Puja, or a peacock feather for Janmashtami. Research the symbols associated with each festival for inspiration.
How much time will this DIY Mahashivratri Craft Idea take?
It takes anywhere between 30 minutes to an hour depending on the level of expertise. So, if you are a beginner, 1 hour should be the maximum amount of time you will need.
Is it necessary to follow vastu principles when placing the decor?
While following vastu principles can enhance the spiritual and aesthetic value of your decor, it’s not strictly necessary. Place your decor where you feel it fits best in your home and where it brings you joy.
What if I can’t find white pebbles for the final decor touch?
If white pebbles are not available, consider using other small decorative elements like beads, cotton balls, colored stones, or even dried flowers. The goal is to add texture and interest around the Shiv Ling and Trishul.
How can I incorporate LED lights into this project?
Adding LED lights can create a beautiful ambiance. Small LED tea lights or fairy lights can be arranged around the base or behind the Shiv Ling and Trishul. If using battery-operated lights, ensure they’re easily accessible for when you need to turn them on or replace batteries.


