In preparation for Easter, I’ve created several DIY decorations. Now, I’m brainstorming gift ideas for my son.
After considering several options, I decided to make something that would keep him engaged with his education.
I purchased a few pens and created a DIY pen top for Easter (Pen Decoration).
The result was delightful! He was thrilled to receive the pens and became more enthusiastic about writing, which he usually dislikes.
In this article, I’ll provide step-by-step instructions for making these pens. Feel free to use these ideas to create your own custom themes.
So, without wasting any time let’s dive into the steps to create a beautiful DIY Pen Decoration.
Step 1: Materials I have used (Gather the materials)
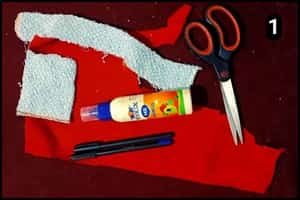
Here’s the list of items that I’ve used to make the pen tops as a gift for my kids on the occasion of Easter.
- Red Velvet Cloth: To wrap the pens I used a piece of red velvet cloth.
- Pieces of Plush Towel: To craft the pen top structures I’ve used pieces of plush towel.
- Pens: I bought a couple of pens to decorate them and present to my children.
- Scissor: To cut the desired pen top structures I’ve used a scissor.
- Glue: I used an multi purpose glue to stick the required elements.
Alright, now that we have all the ingredients prepared, let’s start crafting our Easter-themed pen decorations to enhance the festive atmosphere.
Step 2: Cut strips of Velvet cloth
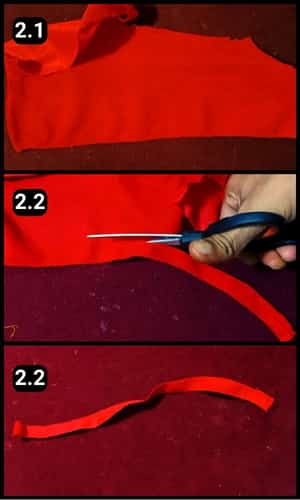
From the piece of red velvet cloth, I cut a couple of strips which will later be used to wrap the pens.
Make sure to cut them evenly and if required mark the sizes using measurement tape.
That being said, if you are a pro, free hand cutting will save some time in this process.
Step 3: Wrapping the strips to our pen
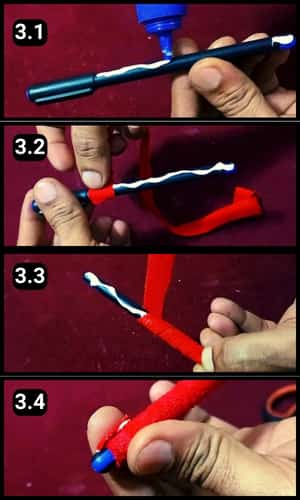
First, I applied glue to the pen’s body as seen in image 3.1 above.
Next, I started wrapping the pen with a strip of red velvet cloth which I had cut in the previous step.
Throughout the process, I moved slowly and ensured the glue spread evenly as I wrapped the piece of cloth around it.
Finally, I wrapped the pen and applied some glue to the tip and stuck it firmly.
Step 4: Wrapping the second pen
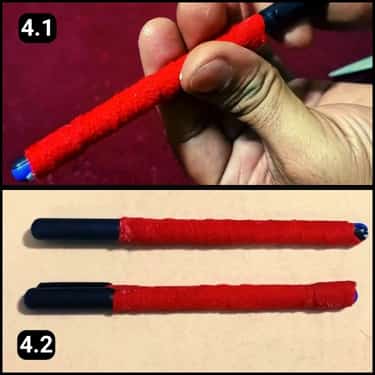
Following the same steps, I wrapped the second pen and let them dry.
They were wrapped as desired and also seemed to be completely dry.
Step 5: Crafting the pen top structure
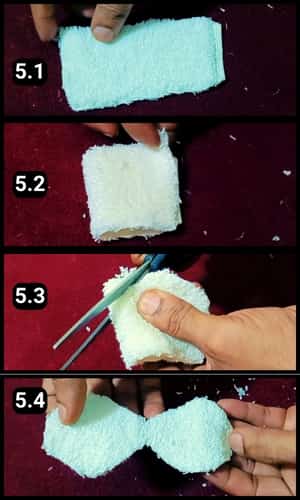
Next, I crafted two structures for two different pens.
To match it to the Easter theme, I first crafted a Bunny’s face and fixed it over the edge of one of the pens.
And to begin with, I used a piece of plush towel.
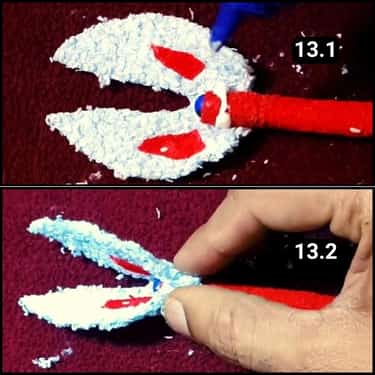
Next, I folded it into half as seen in image 5.2 above.
Finally, I cut the shape and unfolded the piece of towel to form the dual-sided facial structure.
Step 6: Crafting the Bunny’s ears
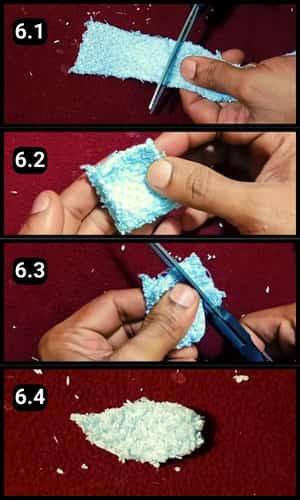
In Step 6, I used another piece of light blue plush towel to craft the bunny ears.
I used a small strip of towel and folded it into half.
Next, I snipped out the ear shapes, just like the ones in images 6.3 and 6.4. It felt like a small art project, turning simple materials into something magical for my little one.
Step 7: Paste them together (Ear and face)
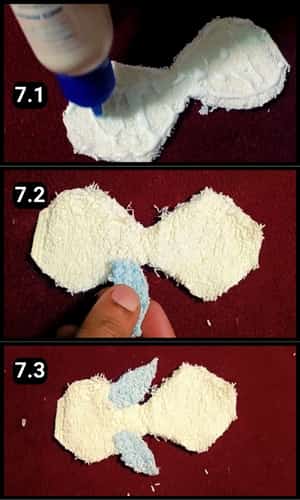
To stick them together, I applied the multi-purpose glue to the facial structures.
Next, I placed the ear cut shapes accordingly so that they were stuck between the facial structures.
Post which, I aligned them properly and since the glue was about to dry I needed to quickly fold the shape (this step is important).
Step 8: Folding the Facial structure
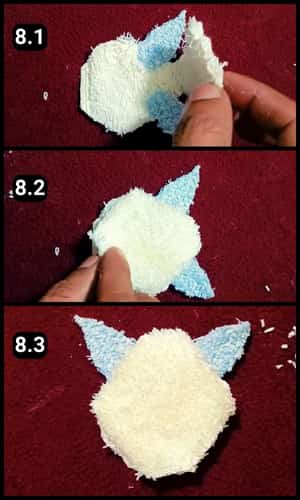
Next, I carefully folded the facial structure and softly pressed along the edges to make sure everything lined up just right.
Then, I set it aside to dry for a bit.
It’s a little moment of patience that pays off big in smiles later.
Step 9: Stick the nose
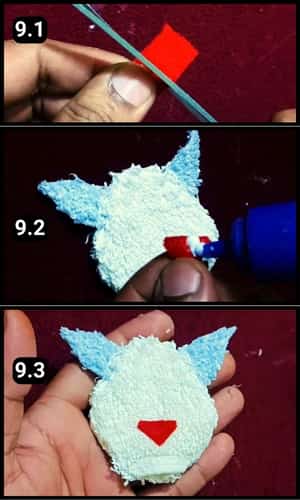
Next up, I used a piece of red velvet cloth and shaped it like Bunny’s Nose.
And then I applied glue and fixed it on both the front and back sides.
Step 10: Fixing the Bunny Pen top
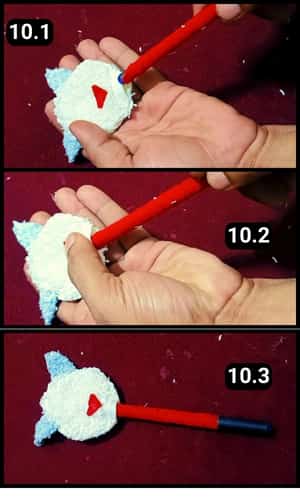
In order to fix the bunny pen top, I gently nudged the pen’s edge into the gap I left unglued.
It slipped in perfectly, but if needed, you can dab a bit of glue to attach the bunny’s face securely to the pen.
Now, let’s give our bunny some eyes to bring it to life.
Step 11: Fixing the googly eyes
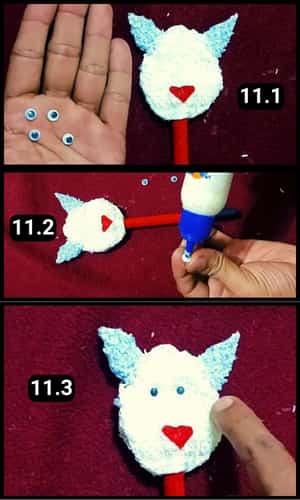
To enhance it further, I stuck googly eyes to the facial structure of the Bunny.
These elements were easily available online and at local stores in various patterns and sizes.
After I had stuck them on, it looked as if it had come to life. I had the first pen top ready and then quickly crafted the second item.
Step 12: Crafting the second pen top
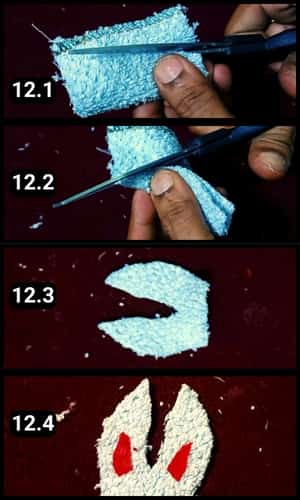
For the second pen, I’m making long bunny ears.
I started by folding a strip of blue towel and then cutting out the ear shapes in one go.
Next, I took a piece of red velvet cloth, shaped some cute accents, and stuck them onto the ears.
Step 13: Fixing the second pen top
Next, I attached the second pen top to the edge of the pen.
I positioned the pen’s edge at the bottom end of the bunny ear structure.
Then, I dabbed on some multi-purpose glue and wrapped the base of the structure around the pen’s edges.
After completing it, I left it to dry for a while.
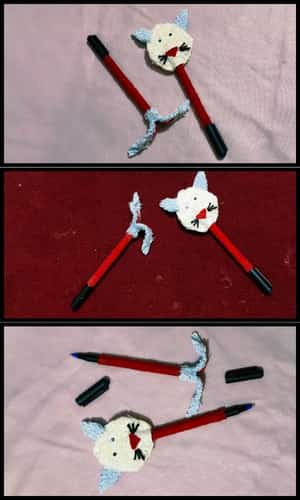
Below, I’ve included a few images where you can see both pen top items ready to charm.
Video Walkthrough of DIY Pen Decoration (Easter Bunny)
Final Thoughts
Seeing the sparkle in my son’s eyes as he reached for his new pens reminded me why I love DIY projects.
They’re more than just crafts, they’re little tokens of love, sparking joy and creativity.
My son was thrilled with the pen tops and couldn’t wait to show them off at school the next day.
Since he’s been expressing a newfound interest in writing, which he previously found challenging, I promised to make more of these pens and pencils if he keeps up the good work.
For your convenience, I’ve also included a video walkthrough above with step-by-step instructions on how to make these DIY pen decorations.
Remember, it’s not about perfection, it’s about the love and thought that go into making something special.
Whether for Easter or any other occasion, these handmade gifts carry a piece of our hearts.
Frequently Asked Questions
How long did it take to make this DIY Easter Pen Decoration?
It took about 40 minutes to craft and decorate the two pens including the drying time.
What can I use instead of towel pieces for this DIY Easter Pen Top Decoration?
You can use cardboard pieces, felt sheets, origami papers, etc. to craft pen top characters.
What if I don’t have googly eyes for the bunny’s face?
No problem! You can cut out small circles from white paper and draw the pupils with a marker. Another fun option is to use buttons or beads for the eyes.
Is it possible to customize these pens for other occasions?
Yes, absolutely! The beauty of this DIY is its versatility. Simply change the theme to match any occasion, like Halloween, Christmas, or birthdays, by altering the shapes and colors.
Where can I find the materials for this DIY Easter Pen Decoration project?
Most of the materials needed for this project can be found at local craft stores or online. You might even discover that you already have many of them at home, making this a cost-effective craft.
Can I wash this DIY Easter Pen if they get dirty?
Because of the materials used, it’s best to spot clean the pens with a slightly damp cloth instead of washing them. Avoid getting the pen’s ink and the glued areas wet.


