Making your own DIY photo frame from cardboard waste is a fun and inexpensive way to add a personal touch to your home décor.
In this creative project, you have the freedom to tailor your frame to your heart’s content, making it uniquely yours.
By turning trash into art, you not only make art, but you also help the environment. Plus, this diy decor makes an excellent gift idea as well.
In this article, I’ll share my personal experience of starting this journey using simple supplies and instructions, which I’ll explain in detail.
Editor’s Note: I recently crafted another version of a DIY photo frame project specifically for valentine’s day. If you prefer a video walkthrough, check out the DIY Valentine’s Day photo frame video here.
Step 1: Things I’ve used to craft this photo frame using cardboard waste
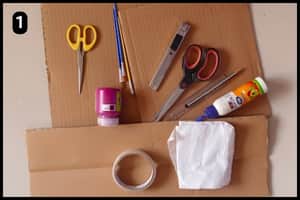
- Cardboard Sheets: I’ve used cardboard sheets which I had received as a parcel box.
- Pencil and a Geometrical ruler: To measure and mark the required measurements I’ve used a pencil and a ruler.
- Scissors and Cutter: Due to the difficulty of cutting cardboard sheets with scissors, I utilized both a pair of scissors and a sharp cutter for effective cutting.
- Multipurpose Glue: I’ve used a multipurpose glue to stick the cardboard sheets together and have also used the hot glue gun on several occasions.
- Tissue papers: To wrap the cardboard sheet for a rough appearance, I used tissue papers.
- Acrylic Paint & Paintbrush: To paint the outer frame panels I’ve used a regular paintbrush and a maroon color acrylic paint.
- Origami Paper: To wrap the base frame I’ve used a red color origami paper.
Step 2: Measure and Cut the Cardboard Sheets
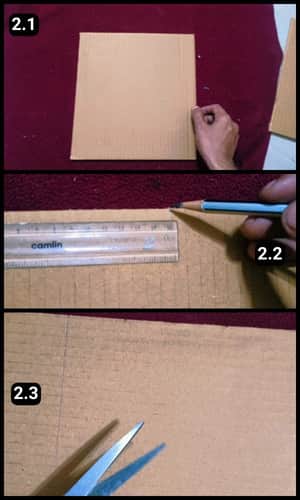
To begin with, I started by selecting a cardboard sheet and cutting it to my desired dimensions.
For this project, I opted for a neat and versatile rectangular shape.
Specifically, I cut my sheet to measure 15 cm x 20 cm, providing ample space for showcasing my favorite memories.
Using a pencil and trusty geometric ruler, I carefully marked out the dimensions to ensure precision.
Then, armed with a sharp cutter, I skillfully sliced through the cardboard, executing clean and precise cuts.
Step 3: Cutting similar sizes
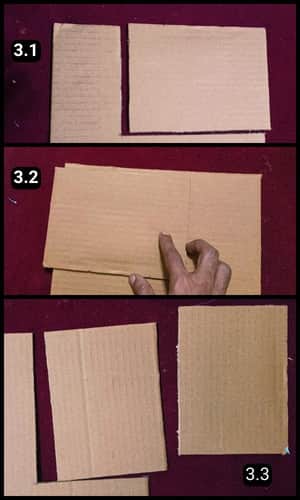
Next, I began by cutting at least three sheets of the same size.
One served as the base of the frame, while the second and third became the cutout panels.
Ensuring uniformity, I carefully cut all three sheets to identical measurements. Then, I proceeded to cut two more sheets to craft the outer panels of the photo frame.
Step 4: Cutting the outer panels
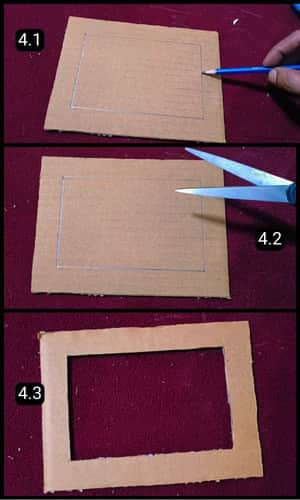
Initially, I measured and marked the required sizes on one of the panels.
Then, I proceeded to cut the sheet to obtain the desired panel for the photo frame. Following that, I replicated the process to cut the second panel to a similar size.
Step 5: Cutting the second frame panel
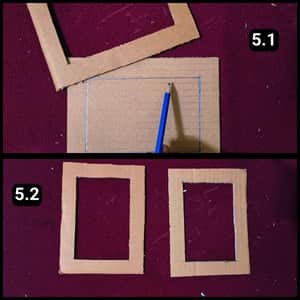
To measure the second panel, I simply placed the first cutout over the second sheet and made the markings accordingly.
After that, I cut it using scissors and obtained two panel frames of the same size as required.
Step 6: Mark and Cut the Base Frame
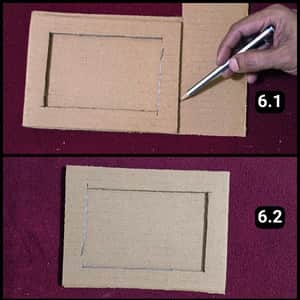
Next, I placed one of the cut-out panel frames over a piece of cardboard and marked the required size for the base.
Once I had marked and cut them, I had the base of the frame ready, as shown in the images above.
Step 7: Fixing the Top panel frames
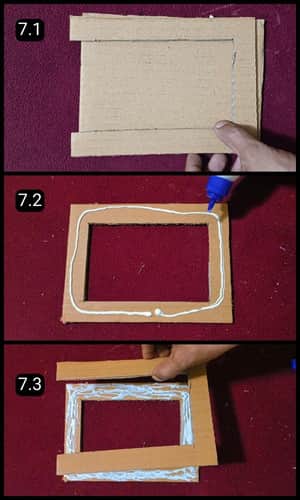
Before fixing the two cutout top panel frames, I needed to cut one side of a frame, as shown in image 7.1 above.
This created the gap necessary to insert photographs into the photo frame.
Then, I applied glue between the cutouts and stuck them evenly, ensuring to press the edges firmly for a secure bond.
To aid in the sticking process, I placed a flat book over them.
Afterward, I let it dry for some time before moving on to the next steps.
Step 8: Tissue Paper Layers
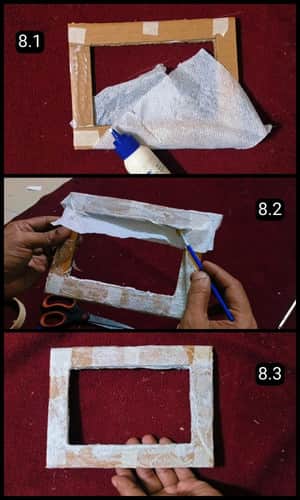
To give the outer panels of the photo frame a vintage touch, I decided to add some texture to their surfaces.
I chose to wrap them with tissue papers for this purpose.
Applying tissue papers not only created a rough surface appearance but also helped fill any gaps around the edges, especially over the cardboard sheets.
I began by applying glue to the panel surfaces and then proceeded to affix the tissue paper.
One option is to dilute the glue by mixing it with water and using a brush to spread the mixture over the tissue.
Alternatively, you can apply glue directly to the surfaces, place the tissue papers, and then use a paintbrush dipped in water to run over the surfaces.
Step 9: Paint and fix the Frames
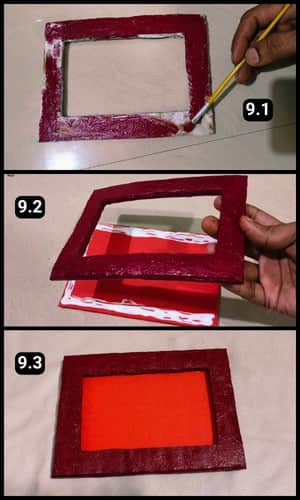
The tissue paper layers appeared to be dry at this point, so it was time to give the main frame some color.
I opted for maroon acrylic paint to enhance the vintage look over the rough surfaces.
Using a regular brush, I applied the paint evenly across the entire frame panel. Afterward, I left the paint to dry for some time.
Although acrylic colors typically dry quickly, I placed the frame under a running fan to expedite the drying process.
Within 10 minutes, the paint appeared completely dry, signaling it was time to attach it to the base.
To stick the frame to the base panel, I covered the base panel of the photo frame with red origami paper.
After applying glue and wrapping it from all sides, I left it to dry.
With both the frame panels and the red base panels now dry, I began by evenly applying multipurpose glue around the edges of the frame base, as shown in image 9.2 above.
Next, I placed the main frame panel over the base and pressed it gently.
To ensure a secure bond, I placed a long book over the frame. I then left it to dry for about 20 minutes.
Step 10: Applying The Golden Shades
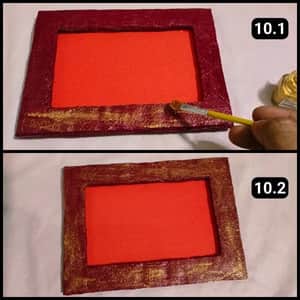
To add a further touch of elegance to the photo frame, I applied golden shades over the main frame panels.
The final touch-ups truly enhanced their appearance, making them visually striking.
While the golden shade was optional, I was keen on elevating the frame’s aesthetic to bring a decorative element to my living space.
Step 11: Fixing the decorative thread
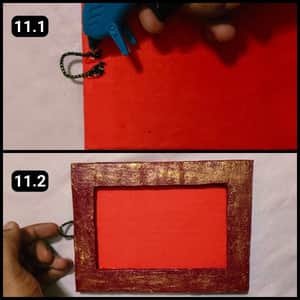
I used a decorative thread to secure it behind the photo frame for hanging purposes.
First, I cut the thread to the required size and secured its edges using a hot glue gun.
I ensured it dried evenly before utilizing the DIY photo frame.
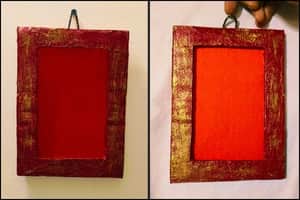
Looking at the final image below, it resembles a decor piece even without adding a photograph to it.

You can either place your pictures as memories or any beautiful painting or image into the frame.
Video Walkthrough of DIY Photo Frame Using Waste Cardboard
Final Thoughts
When you’re in the mood for a fresh home décor project, why not try making your own photo frame using recycled cardboard sheets, just like I did? It’s a fun and easy way to add a personal touch to your living space.
Display your handcrafted photo frame anywhere in your home, whether it’s in the living room, bedroom, or even your office.
Since the frame is made of cardboard, it’s best to keep it indoors to protect it from moisture damage.
I have also put together a video walkthrough of this DIY photo frame project on our YouTube channel to guide you through the entire process step by step.
Frequently Asked Questions
How long did it take to make the cardboard photo frame?
Including the drying time of the glue and paint it took about a couple of hours to complete this particular project.
What else can I use instead of paint for this DIY Photo Frame Project?
You can use paper sticker sheets instead of using paint over the photo frame it will also reduce the making time.
How should the tissue papers be applied to the outer panels of the photo frame?
The tissue papers should be applied to the outer panels of the photo frame by first applying glue to the panel surfaces, then affixing the tissue paper evenly.
What are the benefits of using tissue papers in this DIY project?
Using tissue papers in this DIY project not only creates a rough surface appearance but also helps fill any gaps around the edges, especially over the cardboard sheets, enhancing the overall aesthetic.
What is the purpose of using a hot glue gun in this DIY project?
A hot glue gun is used in this DIY project to secure the decorative thread behind the photo frame for hanging purposes, providing a strong and reliable attachment.


