I love seasonal crafts, especially when they don’t cost me a single rupee.
That’s why I started collecting random household scraps for DIY Shamrock Crafts from Recycled Materials. Old boxes. Bottle caps. Newspaper. Even broken crayons. Why throw them?
If you’re planning simple St Paddy’s Day Crafts at home, these ideas are beginner friendly and super doable. No fancy tools. No art degree needed. Just patience… and maybe a little green paint.
Let’s start. Ready to turn trash into lucky charm decor?
1. Cardboard Cereal Box Shamrock Wall Art
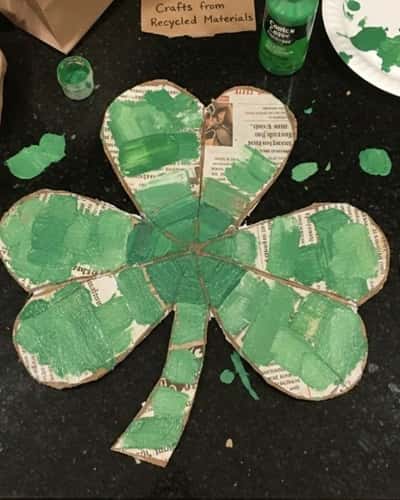
Got an empty cereal box? Perfect.
Materials:
- Empty cereal box
- Pencil
- Scissors
- Green paint (any shade)
- Old sponge or brush
- Glue
- Scrap newspaper
Steps:
- Open the cereal box flat. Draw a big shamrock with three heart-shaped leaves and a stem.
- Cut it out carefully. Don’t rush this part.
- Tear newspaper into tiny bits.
- Glue the paper pieces over the cardboard shamrock to create texture. Let it dry fully.
- Dab green paint using a sponge. It creates a rustic finish.
- Let dry again. Add a small hole on top to hang with thread.
It looks surprisingly bold once on the wall, even if edges aren’t perfect. Mine would probably look uneven but that’s the charm, right?
2. Bottle Cap Shamrock Fridge Magnet

Tiny things can make cutest Easy Shamrock Crafts.
Materials:
- 4 green bottle caps
- Cardboard scrap
- Glue (strong one)
- Small magnet
- Green acrylic paint (if caps aren’t green)
Steps:
- Arrange three caps in a triangle shape for leaves.
- Place one cap slightly below as stem.
- Trace that shape on cardboard and cut backing.
- Glue caps onto cardboard base.
- Attach magnet on backside. Let dry overnight.
Simple? Yes. But it’s bold and chunky. And kids love this one for St Patrick Crafts For Kids because its small and satisfying to make.
3. Newspaper Rolled Shamrock Wreath
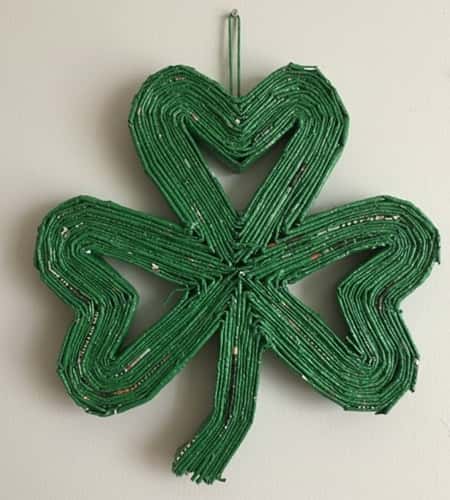
This one looks fancy but it’s not. Promise.
Materials:
- Old newspapers
- Tape
- Green paint
- Circular cardboard base
Steps:
- Roll newspaper sheets into tight tubes. Tape ends.
- Shape three heart loops for shamrock leaves using the tubes.
- Tape joints firmly.
- Attach stem piece.
- Glue the whole shamrock onto circular cardboard base.
- Paint everything green.
Let it dry fully. If paint looks streaky, good. That rustic vibe screams Irish Crafts For Kids.
Would I hang it outside? Maybe not in rain. But inside door decor? Cute.
4. Egg Carton 3D Shamrock
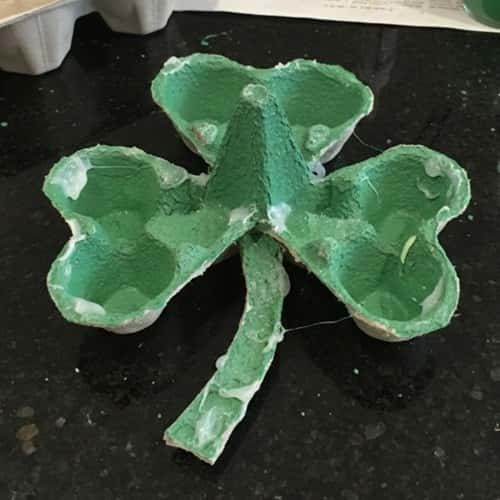
Don’t toss that egg tray yet. It’s gold for diy shamrock crafts.
Materials:
- Cardboard egg carton
- Scissors
- Green paint
- Glue
- Scrap cardboard
Steps:
- Cut out three egg cups carefully. Trim edges smooth-ish.
- Cut one narrow strip for stem.
- Glue the three cups in triangle form onto scrap cardboard.
- Attach stem at bottom.
- Paint everything green. Dab paint inside grooves too.
Let dry completely. The texture from egg carton makes it pop naturally.
It may look slightly bulky, but that’s what makes it look handmade. Perfect for Shamrock Crafts For Kids and even St Paddys Day Kids classroom boards.
5. Old Magazine Collage Shamrock Canvas
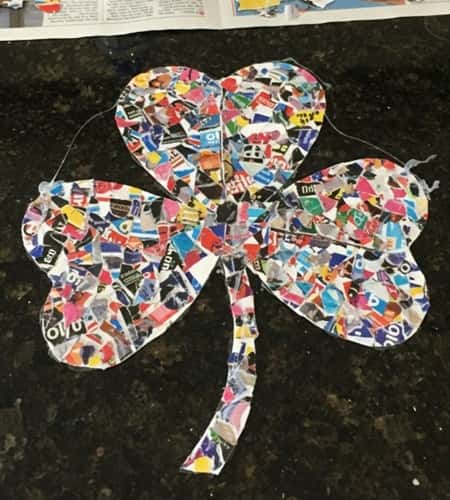
This one feels artsy. And messy. And fun.
Materials:
- Old magazines
- Cardboard piece (canvas base)
- Pencil
- Glue
- Clear tape (optional seal)
Steps:
- Draw a big shamrock outline on cardboard.
- Flip through magazines and tear out green pages. Don’t cut neatly – tearing gives texture.
- Glue pieces inside the outline. Overlap randomly.
- Press down gently. Let dry flat under books.
- Seal with clear tape strips if you want shine.
Each collage looks different. That’s the beauty of Easy Shamrock Crafts like this. No two ever match.
It might not look “perfect,” but who decides perfect anyway?
Great for St Paddy’s Day Crafts For Kids because it builds fine motor skills too.
6. Plastic Spoon Shamrock Decor
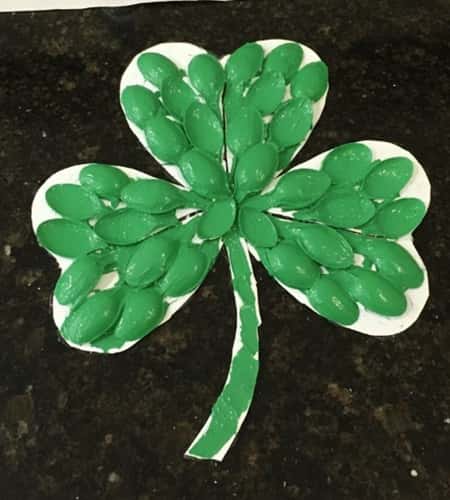
Okay this one surprised me when I first saw it. Plastic spoons? For shamrocks? Yes.
Materials:
- 12 to 15 used plastic spoons (washed well)
- Cardboard base
- Green spray paint or acrylic
- Glue (hot glue works best)
- Small stick for stem
Steps:
- Cut handles off spoons. Keep only the oval heads.
- Draw a shamrock shape on cardboard and cut it out.
- Glue spoon heads overlapping slightly to fill each leaf section. Curve sides outward.
- Attach a small stick as stem.
- Paint everything green. Let dry completely.
The layering creates a petal-like texture. It actually looks fancy but it’s just recycled waste.
This could easily fit into Leprechaun Crafts For Kids themes too. And honestly, if spoons slightly melts under glue, don’t panic – it still works.
7. Broken Crayon Melted Shamrock Art
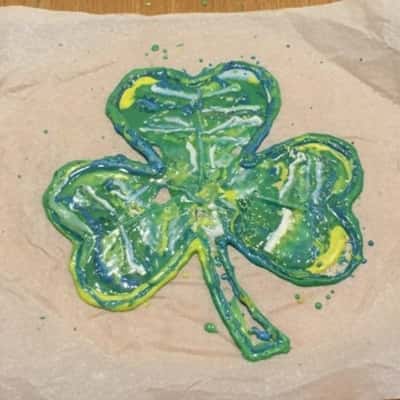
Got tiny crayon bits lying around? Don’t throw them.
Materials:
- Broken green crayons
- Wax paper
- Iron
- Cardboard shamrock cutout
Steps:
- Shave or break crayons into tiny pieces.
- Place wax paper sheet flat. Spread crayon bits inside shamrock shape area.
- Cover with another wax sheet.
- Press lightly with warm iron (adult supervision needed).
- Let cool fully before peeling.
- Cut into shamrock shape and glue onto cardboard backing.
The colors melt into each other like stained glass. It looks messy while melting but once cooled, it’s magical.
This is one of those Fun St Patricks Day Crafts For Kids that feels like science experiment.
Be careful though – too much heat and it gets overly runny, which I guess still works but looks wild.
8. Tin Can Lid Shamrock Hanging
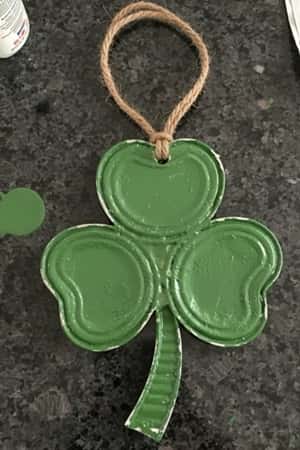
This one feels a bit rustic. Almost farmhouse. But totally made from trash.
Materials:
- 4 clean tin can lids (edges filed slightly for safety)
- Strong glue
- Green acrylic paint
- Twine
- Small cardboard scrap
Steps:
- Arrange three lids in triangle shape for leaves.
- Place one slightly below for stem.
- Glue them onto cardboard backing. Let dry properly.
- Paint entire surface green. Two coats works better.
- Punch small hole on top and tie twine for hanging.
The metal gives it weight. It’s not super light, so hang carefully.
For St. Paddy’s Day crafts decor, I believe this would look cute near the entryway. Even if paint chips a little, it still looks charming.
9. Green Fabric Scrap Shamrock Pillow Patch
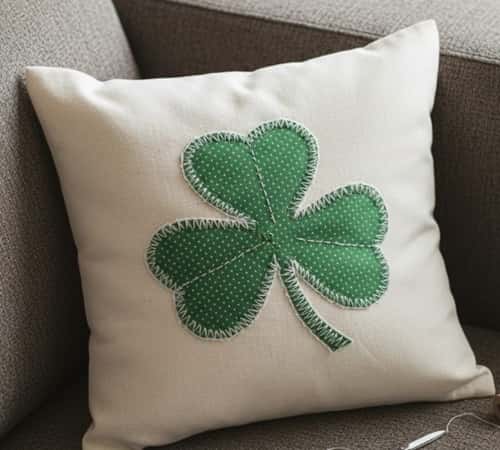
Old green t-shirt? Don’t toss it.
Materials:
- Green fabric scraps
- Old plain cushion cover
- Needle & thread (or fabric glue)
- Paper for template
Steps:
- Draw shamrock template on paper and cut it out.
- Trace onto green fabric and cut shape.
- Place on cushion cover center.
- Stitch around edges with basic running stitch. Uneven stitches are fine.
- If sewing feels hard, use fabric glue instead.
This gives cozy, handmade vibe. Not perfect stitching makes it more real honestly.
It fits beautifully into Irish Crafts For Kids if older kids can sew basic stitches. And yes, if thread knots, just redo it… happens all the time.
10. Old CD Mosaic Shamrock
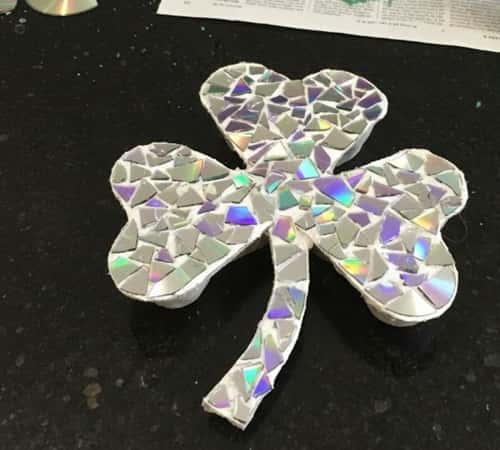
Remember those scratched CDs nobody uses anymore? Don’t throw them away just yet.
Materials:
- Old CDs or DVDs
- Scissors (strong ones)
- Cardboard base
- Glue
- Green paint (optional background)
Steps:
- Carefully cut CDs into small irregular pieces. They may crack unevenly… that’s okay.
- Draw a shamrock outline on cardboard and cut it out.
- Paint the cardboard green first if you want deeper color behind gaps. Let dry.
- Glue CD pieces inside the shamrock shape like mosaic tiles. Leave tiny gaps.
- Let it dry completely before moving it.
The reflective surface shines beautifully in light. It almost looks store bought… but its not.
This can easily be added to St Patrick Crafts For Kids wall display boards. Just supervise the cutting part.
11. Paper Bag Shamrock Garland
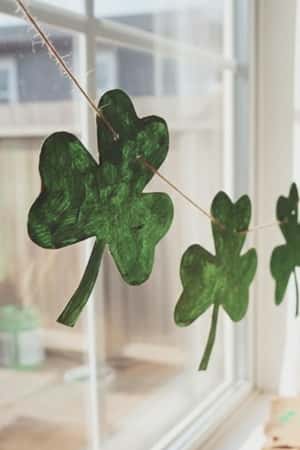
Simple. Budget friendly. Surprisingly cute.
Materials:
- Brown paper grocery bags
- Pencil
- Scissors
- Green paint or marker
- String
Steps:
- Flatten paper bags and draw multiple small shamrock shapes.
- Cut them out. Don’t worry if edges aren’t smooth.
- Paint or color them green. Let dry.
- Punch two small holes on each side of shamrock.
- Thread string through to create garland.
Hang it across window or shelf. It gives soft farmhouse feel.
These Easy Shamrock Crafts work great for Shamrock Crafts For Kids because cutting paper bags is manageable. Though sometimes paper tears weirdly, but that’s fine.
12. Plastic Bottle Bottom Shamrock Suncatcher
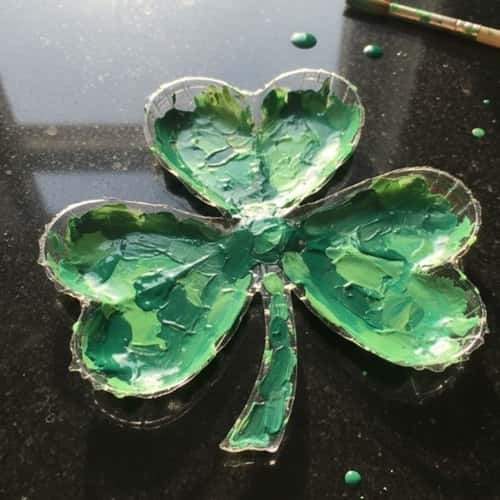
This one feels clever. Like… why didn’t we think of this before?
Materials:
- 3 clear plastic bottle bottoms
- Green glass paint or diluted acrylic
- Glue
- Cardboard backing (optional)
- Thread
Steps:
- Cut the bottom part of three plastic bottles. The natural flower shape works perfectly as shamrock leaves.
- Paint each piece lightly with green glass paint. Don’t overdo it.
- Let them dry completely. It may takes longer than you expect.
- Glue the three pieces together slightly overlapping to form shamrock shape.
- Add small stem from scrap plastic or cardboard.
- Attach thread to hang near window.
When sunlight hits it, it glows softly. It’s imperfect and slightly uneven, but that makes it feel real.
This fits beautifully under diy shamrock crafts and even Leprechaun Crafts For Kids classroom decor ideas. Just be careful cutting plastic edges.
13. Old Puzzle Piece Shamrock Board
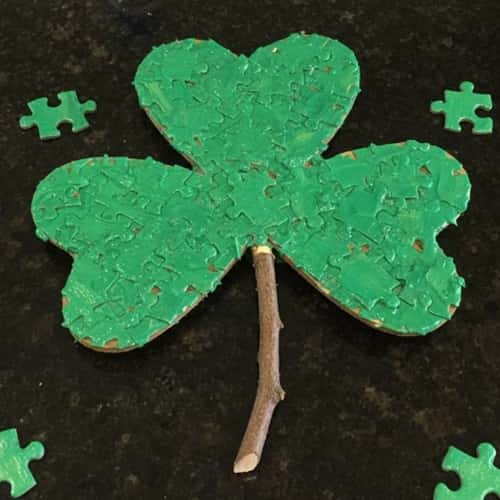
Missing puzzle pieces? Finally useful.
Materials:
- Old puzzle pieces
- Cardboard base
- Green paint
- Glue
- Small twig for stem
Steps:
- Draw shamrock outline on cardboard and cut it out.
- Glue puzzle pieces inside the shape, filling it completely. Overlap slightly if needed.
- Let glue dry firmly.
- Paint entire surface green. Make sure paint goes into gaps.
- Glue twig at bottom for stem.
The raised texture looks playful. Almost like 3D art.
This is one of those St Paddy’s Day Crafts For Kids that builds patience because arranging puzzle pieces takes time. And sometimes pieces don’t fit nicely but thats okay.
Final Thoughts
Here’s something interesting – when we use recycled supplies for St Paddys Day Kids projects, we’re not just saving money.
We’re teaching resourcefulness without even saying it out loud. Kids learn creativity isn’t about buying more stuff.
It’s about seeing possibilities in scraps. And honestly? Many of these Irish Crafts For Kids style ideas may not look flawless. Good. That’s where personality lives.
The tiny glue smudges, crooked stems, uneven paint strokes… they tell a story.
So next time you see “trash,” pause. Maybe it’s just waiting to become your next lucky shamrock.


