Eye masks are not just for grown-ups, they’re a secret weapon for a good night’s sleep.
Imagine the joy on a child’s face when they get to wear one shaped like their favorite character.
With Easter around the corner, I had a lightbulb moment: why not craft a bunny-themed eye mask for my son? It would be a fun, cozy gift, perfectly in tune with the season.
So, I searched through our craft supplies to gather everything I needed for this DIY project.
I managed to sneak in some crafting time while he was at school, keeping the surprise under wraps.
And oh, the look on his face when I finally showed him the bunny eye mask was priceless.
He was so excited, he immediately put it on, pretending to be asleep even though it was the middle of the day.
It was a special moment, capturing the pure joy of childhood and the magic of simple surprises.
Without wasting any time, let’s dive right into the making process starting with the list of things required to make the easter bunny eye mask.
Step 1: Quick look at the requirements to make the eye mask
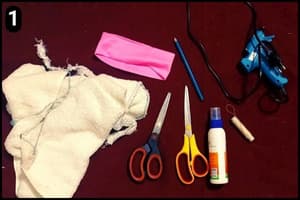
- Soft Towel: I found a piece of a towel that was torn but still new, soft, and plush. It felt just right for something gentle on the eyes, perfect for creating a bunny shape.
- Hairband: I picked out a headband from my wife’s collection, making sure first it wasn’t the one she wore all the time. She was okay with me using it, knowing it was for a special DIY surprise for our son. It’s the pink band as seen in the image above.
- Needle and Thread: To sew and fix a few elements I’ve used a needle and thread.
- Scissors: I’ve used scissors ideal for cutting thick towels and another for the lighter ones.
- Pencil: To draw and mark a few elements I have used a dark shade pencil.
- Hot Glue Gun: I just kept it around if something needs a quick fix during the process.
Step 2: Cutting the Plushy Towel Sheet
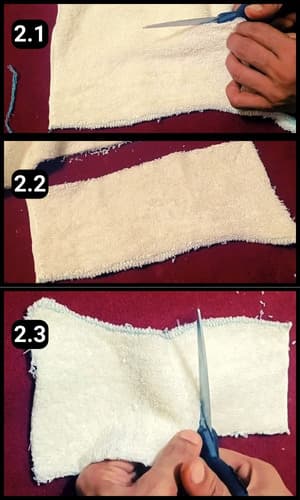
First up, I’ve trimmed the soft towel into the right size for the eye mask.
I am making two bunny faces, one for each eye, so I’ve cut out two pieces to make sure they comfortably cover both eyes.
Step 3: Draw and Cut Bunny’s Facial Structures
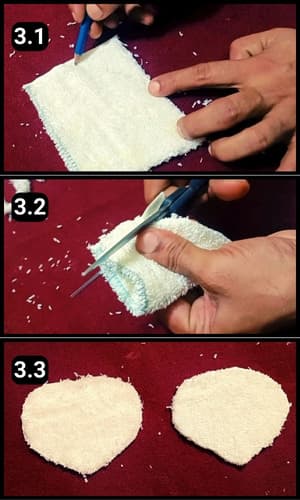
I lightly sketched the bunny’s face on the towel with a pencil before cutting out two pieces. They came out just right, and now I’m ready for the next steps.
Step 4: Shaping Its Ears
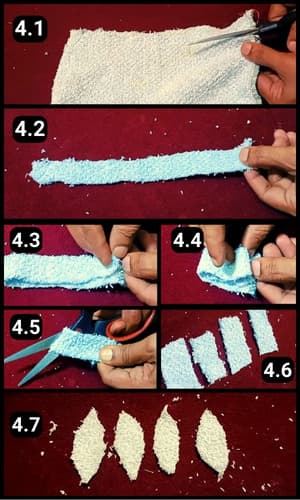
For the ears, I chose a light blue, soft towel.
Since there are two bunny faces, I needed four ears.
So, I cut a long strip from the towel, then folded it as shown in the images 4.3 and 4.4 above.
After that, I snipped it into four pieces, shaping each into a bunny ear. They turned out just as I hoped.
Step 5: Sew the ears
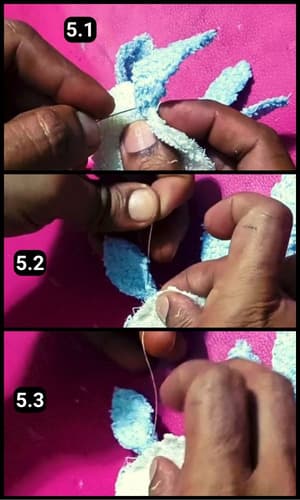
With a needle and thread in hand, I sewed the bunny ears onto the facial structure.
I tackled them one by one, attaching each carefully, and they were all fixed in place successfully.
Step 6: Attaching the two facial structures
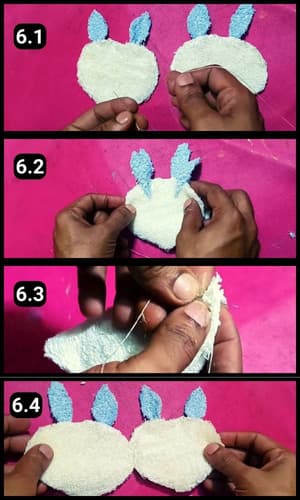
Next, I set out to sew the bunny’s facial structures together with needle and thread.
Following the method shown in image 6.2 above, I’ve placed the two facial pieces on top of each other.
Then, I began stitching them together, just like shown in image 6.4 (In image 6.4 the two faces are now sticking with each other).
Step 7: Attaching the Head Band
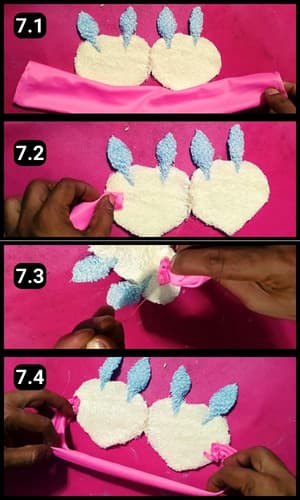
To secure the headband to the eye mask, I needed to sew along both edges.
After sewing, it was perfectly attached to the mask.
Then, I gave it a good stretch to make sure the headband was firmly in place (It held up strong!).
Step 8: Crafting the Bunny’s Nose
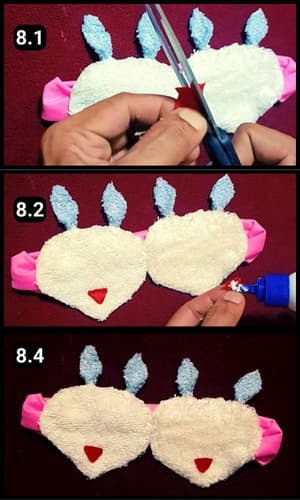
For the noses, I opted for a piece of red velvet cloth.
I shaped them carefully with scissors, ready to place them just right.
Then, I applied glue and positioned them on each facial structure, as seen in images 8.3 and 8.4 above.
Step 9: Stick the Googly eyes
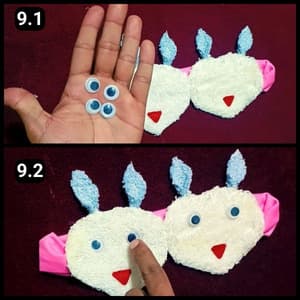
To bring the bunny to life, I added googly eyes.
I glued them on carefully, and just like that, they seemed to wake up with a playful spark.
Step 10: Threading the Mouth
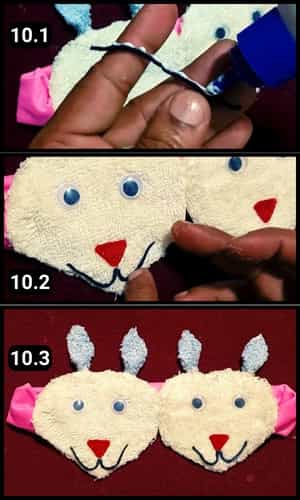
Instead of reaching for a black marker to draw the mouth, which felt too plain next to the other facial features I had attached, I chose a black woolen thread.
Although typically used for knitting sweaters, this thread was perfect for adding a soft, dimensional smile to our bunny.
With a bit of glue, I shaped the mouth with my fingers, repeating the process for the second face.
The result was just as I’d hoped, giving them a completed look that matched the charm in image 10.3 above.
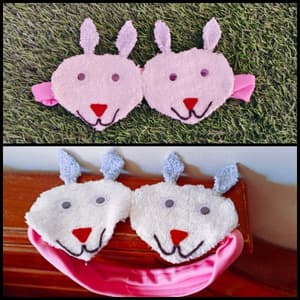
Below, you’ll see the finished project, and it’s truly delightful.
If you’re thinking about crafting a similar DIY eye mask for peaceful sleep, remember to choose a super soft towel or fabric that will gently touch your eyes.
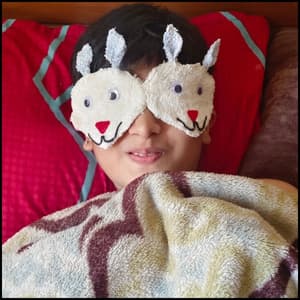
As soon as I gifted it to him, my son grabbed the eye mask and put it on, thrilled with his new treasure.
He was overjoyed, and the DIY gift remained a delightful surprise for him.
Video walkthrough of DIY Easter Bunny Sleeping Eye Mask
Final Thoughts
It’s incredible how objects we barely notice can transform into something special and cherished.
This tiny project of turning a simple towel, a spare headband, and bits of fabric into a delightful eye mask for my son has been a heartwarming adventure.
This wasn’t merely about making an eye mask, it was about weaving love and care into a gift that symbolizes the joy of Easter and the warmth of a homemade present.
It reminds me to appreciate the little things and encourages us all to be creative with what we have.
I’ve made and gifted various eye masks to loved ones, each bringing its own joy and surprise.
Remember, when selecting materials for such projects, prioritize safety, especially for anything close to the eyes or skin.
Frequently Asked Questions
Can I use a cotton towel to make an eye mask?
Yes you can, however, it may not be as soft as a plush towel to your eyes. Hence, use cloth materials that are comfortable to your eyes.
How much time does it take to complete the DIY Sleeping Eye Mask?
It takes about 30 to 40 minutes for intermediate level skills.
Is it necessary to use a sewing machine for this project?
Not at all. While a sewing machine can speed up the process, this bunny eye mask can be entirely hand-sewn. Using a needle and thread allows for more control over delicate areas, like attaching the ears and facial features, making it a great project for those without a sewing machine.
How do I wash the DIY bunny eye mask?
Since it’s made from towel fabric and other delicate materials, it’s best to gently hand wash the eye mask in cold water with a mild detergent. Avoid vigorous scrubbing to protect the glued-on features and air dry it flat to maintain its shape.
What kind of glue is best for attaching non-sewable items like the googly eyes?
For attaching items like googly eyes, a strong fabric glue or a hot glue gun works best. These types of glue ensure a secure bond that’s suitable for materials used in crafts like this. Always allow the glue to fully dry before handling to ensure everything stays in place.
How can I make the eye mask more comfortable for sleeping?
To increase the comfort of the eye mask for sleeping, consider adding a layer of soft padding between the two layers of fabric. Materials like thin foam, quilt batting, or even a piece of soft, cushiony fabric can add extra comfort and help block out light more effectively.


