Recently, I gave a new lease of life to an old table stool, turning it into a charming piece of DIY living room decor.
This little project is perfect not just for sprucing up living rooms, but also small bedrooms, cozy balconies, sunny terraces, and welcoming front porches.
With a mix of colorful paints and a few artificial decor pieces I had lying around, I managed to uplift its look dramatically.
The beauty of this makeover lies in its simplicity, I stuck to just a handful of items to achieve the transformation.
Eager to share how I did it, I’ve outlined the steps below for anyone looking to add a personal touch to their space by using an old table stool that was meant to be discarded..
Step 1: Choosing An Ideal Space
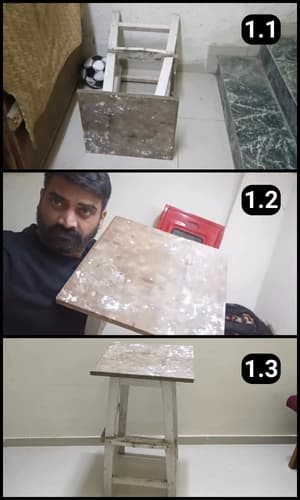
Spotting an old wooden table destined for the trash sparked an idea in me, why not turn it into a piece of DIY living room decor? So, I rescued it and made it the centerpiece of my next project.
For those of you thinking about painting furniture, remember to pick a spot that’s spacious enough for you to work comfortably.
It’s also crucial to work in a well-ventilated area, as paint fumes can be quite strong.
And if the smell bothers you, donning a face mask can make a world of difference in keeping you comfortable while you unleash your creativity.
Step 2: Floor Safety

To guard against paint spills, I laid newspapers under the table.
Some paints are stubborn and can be a hassle to clean off the floor.
It’s always smarter to prevent a mess than to deal with cleaning it up afterward.
This simple step can save you a lot of time and trouble, letting you focus on the fun part of the project without worrying about the cleanup.
Step 3: Wear Safety gloves

To prevent your hands from paint spills make sure to use safety gloves.
Some people can be allergic to paint, so it’s always better to wear safety gear.
I have used rubber gloves and they are from the use-and-throw categories.
Step 4: Painting the Table
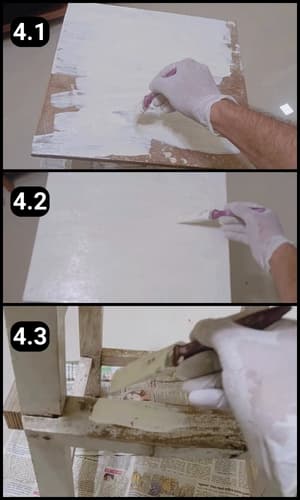
I began by painting the top surface of the table, moving on to the bottom parts after.
To minimize the need for touch-ups, I went for a thick layer of paint right from the start.
Painting demands a bit of caution to keep spills and splatters at bay, ensuring the space stays neat throughout the process.
This approach helps streamline the task, making the painting phase both efficient and enjoyable.
Step 5: Dual Coat
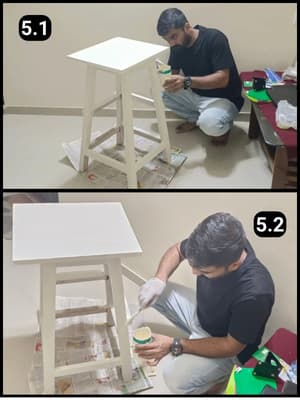
To apply the second coat I waited for about an hour so that the first application dries evenly.
Some parts of the furniture required dual coatings so I had a close look to find them.
I didn’t have to recoat the entire furniture due to the thick application painted in the first attempt.
Step 6: Finishing touch
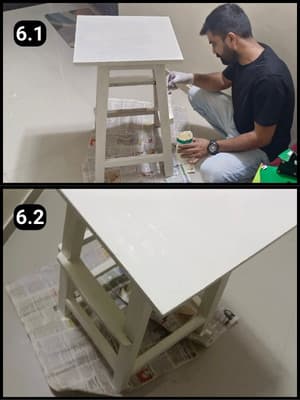
After the second coat, I gave some final touches to the required surfaces such as the edges.
It’s all bright and beautiful and seems to be done now.
I left it to dry for an hour and to quicken the process I made sure the ceiling fan was on and running.
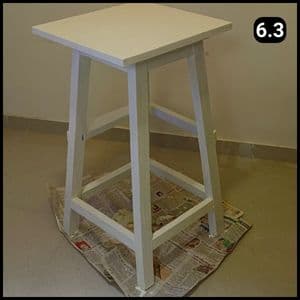
Looking at the image above, the transformation already had me smiling.
Yet, as someone who adores DIY decor, I felt the urge to dial up the vibrancy with brighter, more colorful shades.
Driven by this inspiration, I decided to take it a step further, which I’ll detail in the steps that follows.
Step 7: Add colorful shades

I played around with various light shades, settling on those that caught my eye.
My goal was to achieve a playful look, so I leaned towards the brightest and lightest shades I could find.
For anyone aiming for a similar vibe, fluorescent shades are a fantastic choice.
They really bring a lively and fun atmosphere to any piece, making it stand out in the most delightful way.
Step 8: Paint the shades
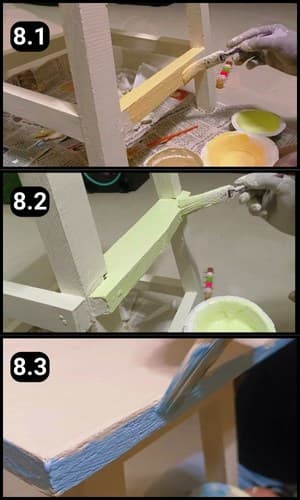
I took my time painting in colorful shades, moving slowly to dodge any need for do-overs.
With just one brush in my arsenal, it meant washing it out after each color application on the table.
But honestly, the joy of seeing the colors come to life, coupled with the thrill of the transformation, made the extra steps feel like part of the fun.
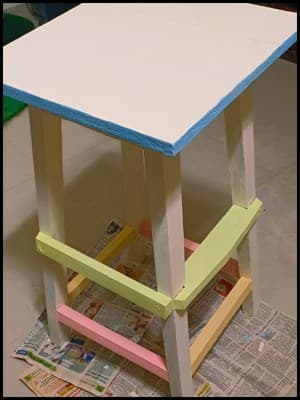
Check out the image below to see how wonderfully this once unsightly piece of furniture has turned into a stunning decor item.
It’s a testament to how a bit of effort can breathe new life into the old.
Step 9: Placing the completed project
Next, I added a touch of charm by arranging some artificial decor on the table, now taking pride of place in my living room.
This final flourish really tied the room together, showcasing how simple additions can elevate a space beautifully.
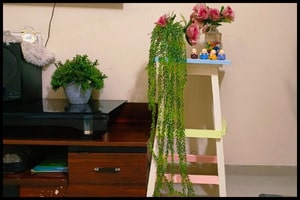
See how striking it is, enhancing the overall appearance of my small space.
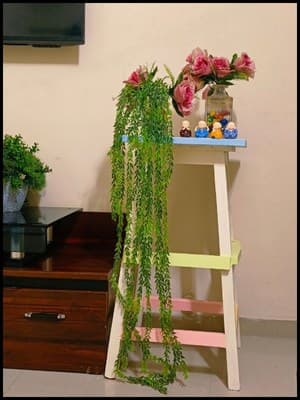
This piece is versatile enough to fit into almost any space or corner without losing its appeal. It effortlessly becomes a focal point, enhancing the area with its presence.
For Complete Video handholding about this project you can also follow the instructions in the video:
Final Thoughts
Wrapping up this DIY journey, remember that a few hours of creativity can breathe new life into old, overlooked furniture.
With projects like these, opting for plastic paint is a wise choice due to its quick drying time, making your makeover swift and satisfying.
Don’t let the age or initial appearance of a piece deter you.
Every item holds potential for transformation, waiting for your touch to unveil its hidden beauty.
As a craft enthusiast, I encourage you to view discarded furniture not as waste, but as a canvas for your creativity.
Your next project could not only add a unique piece to your decor but also impart a sense of achievement and a flair of personal style to your living space.
Frequently Asked Questions
What kind of paint did you use for the furniture makeover, and why?
I used plastic paint for this project due to its quick drying time, which is about an hour for each coat. This type of paint is ideal for DIY projects because it allows you to progress with your work swiftly, reducing waiting times significantly.
How do you decide which colors to use for a piece of furniture?
I recommend playing with light and bright shades to achieve a playful look. Fluorescent shades, in particular, can add a lively atmosphere to your piece. Ultimately, choose colors that catch your eye and align with the vibe you’re aiming for in your space.
How to quickly dry paint on furniture?
There are paints available with quick dry solutions, however, after applying paint make sure to place the furniture in a well-ventilated area for drying. Placing them under the fan will help boost its drying time.
What final touches did you add to complete the transformation?
After the painting was finished and dry, I added some artificial plants to the table, enhancing its charm and character. This not only tied the piece together but also integrated it seamlessly into my living room’s decor, showcasing how strategic accents can elevate a DIY project.
How long does the entire DIY project take, excluding paint drying time?
The active work on this project can be completed in a couple of hours. This timeframe includes preparation, painting, and adding final touches. However, it’s important to factor in drying time between coats and after the final coat to ensure the best finish.


