As Valentine’s Day approaches, there’s a special charm in crafting a DIY greeting card to express your love and gratitude.
Imagine turning simple craft supplies into a heartfelt masterpiece.
Below, I’ve laid out easy steps to create a personalized Valentine’s Day card that radiates warmth and affection.
This is your chance to pour your heart into something unique, making your special someone feel truly cherished.
Whether you’re a crafting pro or just starting, you’ll find joy and meaning in this project.
Let’s take a quick look at the requirements followed by a step-by-step process to craft a personalized valentines card.
Required Craft Supplies
Things that I have used to make a personalized greeting card for Valentine’s Day are listed below:
- Craft Card Papers: I have used black, red, and white sheets of card paper for a contrasting look.
- Glue: You will need glue throughout the project to stick the cutouts and other craft elements.
- Scissor: To cut the required shapes to decorate the card and to trim craft papers as per measurements you will need a scissor.
- Marker Pen: I have used a black marker pen to write desired messages, however, you can use colorful pens depending on your choice. The reason I’ve used black color is to stick to the theme.
- Glitter paper: I’ve used glitter paper to cut a few heart-shaped cutouts because Valentine’s Day decoration seems incomplete without the addition of hearts.
Once you have the above requirements ready, you can proceed with the first step (below).
Step 1: Exploring the Sections

Before we start, take a quick look at the beautiful DIY Valentine’s Day card above I’ve put together.
It’s designed in five sections, with the first two serving as the inviting cover.
As you open the card, three more sections unfold, each revealing a layer of love, as shown in image 1.3.
The adventure begins with the cover (image 1.1), leads to messages hidden on the back (image 1.2), and fully opens up in image 1.3, showcasing the card in its full glory.
Follow the steps below to craft your very own DIY Valentine’s Day greeting card and wow your loved ones.
Step 2: Choosing a color theme

For the base and cover of our greeting card, I went with red and black paper sheets.
I started by taking a larger black sheet and folding it in half to form the card’s outer layer.
Then, I took a red sheet, a bit narrower than the black, and made a small fold along one edge, just like the detail shown in image 2.3.
This simple step added a charming contrast and depth to our card, setting the stage for more creativity to come.
Step 3: Aligning the card cover page
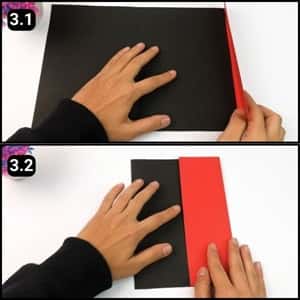
Next, I unfolded the black sheet and positioned the red sheet beneath it, with its folded edge facing down, ready to be joined.
Before applying any adhesive, I made sure both sheets were perfectly aligned once folded together.
This step was crucial to ensure a neat and cohesive look for our greeting card, blending the elegance of black with the warmth of red seamlessly.
Step 4: Sticking them together

I then spread glue along the folded edge of the red sheet and carefully attached it to the black sheet.
It’s important to apply the glue evenly and press down firmly to ensure a secure bond.
With that, our greeting card’s base was all set, laying the groundwork for a burst of creativity to follow.
Step 5: Create blank booklets

I crafted small blank booklets from red paper, as shown in the images above, making four in total.
Each was carefully attached to the left section of the card, facing each other, ensuring they were all similarly sized.
At this point, their contrasting appearance against the card’s base was striking.
Yet, I was eager to elevate their impact even further, which I’ll detail in the steps ahead.
Step 6: Enhancing the Contrasting Effect
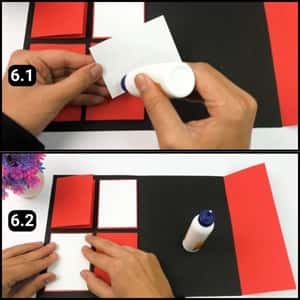
To boost the contrast, I decided to add white sheets to two of the booklet covers, mirroring what you see in image 6.2.
These white sheets were cut a tad smaller and carefully pasted to the center of each cover, allowing the red edges to peek out, framing them beautifully like natural borders.
Step 7: Envelope of love is half ready
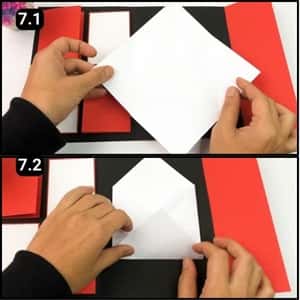
In the card’s middle section, I’m setting up a special spot by crafting and attaching an envelope.
This isn’t just any envelope, it’s where I’ll tuck in a heartfelt message and some of our most memorable photos together.
To make sure it stays flat and neat, I carefully folded it from three sides and pressed down the edges firmly, ensuring they stay in place without popping up.
Step 8: Glue the envelope

To secure the three folds of the envelope, I applied glue and then gently pressed them together to ensure a strong bond.
It’s looking great in its designated spot, but before I attach it to the greeting card, I’m planning to introduce some contrasting effects to make it stand out even more.
Step 9: Create a contrasting background
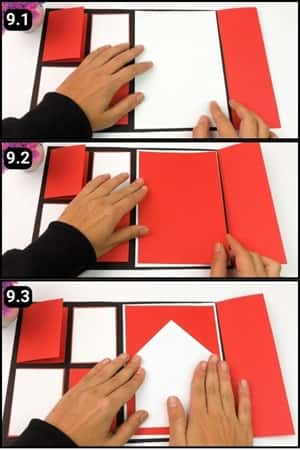
Before attaching the envelope to the card’s middle section, I first adhered a white paper and then a red sheet beneath it to create a striking contrast.
I made sure the white and red sheets were slightly smaller, crafting an effect where they look like elegant borders against the backdrop.
Once this layering was complete, I positioned the envelope in the center of the greeting card.
Now, with the base set, it’s the perfect moment to sprinkle in some creative flair and truly bring this card to life.
Step 10: Enhancing the envelope

Next up, I placed a horizontal red paper strip over the envelope’s center, just like the one you see in image 10.2 above.
After that, I added a slightly narrower white strip on top of the red one.
This created a neat visual of a white strip framed by a red border, capturing the look shown in image 10.4.
This simple yet effective layering adds depth and a pop of contrast to our card.
Step 11: White squares with black borders

I cut two white paper squares, ensuring they were the right size to fit snugly inside the envelope.
To add a touch of contrast, I decided to frame these squares with black paper borders.
I carefully cut half-centimeter strips from a black sheet and glued them around the edges of the white squares.
Now, beautifully bordered, they’re ready to be slipped into the envelope, as shown in image 11.4, adding a sophisticated touch to our heartfelt creation.
Step 12: Insert the frames into the envelope
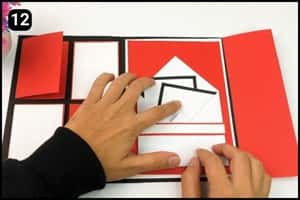
These square cutouts have transformed into blank photo frames, ready for your personal touch.
Imagine filling them with your memories, like that first selfie with your significant other.
It’s a wonderful way to pour your love and affection into this card. Just imagine how amazing they’ll look once you add those special moments.
Step 13: Adding the personal touch

Now, I’m going to sprinkle the card with all those heartfelt messages I’ve been eager to share with my better half, doing it in a creative manner.
I started with a warm “hello” written on the envelope using a marker pen.
Then, I cut several strips of white paper to write additional messages on and attached them to the third section of the greeting card.
They’re all in place now, and honestly, they look stunning to the eye, each message adding a layer of love and personality to our card.
Step 14: Crafting the Letter “LOVE”

For the greeting card’s cover, I crafted the letters L, O, V, E, just like you see in image 14.1.
I took my time cutting each letter out carefully to ensure precision.
After cutting, I prepared to glue them onto the cover, making sure the backs were fully coated.
Once positioned and pressed into place, they were perfectly aligned, giving the cover a bold and striking look that immediately catches the eye.
Step 15: Applying finishing touch

To give the cover page a classy touch, I used a heart-shaped cutout from glitter paper.
Then, I added some glittery stripes starting from the bottom of the red cover, resembling a heartbeat graph, as shown in image 15.1.
Now, our Valentine’s Day card is all set for the special occasion.
For Complete video handholding about the valentines day card making process refer to the below video:
Final Thoughts
Crafting a DIY Valentine’s Day greeting card is a heartfelt gesture that adds a special touch to your expressions of love.
Remember, the essence lies not just in the materials used, but in the thought and effort poured into each step.
Take your time, enjoy the process, and infuse your card with genuine emotion.
Consider personalizing further by incorporating memorable photos, heartfelt messages, or inside jokes that hold significance for you and your partner.
These small details will make your card truly unique and cherished.
Don’t be afraid to experiment with colors, textures, and designs to make your card stand out.
Frequently Asked Questions
How long did it take to prepare the Greeting card?
It took about 30 minutes to complete the Greeting card, however, for beginners it might take up to 45 minutes.
Are the steps provided suitable for beginners?
Yes, the steps are straightforward and suitable for both crafting beginners and enthusiasts.
What if I don’t have all the listed materials at home?
You can always improvise with similar materials you have on hand or consider purchasing them from a local craft store.
Can children participate in making this card, or is it more suitable for adults?
Crafting this card can be a fun activity for children with adult supervision, especially with simpler steps like cutting and pasting.
How can I ensure the card withstands handling and mailing?
Use a sturdy cardstock for the base and secure adhesive for all attachments to ensure durability during handling and mailing.


