Before you go out to purchase a vintage lamp, pause and consider the possibility of crafting your very own DIY vintage lamp right at home.
Inspired by the stunning simplicity of nature, particularly a piece of bark from a coconut tree, I managed to not only craft a lamp but also to create a piece that brings warmth and personality to any space.
Armed with just a handful of basic tools, supplies, and a sprinkle of creativity, I turned ordinary items into an extraordinary and distinct light fixture.
Let’s explore how you can make your vintage lamp, infusing your home decor with a personal flair.
Step 1: Gather the supplies
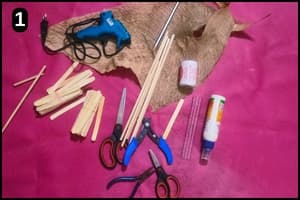
- Popsicle Sticks: I have used popsicle or ice cream sticks, bamboo sticks, and a few wooden sticks.
- Pencil and a Scale Ruler: To mark the required sizes and shapes I’ve used a pencil and a ruler.
- Wooden Glue: I have used wooden glue to stick the elements firmly.
- Hot Glue Gun: A hot glue gun is very helpful in fixing the wooden sticks firmly and quickly.
- Tree Bark: This is the show stealer in this particular DIY Vintage lamp project. I’ve used the bark of a coconut tree for your reference.
- Scissors and Cutters: I’ve used a scissor to cut the tree bark and a wooden stick cutter for the sticks.
- Paint and Brush: I’ve used watercolors and a regular Paint brush to paint the wooden sticks with bright colors.
With all the supplies ready you can now start with this amazing DIY vintage lamp project.
Step 2: Preparing the two panels
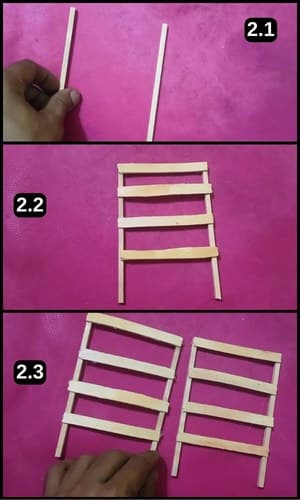
To create the lamp’s frame, I started with four wooden sticks as its pillars.
I then took two sticks at a time and attached popsicle sticks across them horizontally, just like you see in the pictures above.
For a strong hold, I combined hot glue with wood glue on the popsicle sticks.
It’s crucial to let everything dry well if you’re using wood glue.
Though, if you’re short on time, just hot glue works too.
This process was repeated to make another panel, following the same steps.
Step 3: Cutting the tree bark
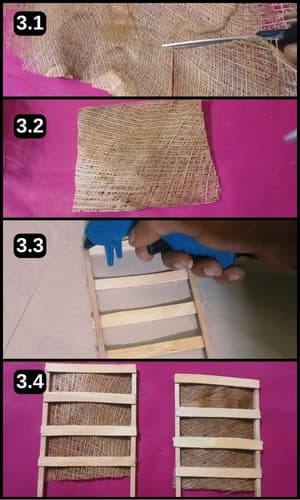
Next up, I’ve trimmed the tree bark with scissors to fit the panels I’ve prepared.
Honestly, the tree bark is what really brings this project to life.
I’ve attached it to both panels, just like in image 3.4, it’s this natural touch that makes the lamp stand out.
Step 4: Fixing the panels
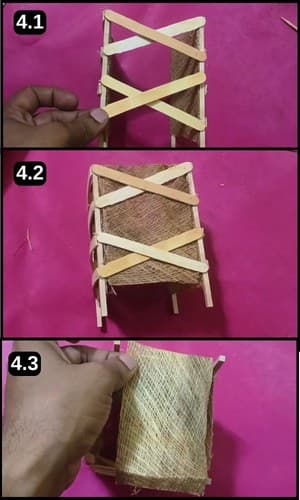
For the remaining two sides of our lamp, I used popsicle sticks again.
This time, I positioned the sticks in a crisscross pattern to add a unique twist.
Four sticks per side did the trick, creating a distinct cross shape. This ensures the panels have their own charm and don’t just blend in.
I then fitted and glued tree bark to these panels, all from the inside, maintaining that rustic vibe.
Finally, I covered the base with another piece of bark, as shown in image 4.3.
Our lamp already looks fabulous, but why not spice it up with some color? Let’s move on to that fun part.
Step 5: Adding a touch of color
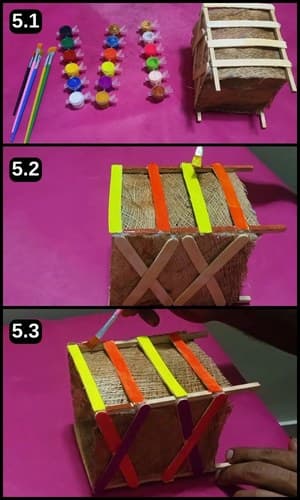
To make it pop under the lights, I decided to paint the wooden sticks in bright, eye-catching colors.
I opted for fluorescent shades, and they truly worked magic. The colors are just stunning to look at.
Step 6: Tying the rope
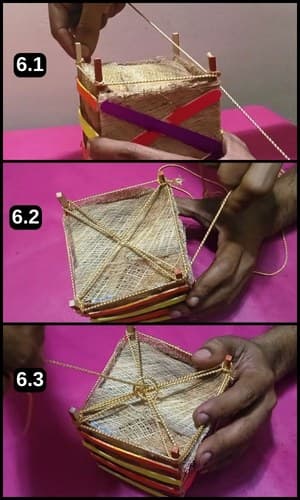
Next, I’ll wrap a decorative rope around the lamp’s corners, so I can hang it in my living room.
But it looks just as lovely sitting on a tabletop.
That being said, I’ve ensured that the knots are tight and centered for a perfect balance.
Step 7: Insert electrical wire
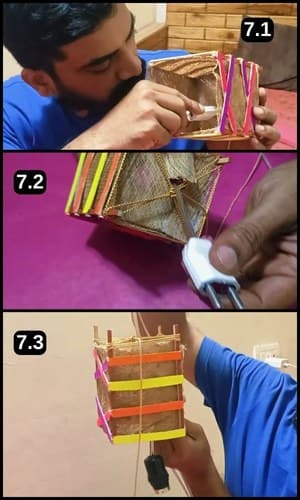
I threaded the electrical cord through the lamp to install the bulb, leaving a gap at the top for the wires, just like in image 7.2.
Next, I’ve adjusted the cord to secure the bulb holder.
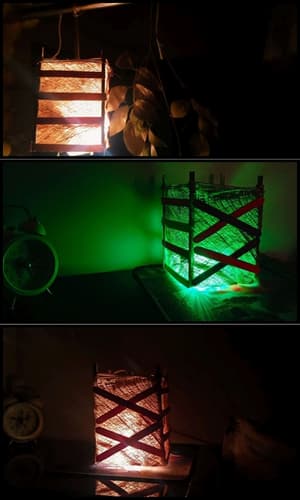
Now that everything’s set up, I switched on my vintage lamp and tried it out in various spots around the room as seen below.
For a video walkthrough, refer below video:
Final Thoughts
The outcome of this project is truly rewarding, just as the photos in this post show.
Initially, I wondered if it would be time-consuming or if it would turn out as I hoped.
To my surprise, it was smoother and more fantastic than I imagined, all thanks to a bit of creativity.
This DIY vintage lamp project beautifully showcases how everyday materials can be transformed into a stunning piece of home decor.
The use of tree bark not only adds a natural and rustic charm but also highlights the importance of reusing materials creatively.
Don’t be afraid to personalize your lamp with different types of bark or paint colors to match your space.
Frequently Asked Questions
How long did it take to make the DIY vintage lamp?
It took about an hour to make the DIY vintage lamp. Because I had to leave the glue to dry for 20 minutes and the color paint to dry for about 10 minutes. In simple words, 30 minutes for the craft and 30 minutes drying time.
What can I use instead of a tree bark?
To obtain a similar effect you can use a mesh cloth (netting cloth) instead of the tree bark. However, you may not get the vintage effect like the tree bark will offer while glowing.
Is it possible to hang the lamp? How?
Yes, by wrapping a decorative rope around the lamp’s corners, you can hang it. Ensure the knots are tight and centered to keep the lamp balanced. It can also be set on a tabletop as an alternative.
How do I install the electrical components?
Thread the electrical wire through the lamp, leaving space at the top for the wires. Pull the wire to position the bulb holder in place, ensuring it’s secure before adding the bulb.
How do I ensure the lamp is safe to use with an electrical bulb?
Make sure all electrical components are properly installed and that the bulb holder is securely fixed. Use LED bulbs to minimize heat production and always double-check your electrical connections and consider consulting with an electrician if you’re unsure.
Can the lamp be used outdoors?
While this lamp is primarily designed for indoor use, it can be adapted for outdoor settings under covered areas to protect it from direct exposure to weather elements. Ensure the electrical components are suitable for outdoor use or well-protected.
How can I clean the lamp or maintain it?
Dust it gently with a soft brush or cloth and If needed, a slightly damp cloth can be used to wipe the surface, but avoid excessive moisture, especially around electrical parts. Regular checks for any loose parts or damage can help maintain its beauty and functionality over time.


