Sprucing up your living space adds that special spark it might be missing.
There’s something truly satisfying about crafting your own decor and seeing it brighten up a corner of your room.
Today, I’ve got a simple DIY trick up my sleeve that will transform your space.
You might think it looks tricky, but trust me, it’s as straightforward as piecing together a puzzle with crafting bits.
Without wasting any time let’s create a DIY Wall Hanging Decor, turning our homes into spaces that mirror our hearts.
Step 1: Quick Look At Things Required
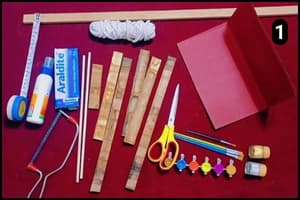
Here’s the list of things I’ve used to make this amazing DIY hanging decor for my living room.
- Wooden sticks: The wooden sticks that I’ve used to make the base of the decor is of a broken wooden vegetable chopping pad. It was about to be trashed so I thought of separating them to use it for my DIY projects.
- Strong Adhesive: To make it stronger I’ve a wooden glue and Araldite as a strong adhesive solution.
- Pencil and measuring ruler: They are used to measure and mark the required sizes for cutting.
- Rope: To tie it to the decor for hanging purposes I’ve used a rope which I bought from a tailoring shop.
- Wood cutter and Scissor: A wood cutting tool such as a small and handy crosscut saw is a must to cut the thicker wooden sticks. Scissor will be used to cut the ropes as per required sizes
- Sand paper: To smoothen the edges of the wooden sticks after cutting I’ve used sand papers. It also helped me scrub the old glue remains they had on their surfaces.
- Color paint and Brush: To offer striking shades I’ve used colors and a paintbrush.
That was all about the things I’ve used so let’s move to the crafting process.
Step 2: Cutting the wooden panels
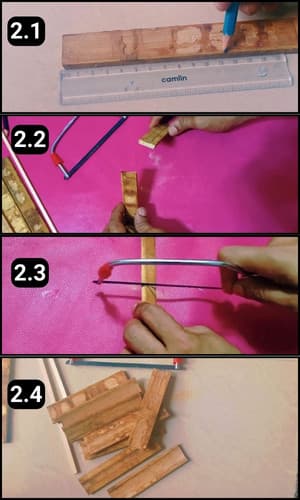
First off, I grabbed a wooden stick and measured it with a ruler and pencil, marking it for cutting.
I settled on 11 cm as the perfect size for our decor’s base.
Then, with a mini crosscut saw in hand, I cut around 10 pieces of wooden sticks, each measuring 11 cm.
To be honest, it felt like I was preparing the building blocks for our little masterpiece.
Step 3: Polishing the Wood
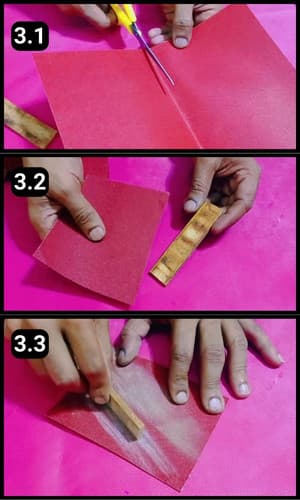
After cutting, I noticed the sticks had some leftover glue and their edges were a bit sharp.
So, it was time to give them a gentle scrub with sandpaper.
Carefully working on each one, they started to look polished, and the edges became nice and smooth.
It’s amazing how a little elbow grease can transform these sticks into something that feels much more finished and safe to handle.
Step 4: Preparing Adhesive Solution
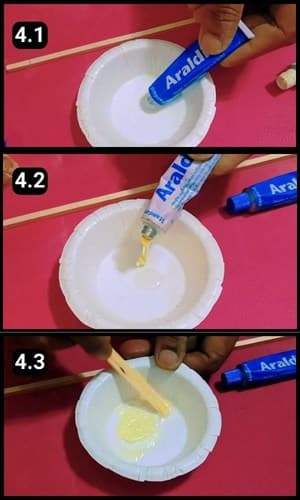
Now, let’s whip up a strong adhesive solution to bind our wooden sticks together for the base.
I’ve used this mixture plenty of times, so I’ve got the hang of it.
If you’re following along with the same solution, be sure to read the instructions thoroughly first.
Usually, it’s about mixing equal parts together and stirring until it gets a bit thick.
I grabbed a wooden popsicle stick for the mixing, it works like a charm. After stirring for around a minute, it looked ready to go.
Step 5: Sticking the wooden panels
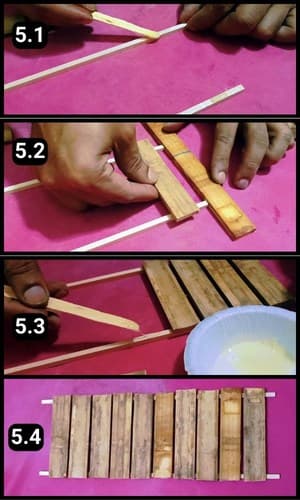
Next up, I laid two craft sticks side by side as the groundwork for our base panels.
Then, it was time to get sticky, I applied glue on their surfaces and began positioning the wooden panels, one after another.
They all fit together snugly, each one spaced out with a small gap of about half a centimeter between them.
It’s like watching a tiny wooden bridge come to life, piece by piece.
Step 6: Adding a touch of color
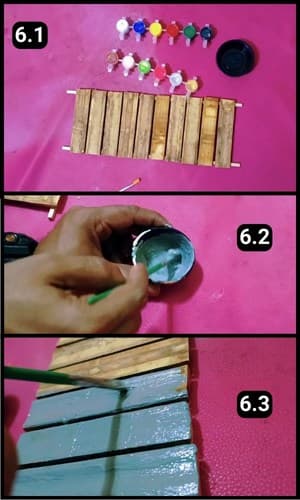
I decided to blend brown and black paint with a bit of plastic paint in a bowl.
Stirring it well, I got this rich gray color that’s just perfect.
With that ready, I painted the entire decor base, giving it a beautiful, deep gray finish.
Once it was all coated, I let it dry, transforming our creation into something that looked like it came straight out of a chic boutique.
Step 7: The Golden Touch
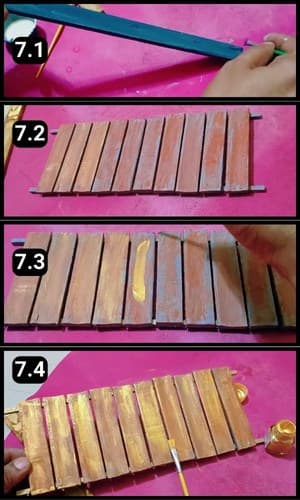
First, I painted the wooden stick that’ll serve as the top support in a dark shade, ensuring it would perfectly balance and tie the hanging decor together.
For a clearer idea, take a glance at image 7.1 above.
Then, I added a coat of brown paint over the previously gray-painted base, adding depth and warmth to our piece.
Once the colors had set and dried, it was time to bring in some glamour.
I brushed a touch of golden paint across the wooden base, giving it a glow that catches the eye from every angle.
The final look is striking, as you can see in image 7.4, it turned out to be a stunning addition that truly shines.
Step 8: Hanging Rope
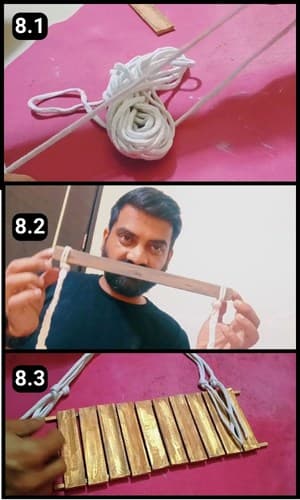
Now, let’s get this beauty ready to hang in the favorite spot in the living room.
I found a regular short pant string, perfect for the job, at a tailoring shop.
I measured and cut pieces for both sides of the decor.
With those strings, I crafted a design resembling a French braid, making sure each side matched in length.
Then, I secured them to the top wooden stick holder on both ends, just like you see in image 7.2 above.
Finally, it was time to attach it to the base of the decor, ensuring everything was perfectly aligned and ready to display.
Step 9: Tie them to the base support
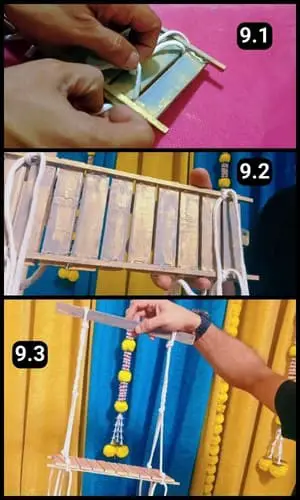
I threaded the rope through a gap at one corner of the base support, just like in image 9.1 above.
Then, I tied it securely and did the same for the remaining three corners of the decor’s base.
Each knot was tied evenly, making sure the whole thing was balanced from every angle.
As a final touch, I’ll attach a rope above the decor’s handle.
This last step will make it ready to be hung up in my living room, bringing a bit of handmade charm to the space.
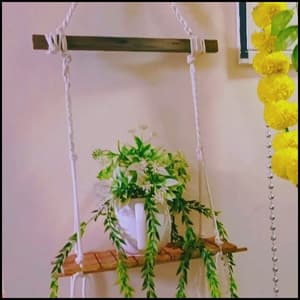
Check out the stunning transformation in the image above! I’ve draped an artificial decor piece over our DIY hanger, instantly elevating my living room’s look.
I’m absolutely thrilled with the makeover but don’t stop there, you’re free to personalize it further.
Hang your favorite decorations, or perhaps some cherished photos, to make this piece uniquely yours.
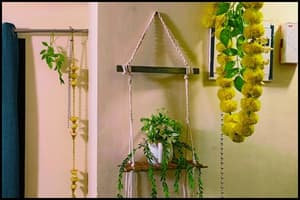
It’s all about adding those special touches that reflect your style to these types of decor.
For a video walk through of this tutorial watch the below video:
Final Thoughts
The creation process of this DIY Wall Hanging Decor itself is a reminder of the treasures hidden in everyday items, like a simple wooden chopping base turning into something beautiful.
Crafting these decor pieces is more than a hobby for me, it’s a passion I love sharing.
So, before you think about discarding those household items, imagine the potential they have to transform your space.
Frequently Asked Questions
How long did it take to make the DIY Wall Hanging Decor?
It took about an hour and 30 minutes to complete this particular hanging decor for my living room. The cutting, sticking, and coloring of the sticks including the rope tying process took the majority of my time.
Can I use any type of paint for the wall hanging decor?
Yes, you can use any acrylic or plastic paint that adheres well to wood. The choice of colors is up to your personal preference or room decor theme. Don’t forget to wait for each layer to thoroughly dry before adding the next.
What should I do if the edges of the wooden sticks are still rough after sanding?
If edges remain rough, you may need to use a finer grit sandpaper for additional smoothing. Sanding in the direction of the wood grain usually yields the best results.
Can this DIY decor be used in rooms other than the living room?
Absolutely! While the instructions are tailored for living room decor, this DIY project can easily be adapted for use in bedrooms, hallways, or even offices. Adjust the size or color scheme to match different spaces.
Is there a way to hang the decor without drilling holes in the wall?
Yes, you can use adhesive hooks that are strong enough to hold the weight of the decor. Make sure to select hooks designed for the surface of your wall and follow the manufacturer’s instructions for the best results. This method is great for renters or those who prefer not to drill holes.


