As the spirit of Ram Navami fills the air, I can’t wait to celebrate the birth of Lord Rama.
The vibrant colors, the joyous chants, and the feeling of togetherness always bring a special warmth to my heart.
This year, I wanted to add a personal touch to my home decor, something that reflected the essence of the festival.
So, I decided to create a unique diy wall hanging decor for ram navami, a small circular masterpiece that would not only grace my walls but also radiate the celebratory spirit.
In this article, I’ll be sharing my DIY step-by-step guide to crafting a beautiful Ram Navami wall hanging.
Also, for your reference I have shared the step by step instructions along with relevant images in this article below.
Let’s take a quick look at the list of things required to craft this Ram navami themed DIY decor.
Step 1: Materials I used for the decor
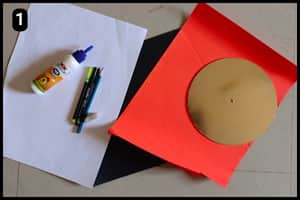
- Cardboard: I’ve used a round shape Cardboard as the base of the decor structure.
- Craft Papers: I’ve used an Orange paper sheet to wrap the round cardboard and black paper to cut the shape of Ram Mandir structure.
- Cutter and Scissor: To cut the required elements you will need a scissor and cutter.
- Glue: To stick the colorful paper sheets I’ve used a multipurpose PVA glue.
- Pencil and Marker: To draw the structure I’ve used a pencil and a black marker pen.
Step 2: The making of outlines

To make the outlines of the holy Ram Mandir I used a pencil.
After the outlines looked perfect I used a black marker pen to highlight the final outline structure.
Note: I referred to an image of this design while drawing them hence the designing process was quicker and accurate.
Step 3: Cutting the Paper shapes
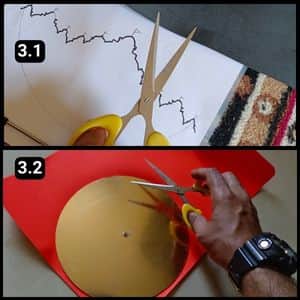
With the outlines finalized, it’s time to bring in the colors.
I used a round piece of cardboard as a base and wrapped it in a vibrant orange paper.
To secure it, I brushed glue onto the cardboard before carefully smoothing the orange paper over it.
After letting it dry completely, I used scissors and a craft cutter for a clean finish to cut out the precise shapes I had drawn beforehand.
Next came the intricate details i.e. the Ram Mandir itself.
While printing a design and adhering it was an option, the true DIY spirit lies in creating something by hand.
So, I took a black sheet of paper and meticulously cut out the intricate details of the Ram Mandir using my hand-drawn template.
Now, the fun part, i.e. assembling everything together to form a beautiful wall decor.
Step 4: Aligning the cutouts
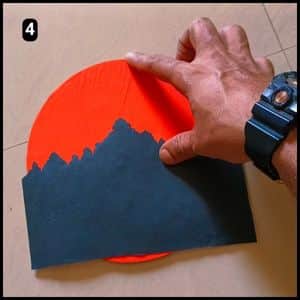
With all the pieces prepped, it’s time for the grand assembly.
Cutting the intricate details of the Ram Mandir was definitely the most time-consuming step, but patience and a steady hand did the trick.
Now, to ensure a flawless fit, I carefully placed the black cutout with the Ram Mandir design on the orange paper-wrapped cardboard base.
Step 5: Trimming the excess areas
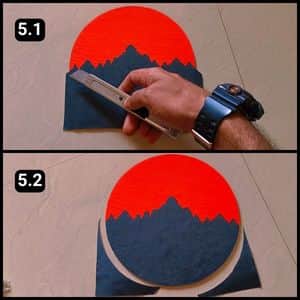
After aligning the shapes, I used a cutter to trim the excess sides.
Since it was challenging to cut with scissors, I opted for a cutter.
Please note that cutters are sharp and can cause injury, so they should only be used by adults, not children.
With the main structures aligned, the base decor is nearly complete.
Step 6: Drawing the Symbolic Flags
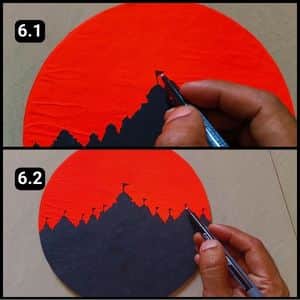
As the final touch, I used a fine-tipped black marker to carefully draw flag designs over each temple.
Precision was key here, as any mistake could ruin my project.
So, I took my time and drew each flag evenly and symmetrically, ensuring they all looked consistent.
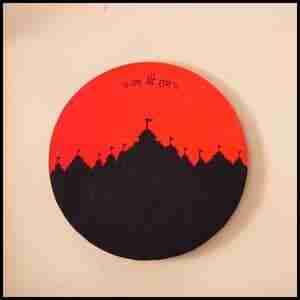
At last I wrote “Jai Shree Ram” in Hindi which means Hail Lord Rama.
I mounted it on my living room wall beside the wooden temple in my home.
I used a strong double sided tape to stick it onto the wall.
It looks really amazing and gives a warm presence of Lord Rama in my living space.
Video Walkthrough of Ram Navami Wall Decor
Final Thoughts
As we celebrate the joyous occasion of Ram Navami, this handcrafted wall hanging serves as a beautiful reminder of Lord Rama’s virtues and the importance of the festival.
The process, though simple, allowed me to express my devotion creatively.
While the intricate details of the Ram Mandir might have taken some time, the final product brings immense satisfaction.
More importantly, this DIY project became a way to connect with the spirit of Ram Navami and welcome its blessings into my home.
For your reference I have also shared the complete video walkthrough of this particular decor on our official YouTube channel.
!! Jai Shree Ram !!
Frequently Asked Questions
How long did it take to make this DIY Wall decor for Shri Ram Navami?
It took 40 minutes for me to make this DIY Wall Hanging Decor for Shri Ram Navami. The major time consuming step is to draw the Ayodhya temple outlines and cut them later.
Is there a way to avoid using a craft cutter for this DIY wall decor project?
If you’re not comfortable with a cutter, you can use sharp scissors for both the base and the Ram Mandir shapes. However, it’s better if you use a cutter as that will give you a precise cut.
The paper keeps warping after applying glue. What can I do?
Use a very thin layer of glue and let it dry slightly before attaching the pieces together.
Is there another way to create the Ram Mandir design or is there any easy way?
Instead of cutting a complex shape, you can try gluing small squares of black paper to create a simpler temple silhouette.