As Holi approaches, I couldn’t resist infusing my home with its infectious spirit.
This year, I’ve crafted a delightful DIY wall hanging decor for holi using just ice cream sticks, glue, and a touch of paint.
Beyond the traditional festivities, Holi offers an opportunity for personal expression and creativity.
In this article, I’ll guide you through the steps to create your own colorful masterpiece, perfect for adding a festive touch to your home.
Let’s dive right into the joy of Holi together and make this celebration truly unforgettable by crafting a wall hanging that matches the theme!
Step 1: Things I’ve Used To Make DIY Wall Hanging Holi Decor
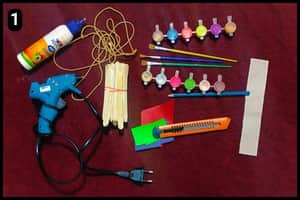
- Popsicle Sticks: To make the base of the Holi decor I’ve used popsicle sticks.
- Cardboard Sheet: Being a DIY enthusiast I’ve again used the cardboard box of cake I had ordered for an occasion. I used it to align and stick the Popsicle sticks over it as a supportive base.
- Decorative thread: To hang the Holi decor around my living room for mounting purposes I’ve used a decorative Thread.
- Colors and Paintbrush: I have used regular water colors and a paintbrush to paint the popsicle sticks and draft a Holi message over it. Additionally, I’ve also used glitters to decorate the decor base.
- Hot Glue Gun & Multipurpose PVA Glue: To stick the required elements I’ve used a hot glue gun and multipurpose PVA glue.
So, after you’ve gathered the necessary materials, the steps to create your wall hanging holi themed decor is fairly straightforward (Let’s look into it).
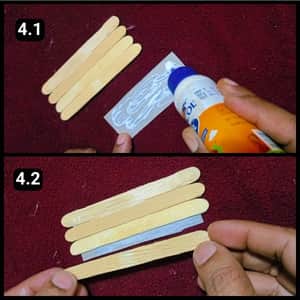
Step 2: Cutting the Base Strip
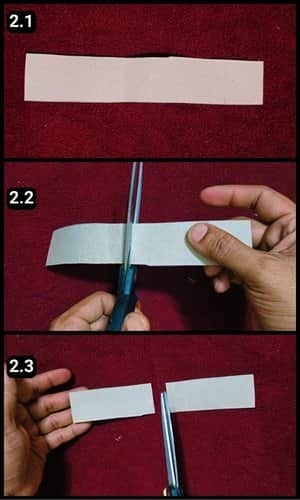
In the initial phase, I divided the cardboard strip into two sections according to the needed sizes to fit the popsicle sticks.
Two sections were necessary, so I split them equally. These segments served as the fundamental support for the decor.
Step 3: Sticking Popsicle Sticks
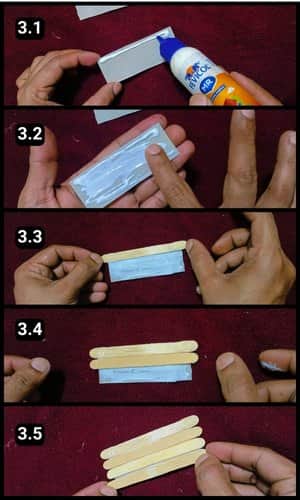
Next, I began sticking the popsicle sticks onto the cardboard base individually.
Initially, I applied multipurpose PVA glue onto the cutout and affixed the popsicle sticks onto it. I placed four sticks over the cardboard base.
If you’d like to replicate this project with a more extensive base, you can increase the popsicle sticks per base to six or eight.
Step 4: Getting the second base ready
Once I had affixed the wooden sticks onto the first base, I proceeded to follow the same steps to complete the second (I had both bases prepared and ready for the next stage).
Step 5: Colorful Application
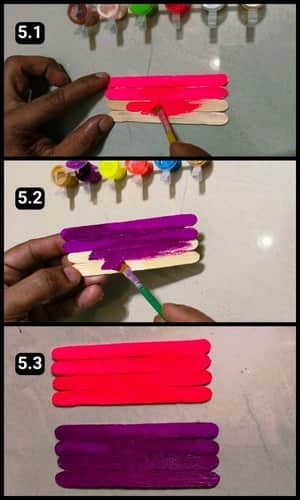
It was time to infuse the bases with vibrant colors, aligning them with the festive spirit of Holi.
Initially, I chose neon pink to coat one base, while the other received a vibrant coat of purple, creating a delightful complementary duo.
The color scheme can be tailored to personal preference, and additional bases can be crafted as desired.
Step 6: Fixing Decorative Rope
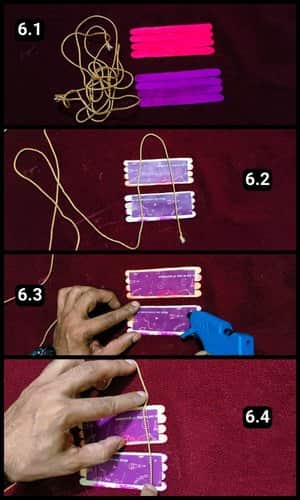
To mount the decor, I opted for a decoration thread in silver and golden tones.
Initially, I selected the suitable size and applied hot glue to the back of the decor base.
Next, I carefully positioned and stuck the decorative thread over the glued area.
Lastly, I allowed it to fully dry before moving forward with the next steps (this step is crucial).
Step 7: Adding Holi Message

Alright, it was time to add a message to the decor, and I opted for the ever-popular phrase “HOLI HAI.”
This iconic expression simply translates to “It’s Holi” and is commonly used during the festivities.
For example, when someone applies Holi color to you, they often greet you with a smile and the phrase “Holi Hai,” signifying the joyous occasion.
Using different colors, I carefully painted the message with a paintbrush.
Alternatively, one can utilize readily available stickers or craft letters using clay. If clay isn’t accessible, you can learn to make clay at home here or check out the video at our YouTube channel for a DIY homemade clay recipe.
Step 8: Adding Effects

It was time to elevate the decor, starting with applying glitters to the corners of the base.
So, I used a black pen to accentuate the borders of the letters, creating a stunning 3D effect.
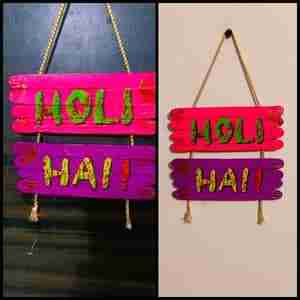
The finished item, as seen in the image below, now boasts the desired effects and looks incredibly captivating to the eyes.

I have made multiple of these and have mounted them all around the living room.
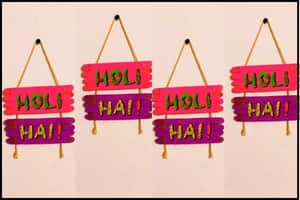
Here’s how the final completed project looks like:
Final Thoughts
Infusing your Holi celebrations with DIY decor ideas adds an extra layer of joy and personalization.
Not only does it lend a unique touch to your festivities, but it also fosters creativity and cost-effectiveness.
These DIY decor concepts are guaranteed to elevate the festive atmosphere and create lasting memories.
For those eager to dive into crafting, I’ve included a link to the full video tutorial of this Holi decor project for your convenience.
So why wait? Gather your loved ones, unleash your creativity, and enjoy a memorable time decorating your home this Holi with these simple and delightful DIY ideas.
Frequently Asked Questions
How long did it take to make this DIY Wall Hanging Holi Decor?
It takes 30 minutes to make this DIY Wall Hanging Holi decor. However, I made 4 of them and making them together took about an hour.
Can I use materials other than popsicle sticks for this DIY project?
Yes, while I used popsicle sticks for this project, you can get creative and use other materials like wooden dowels, bamboo skewers, or even recycled materials like cardboard or paper rolls.
Are there any specific tools or techniques I need to know before attempting this DIY project?
This project is beginner-friendly and requires basic crafting supplies like scissors, glue, and paint. No special tools or techniques are needed, making it perfect for crafters of all skill levels.
Is it necessary to use a cardboard base, or can I use another type of base?
While cardboard is a convenient and readily available option, you can experiment with other materials like wood, foam board, or even canvas for your base, depending on your preferences and availability of materials.


