As I browsed for Easter decor, I was captivated by a visually stunning piece that instantly caught my attention.
Upon closer examination, the elements used seemed familiar to me as a DIY enthusiast. However, the price tag left me feeling underwhelmed, considering my knowledge of its components.
Determined to create something equally impressive, I left the store and began envisioning how I could replicate it.
Back home, I scoured my household for resources to craft a similar Easter egg wreath decor. To my delight, I managed to replicate it even better than I had imagined.
Excited to share my experience, I believe this DIY guide will be invaluable in helping you create your own unique Easter Egg Ring Decor.
But first let’s take a quick look at the items I used to bring this DIY Easter ring decor to life:
- Packaging Strips: I’ve used the plastic strips to make the decor rings. These strips were wrapped around the cardboard box of an electronic item I’d recently ordered.
- Carpenter’s measurement tape: I’ve used the carpenter’s measurement device to measure the Strip sizes for rings.
- Scissor: To cut the required elements especially the plastic strips I’ve used a scissor.
- Hot Glue Gun: I’ve used a hot glue gun to stick the edges of the circles formed using the plastic strips.
- Super Glue: To stick the strip circles firmly together I’ve used the super glue. Also, it helped me stick elements where the glue gun stood weaker.
- Acrylic Paint and a Paintbrush: I’ve used acrylic paint colors such as black and golden ones to paint the circles.
- Artificial Decor: To offer a touch of decor or a fine finishing I’ve used a few artificial decor items available in my household.
Now that we’ve covered the elements used to create the DIY Easter Egg Wreath Decor, let’s progress to the steps outlined below:
Step 1: Marking the required Strip Sizes
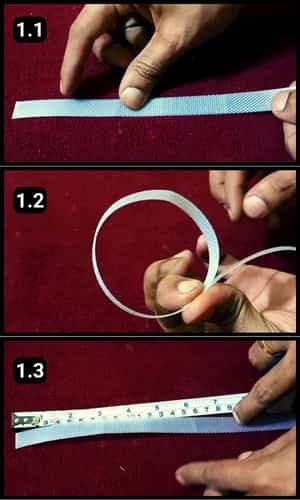
Here, I’ve turned packaging strips into the perfect rings for my Easter egg wreath.
First, I shaped these strips into a circle, tweaking it until I got the size just right.
Then, it was all about getting the length perfect for each ring.
I grabbed a carpenter’s tape measure – you know, the kind you find in any toolbox – and measured out 7.5 inches for each piece.
It’s a simple trick, but it made all the difference in bringing my vision to life.
Step 2: Cutting the required amount of strips
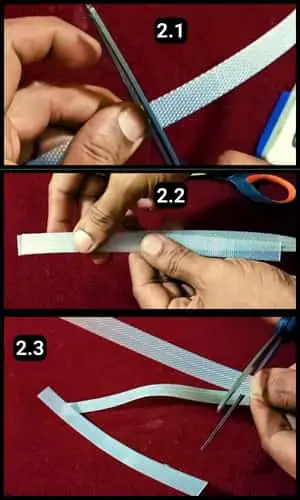
In this step, I grabbed a pair of scissors and cut the first strip to the exact measurement.
Then, I used that initial strip as a template to cut the others, ensuring they were all the same size.
So, I lined it up and snipped away, focusing on getting each one just right.
For my project, I needed nine rings, so I ended up with nine perfectly sized strips. This method kept everything uniform, making the next steps a breeze.
Step 3: Forming the ring
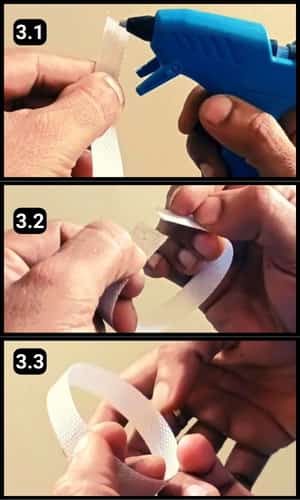
Next, I set out to create a ring from one of the strips I had cut earlier.
Grabbing my hot glue gun, I quickly learned that these strips were stubborn and didn’t bend easily.
When the hot glue wasn’t enough to hold the edges together, I reached for the super glue.
It’s like the strips had a mind of their own, but I wasn’t going to let that stop me.
With a bit of patience and the right adhesive, I successfully formed the first ring. It was a small victory, but it felt like a big win to be very honest.
Step 4: Making multiple rings

I managed to craft the nine rings my project needed.
Even though it took some time to dab on the glue and press the edges together firmly for each one, I made sure they were all sturdy.
Patience was key here, ensuring each ring was strong enough for the wreath. It was a bit of a process, but seeing those rings ready and resilient made it all worth it.
Step 5: Stick The Rings Together
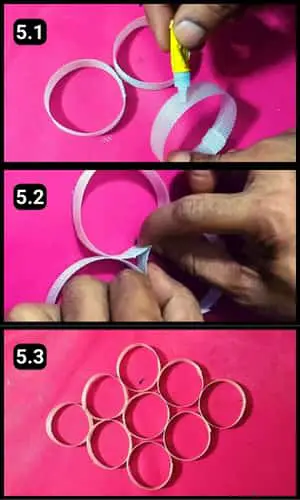
To make sure everything held together tightly, I turned to Super Glue for bonding the rings one by one.
This step was a bit time-consuming, as I had to apply the glue, then press and hold the edges until they stuck firmly and the glue dried smoothly.
There were about fifteen spots where I needed to be extra careful to ensure a strong bond.
But, I got the structure just right, ready to move on to the next phase of my project.
It was a meticulous process, but seeing the framework come together exactly how I envisioned it was incredibly satisfying.
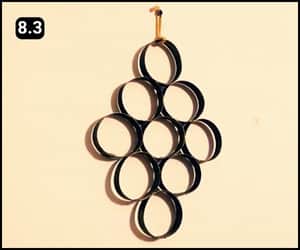
Step 6: Painting the rings inside out
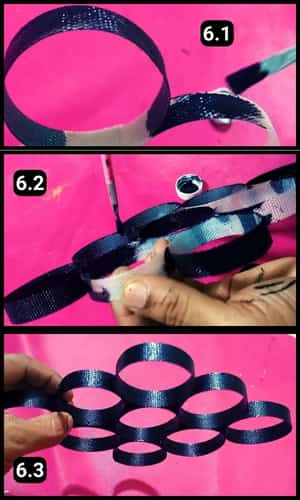
Once the structure was dry, I moved on to painting it thoroughly, opting for a sleek black color.
Acrylic paint was my go-to choice for its vibrant finish and durability.
Painting each ring from all sides took some time, but it was a crucial step in the process that demanded patience.
The real challenge lay in achieving a deep, even black over the embossed textures of the plastic strips.
I had to brush carefully to ensure the paint covered every nook and cranny, bringing out the beauty of the texture beneath.
Step 7: The Golden Touch
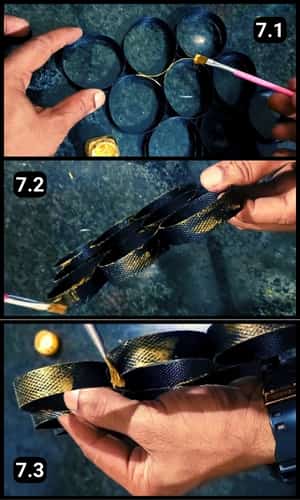
Seeing the textures on the strips, I decided to add a touch of gold.
Honestly, the golden highlights looked stunning against the black.
My excitement soared as I worked through this step, and the number of rings didn’t seem daunting anymore.
When I finished shading them just the way I wanted, the outcome was truly spectacular.
The combination of gold on black elevated the whole project, making all the effort feel completely worthwhile.
Step 8: Fixing the Hanging String
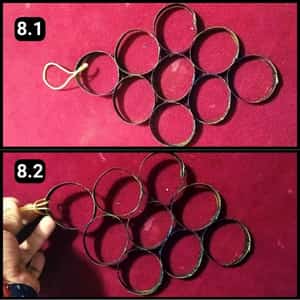
I found a decorative thread with golden hues and tied it to one end of the wreath base.
With a simple knot, it was all set to be hung up, just like in the picture I shared.
This final touch not only added charm but also made it easy to display my creation for everyone to see.
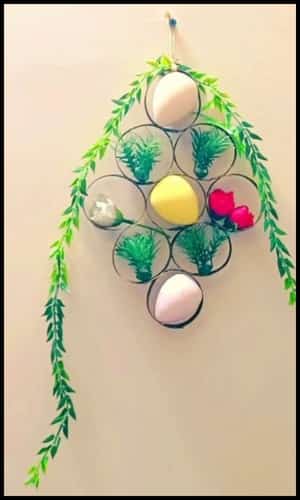
I hung the wreath on my living room wall and dived into adding the final touches.
For the Easter theme, I used decorations that matched perfectly with the holiday.
I placed makeover sponge balls that looked just like Easter eggs among the rings.
Then, I added some artificial bushes and flowers, finishing off with a decoration that truly stood out for Easter. The result was both stunning and fitting for the celebration.
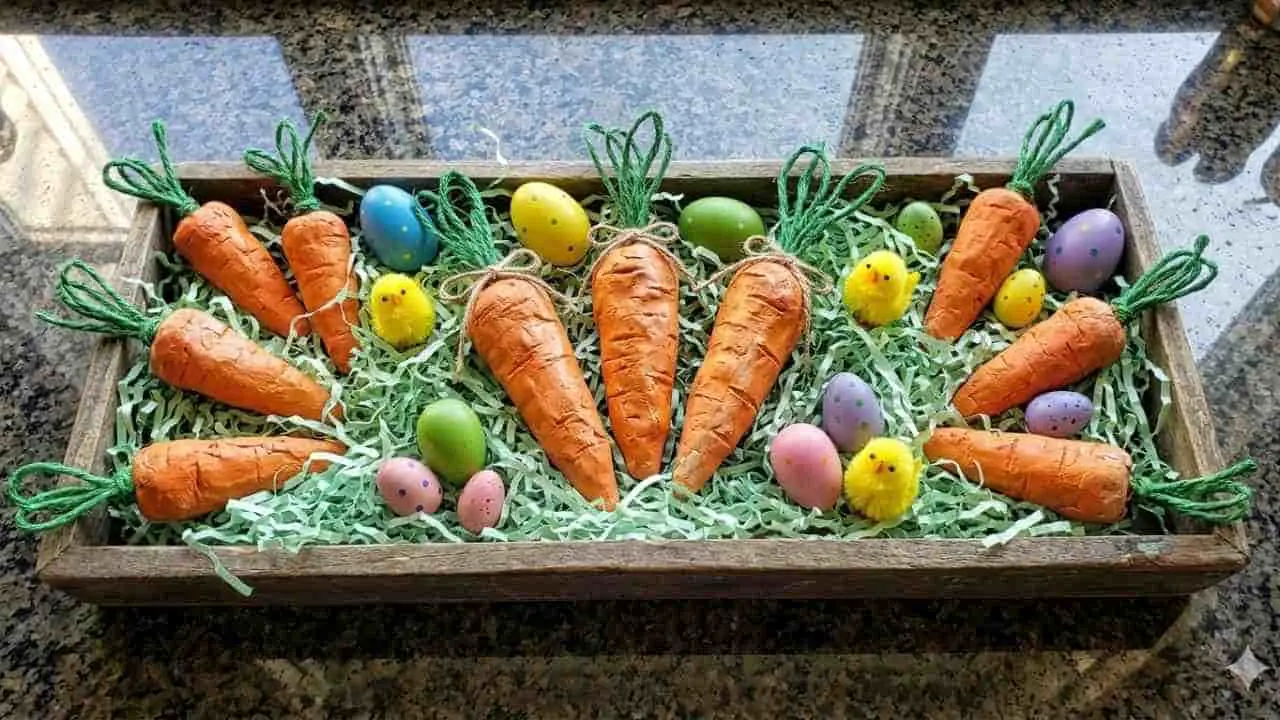
Here’s how our DIY Easter Egg Wreath Decor looks post the completion of our project.
Video walkthrough Of Dollar Tree Inspired DIY Easter Egg Wreath Decor
Final Thoughts
With just a simple package wrapping strip, I’ve unveiled its astonishing potential as an epic decor base.
From what started as an idea, I’m overjoyed to have brought it to life as a DIY Easter Egg Wreath.
Not only does it look stunning, but I’ve also had the pleasure of sharing the joy by crafting similar ones as gifts for my close friends.
The ring base can be adorned differently, making it suitable for various occasions and spaces.
It’s not just limited to Easter, it can seamlessly adapt to any environment, be it homes, shops, or offices.
To make it even more accessible, I’ve also shared a video walkthrough above showcasing the step-by-step process of crafting this decor.
This way, anyone who’s inspired by this project can follow along and create their own masterpiece.
Frequently Asked Questions
How long did it take to complete this?
It took about an hour to craft this particular DIY Easter decor item. The majority of the time was invested in sticking and painting bits.
What else can I use to make the rings?
You can use plastic bottles and cut them like rings and also rings made of cardboard will do the trick.
Can I use a different type of paint if I don’t have acrylic paint?
Yes, you can use any paint that adheres well to plastic. Spray paint is a great alternative for a smooth finish and quick drying.
What other decorations can I add to personalize my Easter wreath further?
Consider incorporating ribbons, lace, or even small, lightweight Easter-themed figurines. Adding personalized elements like family initials or Easter messages can also make it unique.
Is there a way to make the wreath weatherproof for outdoor display?
To protect your wreath outdoors, apply a clear sealant over the painted areas. This will help safeguard against moisture and sunlight.
How can I adjust the size of the wreath if I need it larger or smaller?
To adjust the size, simply increase or decrease the length of the strips used to form the rings. This will directly impact the overall diameter of your wreath.
Can I substitute the hot glue gun with another type of adhesive?
Yes, if a hot glue gun is not available, strong craft glue or epoxy can be used. However, drying times might vary, so be prepared for a longer setting period.
What’s the best way to store the wreath after Easter?
To store the wreath, wrap it in a soft cloth or bubble wrap and place it in a dry, flat box. Avoid stacking heavy items on top to maintain its shape.
Can this wreath design be adapted for other holidays?
Absolutely! By changing the colors and decorations, you can adapt this wreath for any holiday. For example, red and green for Christmas, or orange and black for Halloween.
Is it possible to use natural elements instead of artificial decor?
Yes, you can incorporate natural elements like dried flowers or branches. Keep in mind that natural materials may not last as long and could require replacement over time.