Looking to brighten up your home this Easter season? Easter chalkboard art ideas are the perfect way to add a touch of whimsy and celebration without breaking the bank.
Whether you got a fancy framed chalkboard or just using some chalk paint on an old board, these designs gonna transform any space into a festive Easter wonderland.
From simple bunny silhouettes to intricate spring scenes, there’s something here for every skill level – trust me, even if you think you can’t draw!
Let’s dive into these creative chalk designs that’ll have your guests asking “did you really make that yourself?”
1. Classic Bunny Silhouette with Floral Crown
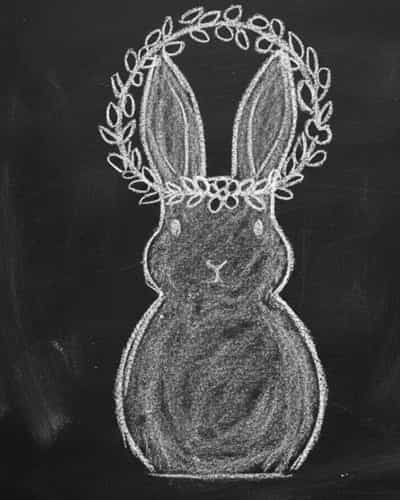
This design is surprisingly easy and looks absolutely stunning on any chalkboard surface.
Start by sketching a simple rabbit profile facing right – just think of it as a circle for the head, a bigger oval for the body, and don’t stress about perfect proportions.
Draw the bunny’s ear pointing upward, nice and tall.
Now here’s where it gets fun: create a flower crown sitting right between those ears using small circular shapes for the blooms.
I like using daisies because they’re basically circles with petals around them, super forgiving if your hand shakes a bit.
Add some leaves by making simple teardrop shapes, varying the sizes so it looks natural and not too uniform.
For the finishing touches, use white chalk for highlights on the flowers and maybe add some delicate vines trailing down.
You can even write “Happy Easter” in a cursive script below the bunny – doesn’t have to be perfect, the charm is in the handmade feel! If you mess up a line, just wipe it with a damp cloth and try again, that’s the beauty of chalk.
The whole piece should take maybe 20 to 30 minutes, and it works great on smaller boards too.
2. Egg Hunt Directional Sign
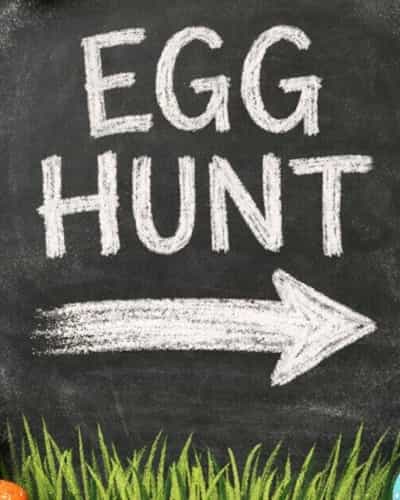
Want something functional AND decorative? This one’s a winner for families with kids!
Draw a large arrow pointing in whatever direction you want – make it chunky and bold so it stands out.
Inside that arrow, write “EGG HUNT THIS WAY” in block letters.
The letters don’t gotta be perfectly aligned, actually the slightly wonky look adds character.
Around the arrow, scatter small egg shapes in different patterns – polka dots on one, stripes on another, zigzags on the third.
Here’s a trick: use the side of your chalk for shading to give the eggs dimension. Just tilt the chalk and rub gently on one side of each egg to create a shadow effect. Add some grass blades at the bottom by making quick upward strokes with your chalk, varying the heights and thicknesses.
You could also throw in a few small flowers peeking through the grass – simple five-petaled flowers work perfect.
If you’re feeling ambitious, add a small bunny peeking from behind the arrow, just his ears and eyes showing.
This design probably takes 15 to 20 minutes and kids absolutely love following the arrow during Easter egg hunts!
3. Scripture Verse with Spring Wreath
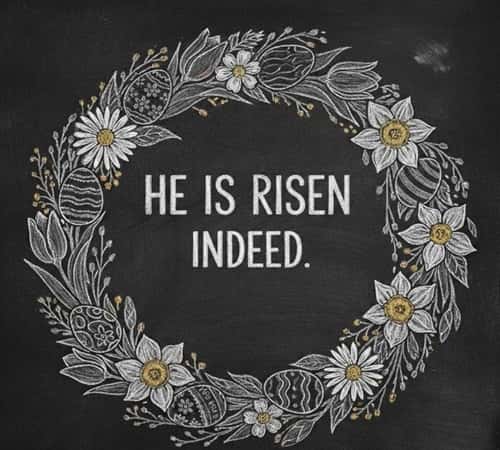
This design brings together faith and festivity in such a beautiful way.
Start by drawing a circular wreath shape – it doesn’t need to be a perfect circle, actually an organic oval looks more natural and hand-drawn.
Fill that wreath with different spring elements: tulips, daffodils, small eggs nestled between flowers, maybe some pussy willow branches. Don’t overthink the flower shapes – tulips are basically U-shapes with a stem, daffodils can be simple star shapes with a circle in the middle. Vary the sizes and angles so everything looks like it’s growing naturally.
In the center of your wreath, write your chosen Easter scripture. Something like “He is Risen” or “Rejoice” works beautifully.
I prefer keeping the text simple and large so it’s readable from across the room.
Use your best handwriting but remember imperfections add authenticity – this isn’t a computer font!
Add depth by going over some petals twice to make them brighter, leave others lighter.
Put tiny dots in the flower centers for detail. Small leaves scattered throughout the wreath fill empty spaces nicely.
The whole thing might take 30 to 40 minutes but the result is something really special that captures the true meaning of Easter.
4. Carrots and Bunny Paws
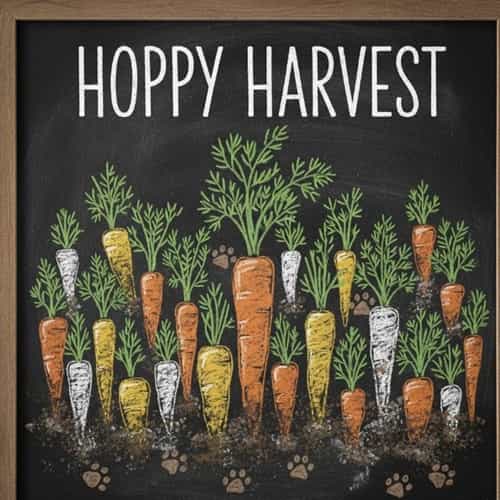
Here’s a playful design that’s ridiculously easy but so charming! Draw three or four carrots coming up from the bottom of your board at different angles and heights.
Carrots are just elongated triangles with lines across them to show segments, top them with leafy greens using quick zigzag strokes.
Make some carrots fatter, some skinnier – variety is key.
Now the cute part: draw little bunny paw prints scattered around the carrots like a rabbit been hopping through your garden!
Bunny paws are simple – three small ovals for toes and one bigger oval pad behind them.
Space them out in hopping patterns, two paws together, then a gap, then two more paws.
You can make a trail leading to one side of the board like the bunny’s heading somewhere specific.
Add some loose dirt marks around the carrots using the side of your chalk to smudge it around.
Maybe throw in a few grass tufts here and there. Write something playful like “Some Bunny Loves Carrots” at the top in a fun bouncy font.
This whole design takes maybe 15 minutes and kids think it’s hilarious – they’ll study those little paw prints forever!
5. Simple “Hoppy Easter” Typography
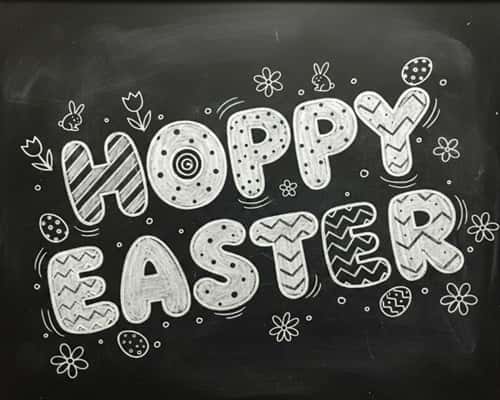
Sometimes the best designs is the simplest ones. This is all about fun lettering and minimal decorations.
Write “HOPPY EASTER” in large bubble letters taking up most of your board.
Make the letters chunky and round – bubble letters are forgiving because they’re supposed to look playful and imperfect.
Inside some of the letters, add simple patterns like polka dots or stripes.
You can outline each letter twice to make them really pop and give them dimension.
Now add small Easter elements scattered around the lettering – a bunny ear poking up behind the H, an egg tucked next to the P, maybe a small chick near the R.
These don’t need to be detailed, just suggestion of these shapes work perfectly. Small flowers or grass blades at the bottom ground the whole design.
The key to good lettering is keeping your hand loose and not worrying too much about perfection.
If one letter’s bigger than another, that’s totally fine! It adds character. You can add small stars or dots scattered in the background for extra whimsy.
This design takes about 20 minutes and makes a bold statement that’s visible from across the room.
6. Easter Egg Tree Branch
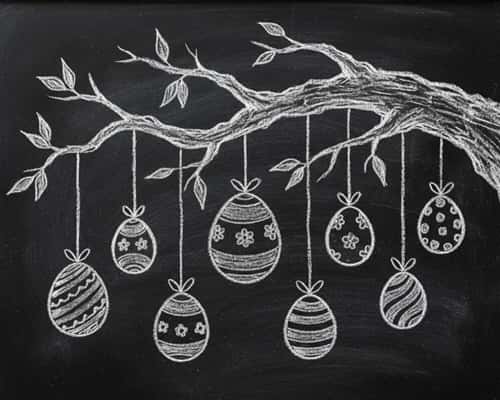
This design is inspired by European Easter traditions and it’s gorgeous!
Draw a tree branch coming in from one side of your board – make it gnarled and interesting with smaller branches shooting off.
Don’t make it too straight, real branches have character with bends and knots.
Add texture to the bark using short parallel lines and some darker shading on one side.
Now hang decorated Easter eggs from the branches using simple curved lines like string or ribbon.
Each hanging egg should have its own unique pattern and design.
Some with geometric patterns, some with flowers, some with simple stripes or dots.
Vary the heights they’re hanging at so it looks natural and organic. Add small leaves budding on some branches – just simple oval shapes in clusters.
You can make some eggs larger in the foreground and smaller toward the back for depth.
Maybe add a small bird perched on one branch or a butterfly near the eggs.
Little details like that bring the whole scene to life! Consider adding some falling petals or leaves scattered around for movement.
This takes 30 to 40 minutes but creates such a elegant spring display.
7. Chick Hatching Scene
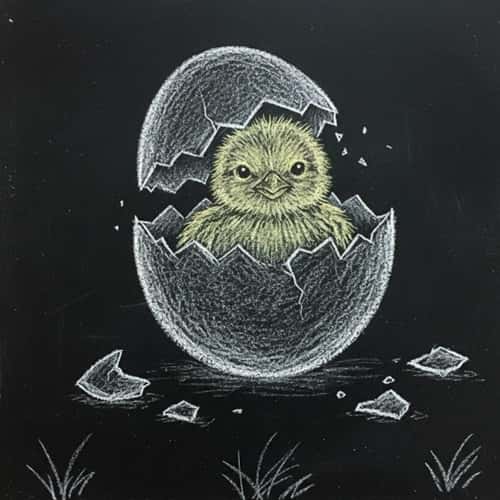
This adorable design tells a little story and it’s easier than it looks, I promise!
Draw a large cracked egg in the center – make the crack jagged and irregular going around the middle.
The top half should be slightly lifted and tilted to show it’s opening.
Inside that egg, draw the cutest fluffy chick you can manage – basically a round circle for the body, smaller circle for the head, triangle beak, and two dots for eyes.
Add fluffiness by making small scribbled lines around the chick’s outline instead of a smooth line.
This creates that downy feather texture. Maybe have one wing poking out waving hello! Scatter eggshell pieces on the “ground” around the main egg.
Add some grass tufts and maybe a few small flowers near the base.
You could include another whole egg next to it with cracks starting to form, suggesting more chicks coming soon.
Write something cute like “New Beginnings” or “Hello Spring” near the top in a gentle flowing script.
Use shading on the inside of the eggshell to show depth – darker where the shell curves away.
This design captures that sense of new life that Easter represents and takes maybe 25 minutes to complete.
8. Garden Gate with Easter Scene
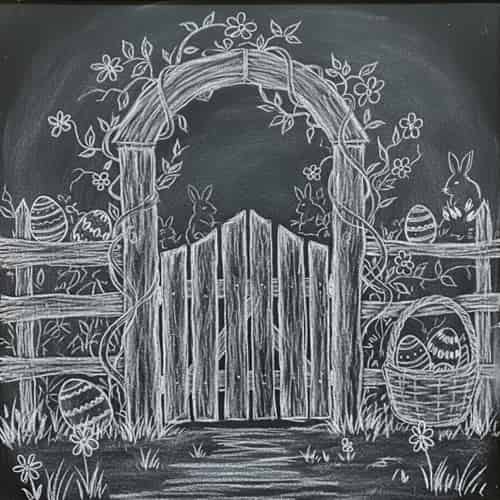
This one creates such a charming vignette! Start by drawing a simple arched garden gate – two vertical posts with horizontal slats between them and a curved top.
Make the gate look wooden by adding vertical grain lines and maybe some knots in the wood. Have the gate slightly open like it’s inviting you into a garden.
Through and around the gate, draw your Easter scene – bunny silhouettes hopping in the distance, eggs hidden in grass, flowers blooming everywhere.
Add climbing vines growing up the gate posts with leaves and small flowers.
Make some vines thick, some thin and delicate trailing across the arch. In the foreground at the bottom, draw fuller grass and larger flowers like tulips or daffodils.
You can add a small path leading through the gate using simple curved lines or stones.
Maybe put a basket visible through the gate or a bunny disappearing around the corner. Write “Welcome Spring” or “Easter Joy” on a small sign hanging from the gate.
The layering in this design – foreground, gate, and background – creates real depth and interest. Give yourself 40 to 50 minutes for this more complex scene.
9. Minimalist Egg Collection
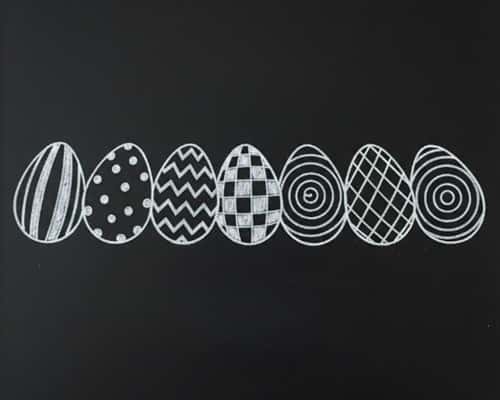
Sometimes less really is more, you know? This design is perfect if you prefer clean modern aesthetics.
Draw five to seven eggs arranged in a simple row across your board. Keep them different sizes and tilt them at slightly different angles.
Each egg gets a single distinctive pattern – one with perfect polka dots, one with clean stripes, one with a chevron pattern, one with a simple cross-hatch, one with waves.
The beauty here is in the restraint and the pattern execution.
Take your time with each pattern making the lines as clean as possible, though remember we want that handmade look not computer-generated perfection.
Leave plenty of negative space around the eggs – that emptiness makes them stand out more.
You might add just the word “Easter” in small simple letters at the bottom or top.
No flowers, no grass, no extra elements. Just those beautiful patterned eggs floating on the black background.
This minimalist approach is sophisticated and takes only 15 to 20 minutes but looks like you spent way longer!
The trick is keeping your hand steady and your patterns consistent within each egg while making each egg distinctly different from the others.
10. “He is Risen” with Cross and Lilies
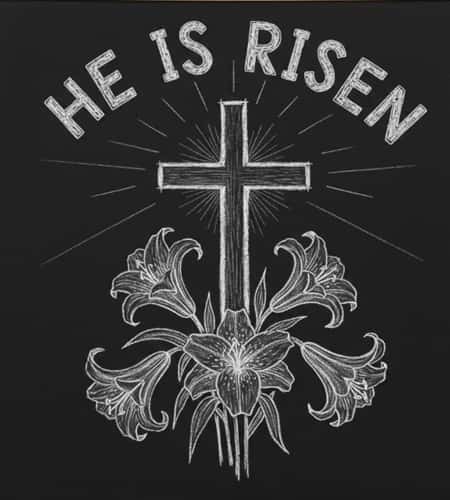
This design beautifully captures the spiritual heart of Easter.
Draw a simple cross in the center – doesn’t need to be fancy, just two intersecting lines with the vertical longer than the horizontal.
Around the base of that cross, draw Easter lilies – these are trumpet-shaped flowers that symbolize resurrection and purity.
Lilies look complex but break them down: draw a long stem, then the flower is basically several elongated petal shapes radiating from a center point, slightly curved and overlapping.
Add some leaves along the stems – long blade-like shapes. Group three or four lilies at different heights around the cross.
Above the cross, write “He is Risen” in your most elegant script or in simple block letters if that’s more comfortable.
You can add some subtle rays of light emanating from behind the cross using light chalk strokes radiating outward.
Maybe include the date of Easter Sunday this year for a personal touch. Small details like shading the inside of the lily trumpets adds dimension.
This design combines faith and artistry in such a meaningful way and takes about 30 minutes.
It’s perfect for church spaces or Christian homes wanting to celebrate the true meaning of the holiday.
11. Bunny Tea Party Scene
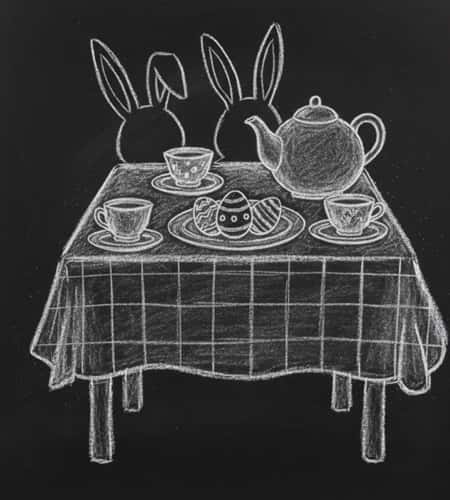
This whimsical design is absolutely delightful and kids go crazy for it! Draw a simple table viewed from the side – just a horizontal line with table legs.
On that table, place teacups, a teapot, and plates with Easter treats.
These can be very simple shapes – cups are just rounded rectangles with handles, the teapot is a circle with a spout and handle.
Add decorated Easter eggs on the plates and maybe some carrot cake slices!
Now here’s the fun part – draw bunny silhouettes sitting at the table.
You can show just their heads and ears poking up above the table edge.
Give each bunny a different ear position – one up alert, one flopped, one tilted. Add simple facial features like dots for eyes and small triangles for noses.
Behind the scene, you might add a window shape with a simple spring view or just some floating flowers and butterflies.
Write something cute like “Easter Gathering” or “Spring Tea Time” at the top. Tablecloth pattern with dots or stripes adds nice detail.
The charming storytelling quality of this design makes it special – it’s not just decoration, it’s a little narrative. Plan for 35 minutes to get all those cute details just right.
Final Thoughts
The real magic of chalkboard art isn’t in creating something perfect – it’s in creating something personal.
Each smudge, each slightly crooked line, each imperfect circle tells the story of your hand creating something beautiful for the people you love.
Easter’s all about renewal and new beginnings, and there’s something deeply satisfying about wiping clean a board and starting fresh with a new design that captures the joy of the season.
Don’t overthink it, just grab some chalk and let your creativity flow.
The mistakes become character, the wobbles become charm, and before you know it, you’ve created something that makes people smile – and honestly, isn’t that what Easter decorating is all about?


