Foam clay crafts are honestly one of the easiest ways to dip your toes into Kids craft projects without ending up in a glitter explosion.
Foam clay is soft, colorful, air-drying, and ridiculously forgiving. Even if your hands feel “left-handed” on some days, it still behaves nicely.
And when you’re just starting out with diy foam clay craft projects, simple ideas go a long way. I’ve listed beginner-friendly, repeatable creations that actually look cute and don’t require fancy tools.
Want something quick? Something fun for kids? Or just a calming weekend activity? You’ll find a mix below that keeps things simple, clean, and confidence-building.
What is a Foam Clay in the first place?
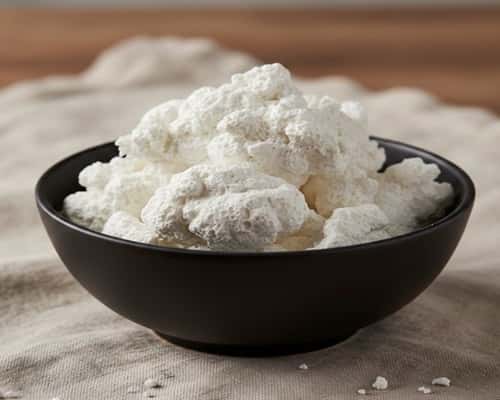
Foam clay is a lightweight, moldable crafting material that air‑dries into a firm, durable finish. It’s soft and squishy when fresh, easy to shape with your hands or simple tools, and once dry it hardens without cracking, making it perfect for DIY projects, decorations, and even cosplay props
In simple terms, Foam clay is essentially the bridge between traditional modeling clay and modern craft foams – easy enough for kids, but versatile enough for professional artists.
Key Features of Foam Clay
- Lightweight & Soft: Easy to handle, especially for beginners and kids.
- Air‑Drying: No oven or kiln required; it hardens naturally in a few days.
- Versatile: Can be shaped into figurines, jewelry, ornaments, or props.
- Durable Finish: Once dry, it becomes firm and long‑lasting without breaking easily.
- Colorful Options: Available in many vibrant shades, and colors can be mixed for custom effects.
Common Uses Of Foam Clay
- DIY Crafts: Mini sculptures, fridge magnets, bookmarks, and home décor.
- Cosplay & Props: Popular in the cosplay community for lightweight costume accessories.
- Jewelry & Accessories: Earrings, pendants, keychains, and bag charms.
- Educational Projects: Safe for kids’ school crafts and creative play.
Here are 12 Unique and easy to make foam clay craft projects that kids will enjoy.
1. Mini Foam Clay Fruit Charms
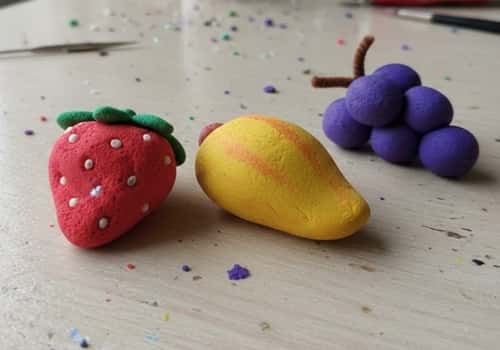
These little charms are perfect warm-up projects. They’re tiny, colorful, and forgiving—basically the craft version of a confidence boost.
Start with small balls of foam clay. Shape one into a strawberry, one into a mango, one into grapes.
For texture, gently tap the surface with a toothpick. Add teeny leaves with green foam clay. Let them air dry, then glue on jewelry loops or keychain rings.
The shapes don’t have to be perfect. Imperfect fruits look adorable. Kids can join too, because the steps are simple and quick.
2. Simple Foam Clay Flower Magnets
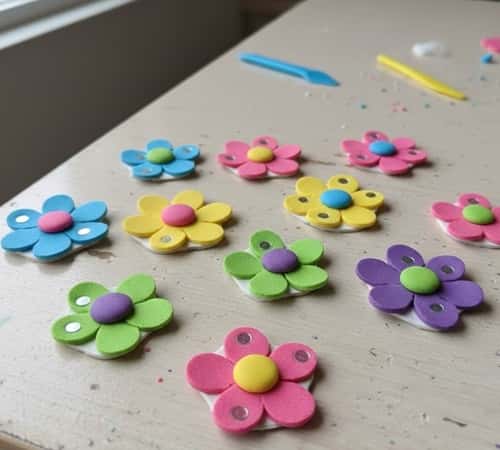
If you want something cheerful without complex shaping, start with flower magnets.
Roll tiny petals, flatten them, and gently pinch the tips. Press 5–6 petals into a circle. Add a contrasting center.
Stick a small magnet on the back using strong glue once the clay dries. You can make a whole garden of colors in under an hour.
These brighten up any fridge. And honestly, who doesn’t like opening their refrigerator to a tiny foam clay sunflower staring back?
3. Tiny Foam Clay Animals for Display Shelves
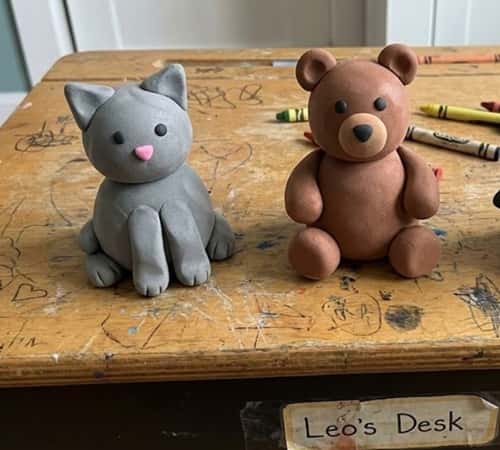
Keep this simple – just basic shapes. Make a round ball for the head, slightly bigger ball for the body.
Add little ears, a tail, and dot eyes using black foam clay. Start with easy animals like cats, bears, or penguins.
These little figures dry firm and sit nicely on shelves or study tables. They’re great for kids who want instant wins without sculpting stress.
And if your animal looks “creatively unique,” even better. Foam clay animals are meant to look cute, not anatomically correct.
4. DIY Foam Clay Coasters
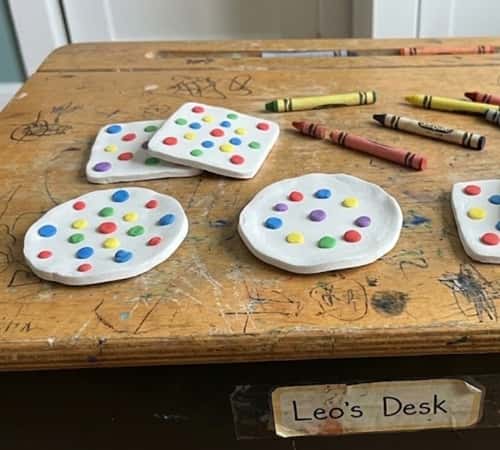
Beginners love this because it feels fancy without being difficult. Roll out foam clay into a flat circle or square.
Use a cup, lid, or cookie cutter to shape it evenly. Add simple patterns – dots, waves, tiny flowers – by pressing small bits of foam clay on top.
Keep things low-relief so cups sit flat. Let the coasters dry for a full day. They end up lightweight but surprisingly durable.
These also make thoughtful handmade gifts without the usual “oh no, this will fall apart” fear.
5. Foam Clay Name Tags for Kids
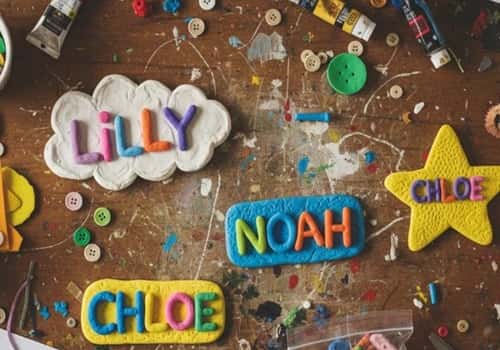
These are perfect for labeling school supplies or room doors.
Roll a flat base in any shape – oval, rectangle, cloud, whatever feels fun. Add raised foam clay letters on top.
Keep the letters chunky so they’re easy to form. Add small stars, hearts, or stripes for decoration.
Once dry, stick double-sided tape on the back. Kids love seeing their names in 3D foam clay, and parents love how quick these are to make. It’s one of the easiest foam clay crafts with instant payoff.
6. Easy Foam Clay Pencil Toppers

These pencil toppers are such a fun little project because you only need a basic shape that sits snug on top of the pencil.
Roll a medium ball of foam clay and gently push a pencil tip halfway inside to create the opening.
Pull it out carefully so it doesn’t warp. Now shape the ball into something simple – a star, donut, smiley face, or even a tiny dinosaur head.
Add tiny foam clay details like sprinkles or dots. Let it dry before using so it actually grips well.
Kids love these because they get to personalize their school supplies without complicated steps.
7. Simple Foam Clay Keychains
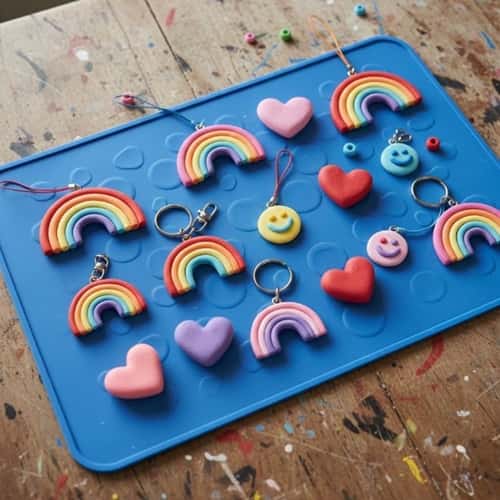
Keychains are one of the easiest foam clay crafts because you can shape almost anything. Start with a small flat disk or mini figurine shape.
Press a tiny metal eye pin into the clay before it dries. Make charms like mini rainbows, hearts, or even little cartoon faces.
Keep the design flat so it stays lightweight. Once dry, attach a key ring.
The best thing here? Even a “not-so-perfect” shape looks cute hanging from a backpack or key set. Plus, the drying time gives you just enough patience training for the week.
8. Foam Clay Decorative Bowls
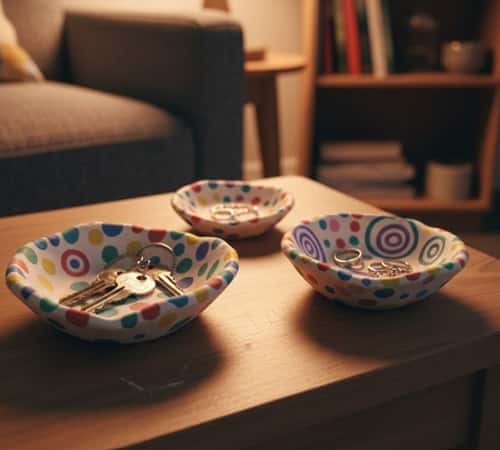
These bowls are shallow catch-all dishes perfect for keys, rings, or coins.
Roll a ball of foam clay and flatten it into a thick circle. Drape it over the bottom of a small bowl to hold the shape – don’t press too hard.
Add simple raised details like dots or swirls. Let it dry in that position so it keeps the curve.
Once dry, remove it from the bowl and you’ve got a lightweight little dish. Super simple. Super satisfying. And it looks way fancier than the effort it takes.
9. DIY Foam Clay Bookmark Toppers
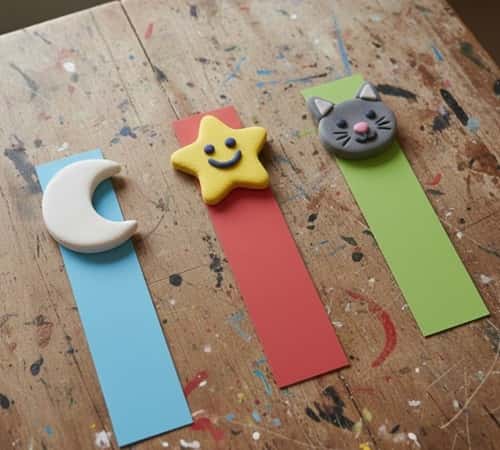
For this one, you only need two parts: a foam clay topper and a plain cardboard strip. Shape the topper into something flat and simple – like a moon, star, or cute animal face. Let it dry fully.
Then glue it onto the end of the cardboard strip. You can even color the strip with markers to match.
These bookmarks are lightweight, durable, and surprisingly giftable. Kids love using them because they make reading feel more fun, especially when a little foam clay cat head peeks out of the book.
10. Foam Clay Mini Planter Faces
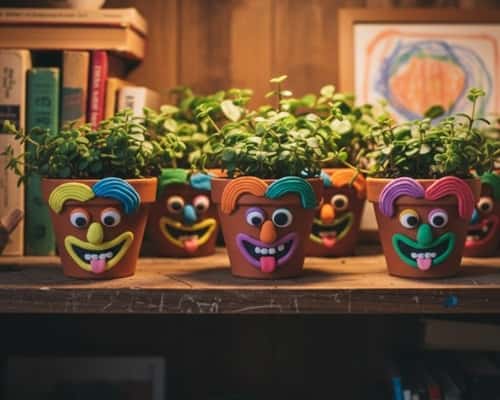
Take small plastic planters or tiny ceramic pots and add foam clay faces to them.
Roll small balls for eyes, long pieces for eyebrows, and chunky round bits for noses. Stick them onto the pot and press gently so they adhere well.
You can add fun expressions – sleepy eyes, surprised faces, goofy smiles.
These look adorable on desks or windowsills (and nope, we’re not using window light in the image).
Beginners love this because you can’t mess it up. Every face turns out charming in its own weird way.
11. Foam Clay Emoji Pins
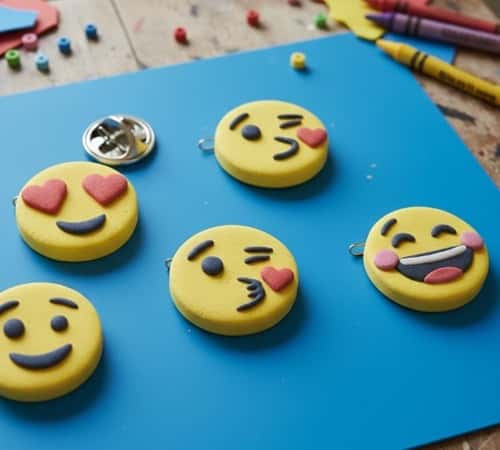
This one is quick, silly, and works for all ages. Roll flat circles of foam clay – keep them thick enough so they don’t bend while drying.
Make simple emoji faces using tiny foam clay pieces: heart eyes, a big grin, a wink, or the classic “uh-oh” face.
Stick the details gently so they bond well. Once everything is dry, glue a pin-back on the reverse.
These little emoji pins look fun on backpacks or bulletin boards.
And don’t stress over accuracy – the more lopsided the face, the funnier it gets. That’s the charm.
12. Foam Clay Desk Organiser Shapes

You don’t need complex molds for this. Roll foam clay into simple block shapes – rectangles, squares, even chunky cylinders.
These will become compartments for pens, paper clips, or USB drives. While the clay is still soft, press a pencil or marker inside to create hollow sections.
Don’t go too deep – just enough to form neat pockets. Add small foam clay accents like stripes or dots.
Let each piece dry separately, then arrange them together on your desk like modular organizers. It’s oddly satisfying and makes your workspace look handmade but tidy.
Final Thoughts
If there’s one thing foam clay teaches you, it’s that creativity doesn’t need to feel intimidating.
The material itself removes the pressure because it’s soft, slow-drying, and very forgiving.
The real trick is setting up a tiny craft corner at home – nothing fancy – just a tray with basic tools, a few colors, and a flat surface you don’t mind getting messy.
When everything is within reach, you’ll find yourself creating more often without overthinking it.
Try batching your projects too, make shapes one day and decorate them the next.
And always let pieces dry fully before handling. That’s the difference between “It collapsed,” and “Wow, this turned out great.” Let the process stay relaxed, and the results will follow.


