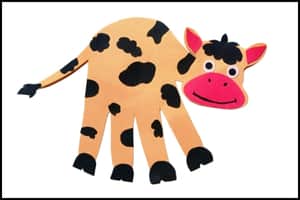
Ever wondered how a simple handprint can turn into an adorable cow? It’s easier than you think!
In just a few steps, you can transform basic craft supplies into a charming handprint cow that’s perfect for kids and adults alike.
With a colorful template that does most of the work for you, all you need is a bit of glue and some creativity.
Whether you’re a seasoned crafter or just looking for a fun activity to do with your little ones, this project is a fantastic way to bring a bit of farmyard magic into your home.
Ready to make your own handprint cow? Let’s take a quick look at the list of basic craft supplies you’ll need to make handprint paper Cow structure in step 1 below.
Step 1: Materials You’ll Need For Handprint Cow
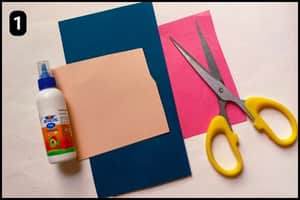
- Craft Papers: You will need colorful craft paper sheets to make the handprint Cow structure (You can use basic craft papers and shades of your choice).
- Scissor: To cut the shapes of the handprint Cow shape and other elements you will need a scissor.
- Glue: To stick the paper cutouts for assembling together you will need a regular glue. You can either use a basic craft glue or a multipurpose glue.
- Handprint Cow Template: I have made a ready template which includes colorful handprints shapes for your reference and you can access the same in the below step 2.
Estimated Time Taken to Craft the Handprint Cow Structure: It took 12 minutes for me to craft the Handprint Cow structure using the ready template from our website. The most time-consuming part was cutting out the cow patches and other small details. However, the time will vary if you choose to manually cut the shapes using colorful craft papers without the template.
Step 2: Handprint Cow Template
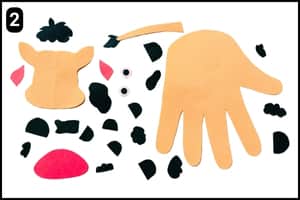
If you look at the image above, this is how the handprint cow template will look when you download it.
The template features a handprint as the cow’s main body, along with its face, facial details, body patches, tail, and trotters (feet).
Just download and print it in a few clicks, and you’re all set to start the handprint cow activity.
It simplifies your task by eliminating the need to search for colored craft papers and cut precise shapes.
Step 3: Cutting The Template Shapes
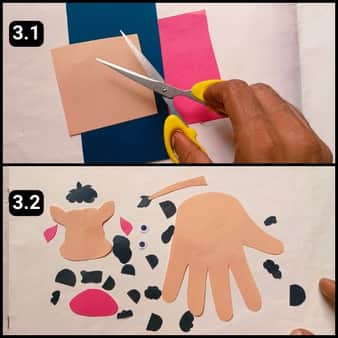
To cut the shapes manually without using the handprint cow template, first gather colorful craft papers as shown in image 3.1 above.
Then, use the images on my blog as a guide to cut out the necessary shapes for the handprint cow, as illustrated in image 3.2 above.
This manual process can be a bit tedious and time-consuming, so take your time to prepare each detail carefully to create a well-structured handprint cow.
Note: This step is optional if you are using the ready handprint Cow template from our website.
Step 4: Assembling The Cow’s Facial Details
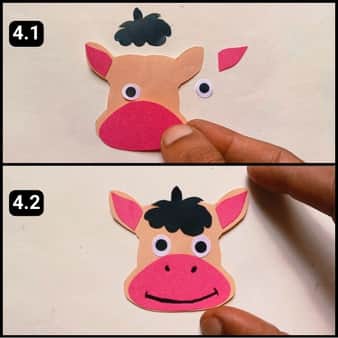
Now that all the shapes are prepared, it’s time to bring the handprint Cow to life!
I began by crafting the Cow’s facial features, this involves assembling the ear shades, mouth, eyes, and hair shape on its head.
To ensure a sturdy and long-lasting structure, I secured each shape in place using glue.
After applying the glue, I let the structure dry for a while to allow the adhesive to set properly.
Step 5: Assembling The Head & Trotters
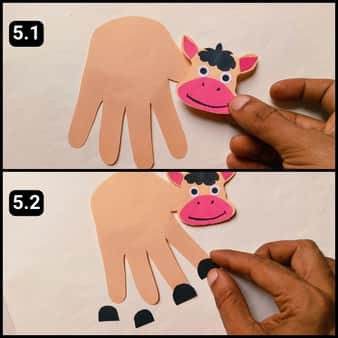
With the facial features in place, I next focused on bringing the Cow’s body to life.
I began by carefully attaching the head to the main handprint body, ensuring a secure and even bond.
Next, I turned my attention to the Cow’s trotters, also known as its feet.
I positioned each one at the base of the Cow’s legs, applying a small amount of glue to secure them in place, one by one.
This attention to detail helps to create a sturdy and lifelike structure.
Step 6: Assembling The Tail & Body Patches
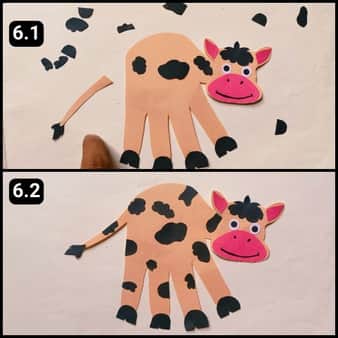
The Cow’s handprint structure is now nearing completion, but it’s missing a few crucial details.
To bring it to life, I carefully assembled the body patches, ensuring a seamless fit, and then added the tail.
Next, I attached the tail to its designated spot, completing the Cow’s silhouette.
With these final touches in place, the handprint Cow craft is now fully assembled, and the result is truly breathtaking.
The finished handprint Cow exudes a sense of surprise and wonder, captivating the eye.
Upon closer look, it’s remarkable to see how the various shapes and parts come together to create a cohesive and lifelike form, making it difficult to believe it was crafted from a simple handprint.
I have uploaded a complete video walkthrough of this handprint cow craft here.
Final Thoughts
What started as a simple handprint has been transformed into a delightful, lifelike bovine figure.
The step-by-step instructions make the process accessible, while the ready-made template streamlines the craft for even the most novice DIYer.
The attention to detail in assembling the facial features, trotters, tail, and body patches is truly impressive.
For anyone looking to unleash their inner artist, I highly recommend giving this project a try.
Note: To further assist you I have shared a quick video walkthrough of the handprint Cow craft on our official YouTube channel as well.


