Today, I’m thrilled to share a delightful handprint octopus craft that’s sure to make a splash in your crafting adventures.
With just a few simple materials and about 10 minutes of your time, you can create an adorable octopus that’s bursting with personality.
Whether you’re a seasoned crafter or just dipping your toes into the world of DIY, this step-by-step guide will have you crafting like a pro in no time.
So, grab your scissors and glue, and let’s dive into this ocean of creativity together.
First things first, let’s take a quick look at the list of basic craft supplies you’ll need to make handprint paper Octopus structure in step 1 below.
Step 1: Materials You’ll Need To Make Handprint Octopus Craft
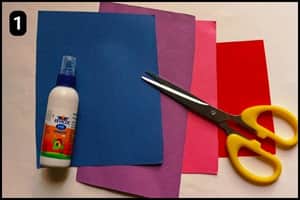
- Craft Papers: To create a sturdy and visually appealing handprint Octopus structure, you’ll need a set of vibrant, thick craft paper sheets. Choose from a variety of basic craft papers and shades to match your desired color scheme. Ensure that the papers are substantial enough to provide stability to the final structure, allowing it to stand upright and maintain its shape.
- Scissor: To cut the shapes of the handprint Octopus shape and other elements you will need a scissor.
- Glue: You can either use a basic craft glue or a multipurpose glue.
- Handprint Octopus Template: I have made a ready template which includes colorful shapes of the handprint Octopus for your reference and you can access the same in the step 2 below.
Estimated Time Taken to Craft the Handprint Octopus Structure: It took 10 minutes for me to craft the Handprint Octopus structure using the ready template from our website. The major consumption of time was to cut the Octopus patches and other tiny details.
Step 2: Preparing/Downloading The Handprint Octopus Template
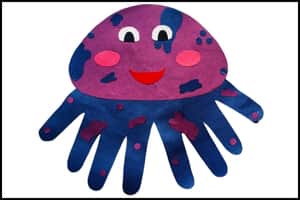
Take a quick look at the image above to get a sneak peek at the handprint Octopus template, which you’ll be able to download with ease.
This comprehensive template includes all the essential elements required to form a cute looking handprint octopus i.e. the Octopus’s main body, face, facial features, body patches, feet, etc.
By downloading and printing the template with just a few clicks, you’ll be ready to start the handprint Octopus activity right away.
This convenient template will also save you time and effort by providing a pre-designed layout, eliminating the need to search for and cut out individual craft paper shapes in various colors.
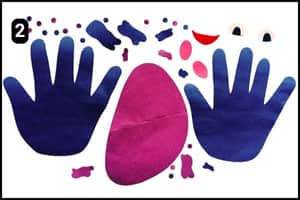
Step 3: Cutting The Octopus Shapes
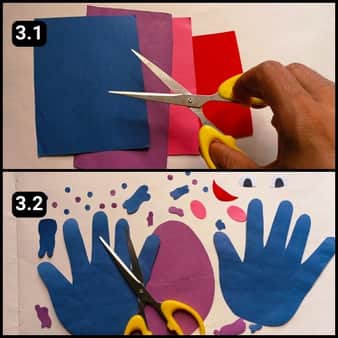
You can streamline your creative process by utilizing the pre-designed template I’ve created, which includes all the necessary shapes for the Octopus body.
Simply cut out the shapes and move on to the assembly steps.
If you don’t want to use the ready made octopus template no worries! You can still create your own template by using colorful craft papers and cutting out the required shapes.
Refer to the final Octopus craft structure to ensure you’re using the correct colors for each shape.
Once you’ve cut and prepared all the shapes, you’re ready to begin assembling your Octopus craft.
Step 4: Assembling The Handprint Octopus
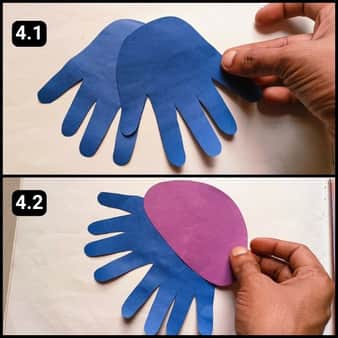
With the cutouts of the handprint Octopus ready it’s time to assemble the shapes.
I began by assembling the two handprint shapes as shown in image 4.1 above.
I aligned the handprints so that the thumbs were hidden, creating the eight arms of the octopus.
Then, I secured the handprints with glue and positioned the main body shape over them.
As seen in image 4.2 above, I centered the purple cutout in the middle and secured it with glue.
Step 5: Assembling The Facial Details
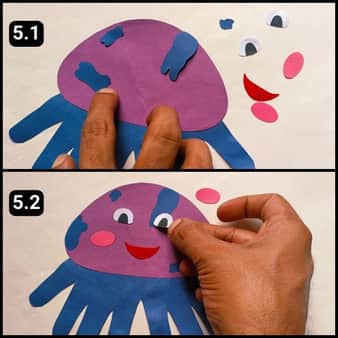
Now that the main body structure is complete, it’s time to add the finishing touches.
The template includes various shapes that resemble the Octopus’s body patches, available in two distinct shades.
To achieve a realistic look, be sure to alternate the shades on the head and lower body.
I began by attaching the patches to the facial structure, which forms the upper body of the Octopus.
Next, I added the eyes, mouth, and cheeks shapes to their designated positions.
This completes the upper body of the handprint Octopus structure, bringing it one step closer to its final form.
Step 6: Fixing The Lower Body Patches
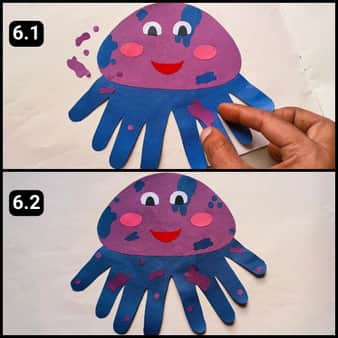
I completed the handprint Octopus structure by attaching the patch shapes to its lower body, adding a pop of color and texture to the design.
The beauty of this project lies in its flexibility, so feel free to arrange the patches in a way that suits your personal style, inspired by the images above.
With the final details in place, I’m thrilled to present this amazing handprint Octopus structure, which will soon join the ranks of my handprint sea animals collection.
Final Thoughts
To enhance the overall crafting experience, I’d recommend discussing octopus facts while crafting, or even expanding the project into a full underwater scene.
Consider using recycled materials for an eco-friendly twist.
And for added durability, you might laminate the finished product.
Also, encourage experimentation with colors and patterns.
Overall, it’s a fantastic, low-cost project that combines art, learning, and family bonding
Note: To assist you further I have also shared a quick video walkthrough of the handprint Octopus craft on our website and the official YouTube channel.