As a parent, we are always on the hunt for fun kids craft activities that spark creativity and make lasting memories.
Well, get ready for the most delightful paper plate mother’s day craft that ticks all the boxes.

We’re going to transform a simple paper plate into an absolutely heartwarming happy face mom that your little ones can proudly gift this Mother’s Day.
This engaging project allows children to explore their artistic abilities while celebrating the most special woman in their lives.
From painting the plate to cutting out each feature and assembling that cheerful smile, you’ll witness your kids’ talents flourish.
But the real magic happens when you see their beaming faces after crafting this paper plate craft masterpiece (It’s a priceless keepsake mom will adore).
But first let’s take a quick look at the list of things required to craft this mother’s day masterpiece.
Step 1: Things You’ll Need To Make This Mother’s Day Craft

- Paper Plate: I have used a biodegradable paper plate for this particular craft activity, however, you can use standard paper plates or as per your preferences. The Paper plate will be used as the base of the mother’s day craft structure where I will assemble the Cutout shapes.
- Paint and Paintbrush: To shade the paper plate as human skin color I have used water color and a paintbrush.
- Scissor and Glue: You will need a scissor to cut the shapes from the printed template and a multipurpose or regular glue to stick the shapes.
- Mother’s Day Template: For the Cutouts or the shapes you will need a template with required designs and hence I have made a template that you can download and print it in the following step.
Estimated Time To Complete This Mother’s Day Craft: It took 10 minutes for me to craft the Mother’s Day special craft structure using the ready template from the website. The total time also includes the painting and drying of the paper plate.
Step 2: Download The Mother’s Day Template

If you look at the image above this is what the Mother’s Day special template looks like.
You can download this mother’s day template for free from our blog and print it out.
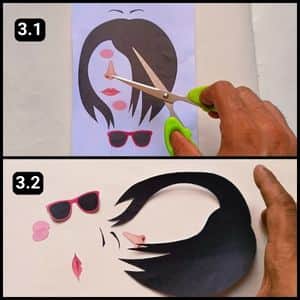
The template includes shapes for eyebrows, sunglasses, a nose, lips, hairstyle, and cheeks, all ready for you to cut and assemble.
Step 3: Cutting the Template Shapes
With the basic craft supplies and the template ready, it was time to proceed with the activity.
I started by cutting the shapes from the colorful template printed on paper, as seen in image 3.1 above.
Using a standard craft scissor, I cut the shapes carefully and precisely by proceeding slowly. Finally, with all the required shapes ready, I was set to move ahead.
Step 4: Painting the Paper Plate
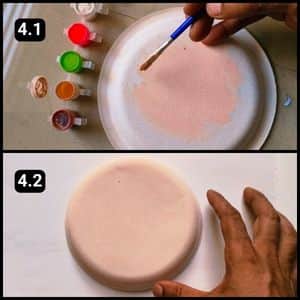
I then applied skin-colored watercolor paint over the back of the paper plate, as shown in the images above.
Finally, I left it to dry for a while so the watercolor could set evenly.
Step 5: Assembling the Shapes
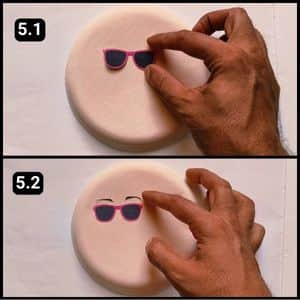
The paint on the paper plate had dried and was ready for the next steps.
I began by assembling the cutouts, starting with the sunglasses. Next, I aligned and stuck the eyebrows just above the sunglasses.
Step 6: Assembling the Facial Elements

Now, let’s assemble the remaining facial features such as the nose, lips, and glowing makeup cutouts.
I first aligned and stuck the nose between the sunglasses.
Next, I placed the lips shape below the nose. Finally, I aligned the pink oval shapes on each side to resemble cheeks.
Step 7: Assembling the Hair Shape
With this, we moved to the final step of the Mother’s Day special craft activity, which was to attach the hair shape or paper wig to the structure.
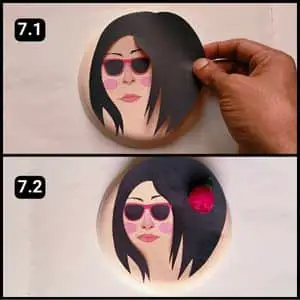
I first aligned the women’s hair shape over the paper plate to find the best position.
Finally, I applied glue and secured it to complete the women’s facial structure on the paper plate.
If you look at the final image above, you’ll see the complete structure of the desired craft, which is special.
I added an artificial flower over the hair to enhance the structure, but you can customize it further by adding a flower sticker or any other embellishments as you wish.
Video Walkthrough Of This Paper Plate Mother’s Day Craft for Kids
Final Thoughts
This delightful mother’s day craft not only allows kids to tap into their creativity, but it also fosters quality bonding time as you guide them through each step.
The sense of pride they’ll feel after crafting that cheerful happy face mom is unmatched.
I highly recommend going the extra mile by letting them personalize it with stickers, drawings or cut-out messages.
Most importantly, cherish those smiles and laughter shared during this simple yet meaningful activity. It’s moments like these that create lifelong memories with your little ones.
Note: I have also shared the complete video walkthrough of this paper plate Mother’s Day craft on our official YouTube channel for your reference.


