Have you ever watched a cute larva inching across a leaf and marveled at its determination? Well, I’ve got the perfect way to bring that sense of wonder into your home with these delightful paper caterpillar crafts for kids.
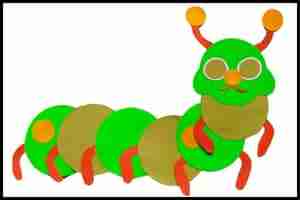
As a parent, I know the struggle of finding simple crafts that not only entertain but also educate.
That’s why I’m thrilled to share this insect craft that’s ideal for preschool and toddlers.
Whether you’re looking for a fun weekend activity or an engaging classroom project, this adorable paper caterpillar is sure to captivate your little ones.
Get ready to unleash their creativity and explore the fascinating world of these squirmy critters.
Editor’s Note: I have designed various Caterpillar structures for craft projects as they are always in demand. You can find the other versions of caterpillar created by me below:
Let us begin with the things you’ll need to craft a cute and happy paper caterpillar structure below.
Things You’ll Need To Make Happy Paper Caterpillar Craft for KIDS
- Scissor: You will need standard scissors to cut the shapes of the caterpillar from the Template.
- Glue: To assemble the shapes together you will need glue and you can use standard glue or a multipurpose adhesive.
- Caterpillar Template: To obtain the design of the caterpillar shapes you will need a template. To obtain the caterpillar’s template you can scroll down to step number 1.
- Construction Paper: To enhance the structure of the Caterpillar you can cut the template shapes on construction papers (Optional).
Step 1: Preparing/Downloading The Caterpillar Template
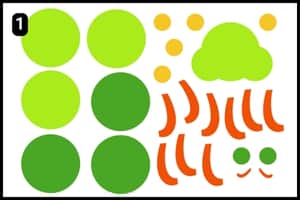
This image (above) showcases the unique design of the caterpillar I’ll be crafting.
You can easily download and print the caterpillar craft template by clicking here.
Once printed, use the template to cut out the shapes on construction paper or origami paper depending on how sturdy you want the structure to be.
If you don’t have hard construction paper handy, simply cut out the shapes from the template and assemble them.
The vibrant colors I’ve used will ensure your caterpillar looks bright and cheerful regardless
Step 2: Cutting the Caterpillar Shapes
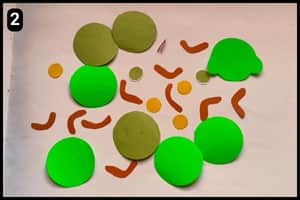
If you look at the image above, you’ll see that I’ve cut out the shapes for the caterpillar’s structure from the template. The tiny, circular shapes can be tricky, so take your time and cut them out patiently.
In the next step, I’ll show you how to align them properly before gluing everything together.
Step 3: Assembling the Eye Shapes
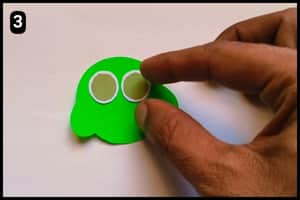
Let’s start assembling our paper caterpillar by putting together the eye shapes first.
I’ve added a white background behind the eyes to make them stand out with a nice contrast.
Step 4: Fixing the Caterpillar Antennas
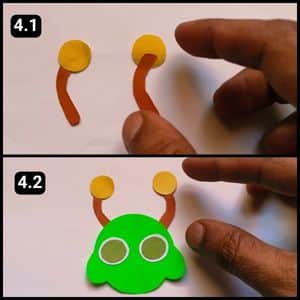
Now that the eye shapes were perfectly positioned, it was time to align and attach the antennas to our caterpillar.
I started by assembling the antennas, sticking the tiny brown shapes onto small yellow circles as shown in image 4.1 above.
Then, I applied glue to the bottom edges of the antenna shapes and attached them to the back of the facial structure.
Step 5: Attaching The Caterpillar Mouth Structure
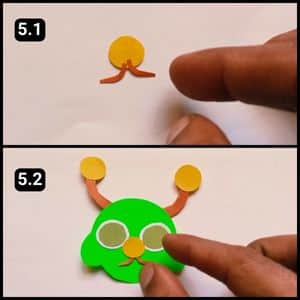
It was time to assemble the mouth shape before attaching it to the caterpillar’s face.
I aligned and stuck the tiny brown shapes with a yellow circle to complete the caterpillar’s mouth, as shown in image 5.1 above.
Aligning and sticking these tiny pieces was challenging, but with patience, I got them together.
Once assembled, I attached the mouth to the caterpillar’s face, placing it perfectly between the eyes as seen in image 5.2 above.
Step 6: Assembling the Lower Body
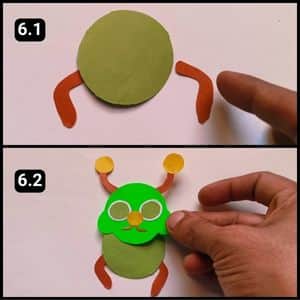
Next up, I began assembling the lower body of the caterpillar.
Using the dull green circle, I attached the leg shapes as shown in image 6.1 above.
Then, I aligned the caterpillar’s facial structure over it and glued them together, as seen in image 6.2 above.
Step 7: Fixing the Caterpillars Curving Structure
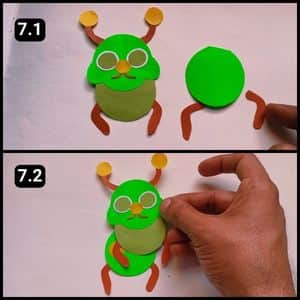
It was time to attach the third circle, a bright green one, in a curved position.
First, I glued the tiny brown shape legs, as shown in image 7.1 above. Then, I aligned this piece below the top structure, slightly curving it to the left, as seen in image 7.2 above.
This setup allowed me to align the rest of the circles horizontally.
Step 8: Assembling The Remaining Body Structure
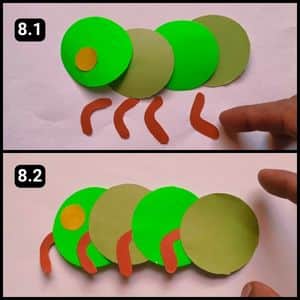
With the upper structure complete, it was time to assemble the lower body of the caterpillar.
I aligned the remaining circles to check the fit and choose the best placement.
Finally, I attached the leg shapes to each circle and glued them together, as seen in image 8.2 above.
Step 9: Apply The Final Touch Up
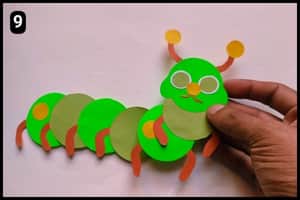
With this we have moved to the final step of the happy paper Caterpillar craft i.e. to fix the lower body with the upper structure.
I applied glue to the joining edges and carefully fixed them together to form the complete caterpillar.

If you look at the image above, you’ll see the final structure of the paper caterpillar, and it looks absolutely amazing.
In my case, the children were so excited and had a fantastic time working on their creations all day and I am sure you too will have a good time.
Note: It takes about 10 to 12 minutes to complete this happy face paper Caterpillar craft using the ready template from our website.
Final Thoughts
As a parent, I highly recommend giving this happy face paper caterpillar craft a try, the process allows preschool and toddlers to explore their creativity while learning about the fascinating world of insects.
Plus, the final cute larva creation is so vibrant and cheery, it’s bound to bring a smile to everyone’s face.
My top tip? Get the whole family involved, not only is it a wonderful bonding experience, but seeing children’s faces light up as they assemble their squirmy buddy is priceless.
This simple craft ticks all the boxes i.e. it’s educational, engaging, and most importantly, tonnes of fun.
Note: I have also shared the complete video walkthrough of the happy face paper Caterpillar craft on our official YouTube channel.


