Let’s hop into the world of Happy Paper Frog Craft for Kids, where creativity leaps off the page.
Crafting these adorable paper frogs is not just fun but also quick.
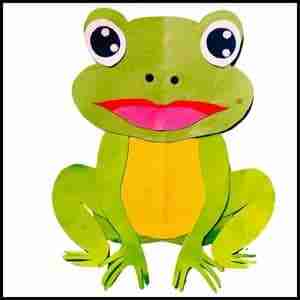
Imagine spending just 10 minutes to create a whimsical amphibian friend using our easy-to-follow template.
With colorful craft papers, scissors, and glue in hand, you’re all set to bring this cheerful frog to life.
What makes this craft special is its versatility i.e. from choosing vibrant colors to personalizing details like googly eyes or hand-drawn accents, every frog can be as unique as its creator.
But before we begin, let’s take a quick look into the basic elements required to craft the paper Frog.
Step 1: Things You’ll Need for Happy Paper Frog Craft
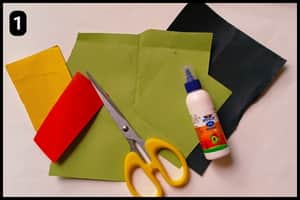
- Craft Papers: To cut the shapes of the Frog’s body you can use standard craft papers. Make sure they are thick enough so that the final structure turns out to be steady.
- Scissor: To cut the shapes of the paper Frog from the template or using colorful paper sheets you will need a scissor.
- Glue: To put together the paper shapes and create the paper frog, you’ll need some glue.
- Frog Template: To get the frog shapes, you’ll need a template. You can find the frog template in Step 2 below.
Estimated Time taken to complete the Paper Frog Craft: It took 10 minutes for me to make the paper Frog craft using the ready template from our website.
Step 2: Download The Paper Frog Template
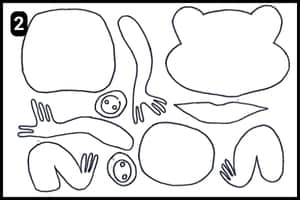
If you check the image above, you’ll see what the paper frog template looks like.
It includes the legs, hands, face, and lower body shapes of a frog.
You can download and print the template, then customize it with your choice of colorful paper.
Note: This paper frog template is unique and self-made.
Step 3: Cutting the Frog Shapes
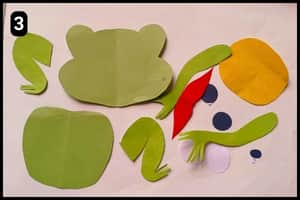
Using the template design, I cut the frog shapes from colorful craft paper.
I chose green for the main body parts like the belly, face, hands, and legs.
I used yellow for the belly accent and red for the mouth.
For the eyes, you can either cut shapes from paper or use googly eyes. I opted to cut the eyes from black and white craft paper.
Step 4: Prepare and fix the Eyes
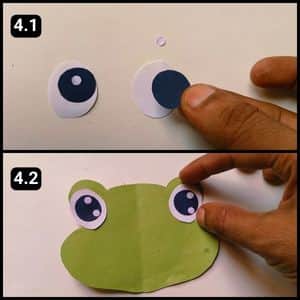
Before assembling the frog’s face, let’s prepare the eye shapes.
I cut two white circles as the base and then glued two slightly smaller black circles on top, as shown in image 4.1 above.
Next, I added tiny white circles over the black cutouts to complete the eyes.
Finally, I positioned the completed eyes on the frog’s face and glued them in place. The eyes look like they’re popping out, just like a real frog’s.
Step 5: Assembling the Nose and Mouth
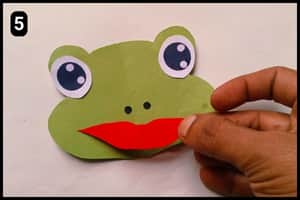
Now it’s time to assemble the remaining facial details, like the mouth and nose.
For the nose, you can either draw two dots with a black marker or stick on two small circles.
I used a paper punch to create two small circles from black paper and glued them in place.
Make sure to properly align the mouth shape at the center of the face, or it will look off.
Step 6: Assembling the Lower Body
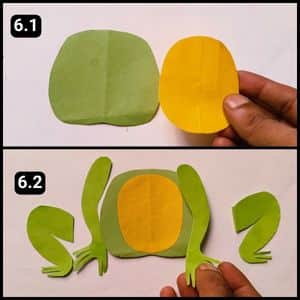
It’s time to prepare the lower body of our happy face paper frog, in order to do so:
- Start by gluing the yellow piece to the belly.
- Next, align and stick the hand shapes one by one.
- Apply glue only to the top edges of the hands, leaving the lower part loose so they can move when you shake the structure.
- Finally, attach the leg shapes to the sides of the main body, making sure they are evenly aligned. This completes the lower body of the paper frog.
Step 7: Fixing the Head with Body
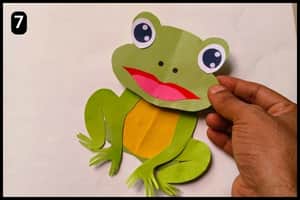
We’ve reached the final step of the paper frog craft i.e. assembling the head with the body.
Properly align the shapes, centering them before gluing them together.
Your amazing and cheerful paper frog is now ready to delight kids

If you flip the structure by holding its head the lower body will appear as if the frog is tumbling.
Video Walkthrough Of Paper Frog Craft For KIDS
Final Thoughts
This happy looking paper frog is a simple yet engaging project that only takes about 10 minutes to complete using our ready-made template.
The beauty of this craft lies in its versatility i.e. you can customize the colors and even add personal touches to make it truly unique.
I recommend using thick craft paper to ensure the frog is sturdy enough for little hands to play with.
When assembling, take your time to align each piece properly, this attention to detail makes all the difference in the final look.
The movable hands add a fun, interactive element that kids will love.
Note: For your reference I have also posted a video walkthrough of this paper frog craft project on our official Youtube channel.


