Look, I’ve been blogging for years, and nothing… and I mean nothing has transformed my traffic game quite like Pinterest.
We’re talking about going from a trickle of visitors to a absolute flood.
But here’s the thing most bloggers get wrong: they treat Pinterest like Instagram or Facebook.
Big mistake…
Pinterest is a search engine, folks, and if you’re not approaching it that way, you’re leaving thousands of pageviews on the table.
In fact, this method is just one piece of my larger Pinterest Traffic Strategy framework that I break down inside my complete Pinterest strategy guide. (If you want the big-picture roadmap, start there.)
Today I’m walking you through my exact step-by-step process for creating blog posts that Pinterest absolutely loves.
This isn’t theory – this is the same workflow I use every single time I sit down to write a post that I know will drive serious traffic.
And I’m gonna be real with you, it’s not complicated, but it does require following a specific system.
Step 1: I Start With Pinterest Trends (Not Keyword Tools)
Here’s where most people mess up right out the gate.
They head straight to Google Keyword Planner or Ahrefs and start planning content based on what works for Google. Wrong platform, friends.
I always.. Pretty much always start with Pinterest Trends itself. Why? Because Pinterest literally tells you what their users are searching for right now. It’s like having a direct line to your audience’s brain.
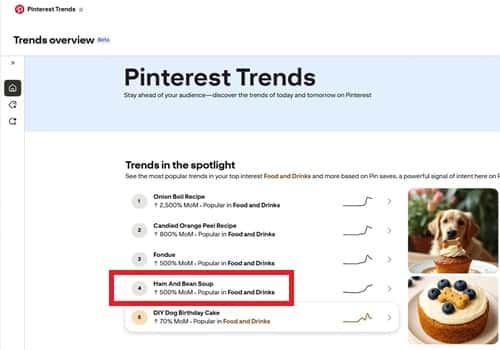
So here’s what I do. I open up Pinterest Trends (trends.pinterest.com if you haven’t bookmarked it yet), and right there on the home page, Pinterest shows me what’s trending. No digging required. They just hand it to you.
For this example, I was looking at the trending topics, and one immediately caught my eye: “Ham and bean soup.”
Now, I run a food blog, so this fit perfectly with my niche.
But even if you’re in a different niche i.e. home decor, DIY, fashion, whatever.. the process is exactly the same.
You’re looking for trending topics that align with what you write about.
The beauty here is that you’re not guessing. You’re not hoping.
Pinterest is showing you real search data from real users who are actively looking for this content right now.
Step 2: I Drill Down Into the Specific Trend
Okay, so “Ham and bean soup” caught my attention. But I don’t stop there, because that’s still pretty broad. I need to get more specific.
When I clicked on “Ham and bean soup,” Pinterest gave me several related trending searches and it also shows the uptrend as seen below:
I could see multiple variations.
I selected “Ham and bean soup recipes” because, well, that’s what people are actually searching for.
They don’t just want to read about ham and bean soup… they want a recipe they can follow. See the difference? That one word changes everything.
This is where you start to understand search intent, which is crucial for Pinterest success.
People on Pinterest are planners. They’re searching with purpose. They want actionable content, not just information.
Step 3: I Check the Seasonal Trend Data
Now here’s where it gets really strategic, and this step alone has probably doubled my Pinterest traffic.
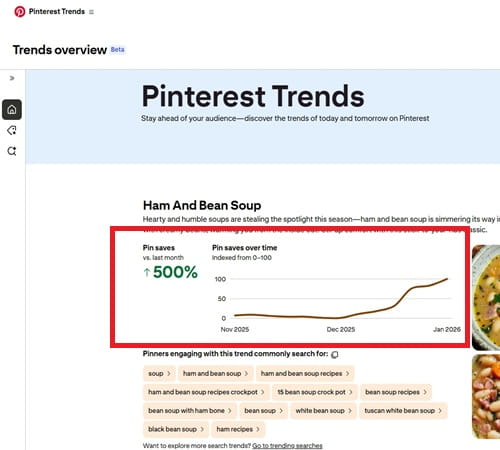
In Pinterest Trends, I selected the 1-year date range to see when this particular search term peaks throughout the year. And what did I find? “Ham and bean soup recipes” absolutely spikes in April. Like, we’re talking a massive peak.
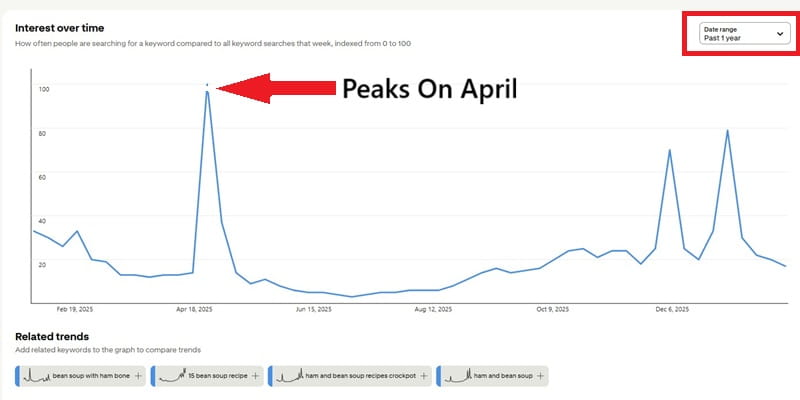
Now, you might be thinking, “April? For soup? That’s weird.” But here’s the thing – I don’t question what the data tells me.
Maybe it’s because people are using up their Easter ham leftovers. Maybe it’s because April can still be chilly in many places. Doesn’t matter. The data doesn’t lie.
And here’s the kicker: it was February when I was doing this research. That meant I had about two months to create my content, get it published, and let Pinterest’s algorithm start showing it to people before the peak hit.
This is what I call “seasonal pre-planning,” and it’s absolutely critical. Pinterest’s algorithm takes time to index and rank your pins.
If you wait until April to publish content about something that peaks in April, you’ve already missed the boat.
You want your content out there at least 45 to 60 days before the peak.
Step 4: I Assess the Competition
Alright, so I’ve got my topic. I’ve confirmed it’s trending. I’ve verified the timing is right. Now I need to know… can I actually rank for this?
I went directly to Pinterest’s search bar and typed in “ham and bean soup recipes”
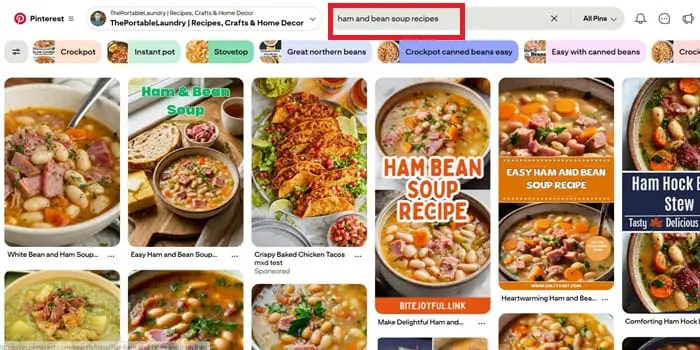
What I saw was… it was competitive… Lots of pins and Lots of established food bloggers with Big names in the space.
But here’s what I’ve learned… competition isn’t necessarily bad.
It actually validates that people want this content. An empty search result? That’s often a red flag that there’s no demand.
Still, I don’t like going head-to-head with the big dogs if I can help it. So instead of giving up, I got smarter about it.
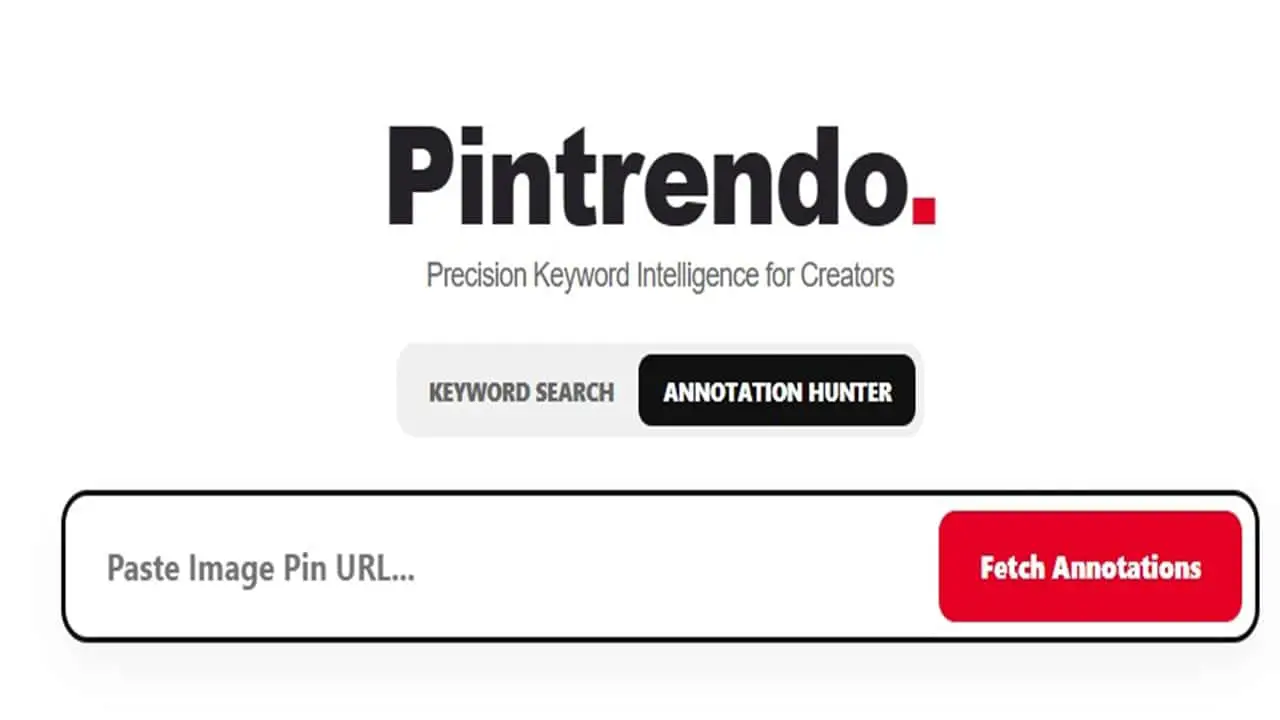
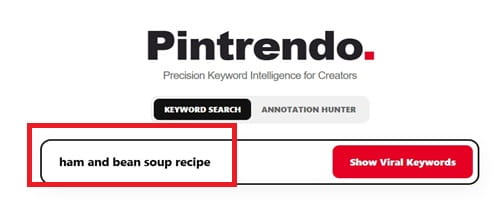
I opened up Pintrendo’s keyword research tool (It’s completely free and has a limitation of 10 per day searches, more than enough if you are writing 5 or 6 blog posts per day), and I entered “ham and bean soup recipes”
Step 5: I Find the Underserved Opportunities
This is where the magic happens, folks. This is where you separate yourself from the bloggers who give up too easily.
Pintrendo showed me a whole list of related keyword variations for “ham and bean soup recipes” And tucked in there among all the competitive terms, I found several that were extremely underserved.
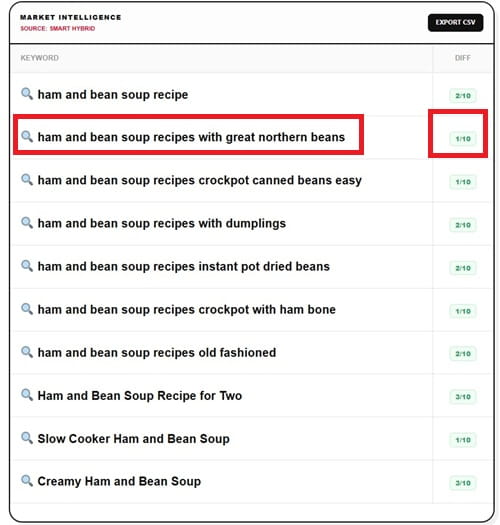
Lower search volume than the main term, sure, but also way less competition.
The one that caught my eye? “Ham and Bean Soup Recipe With Great Northern Beans.” Perfect!
It’s specific. It’s exactly what someone searching for that particular variation would want.
And the competition was minimal compared to the broader terms.
This is what I call finding your “sweet spot” keyword.
It’s got enough search volume to be worth your time, but it’s not so competitive that you’ll never rank.
A lot of bloggers make the mistake of only going after the biggest keywords.
They want that high search volume. But I’d rather rank #1 for a keyword with 1,000 monthly searches than rank #50 for a keyword with 50,000 monthly searches. You know why? Because nobody’s clicking on result #50.
Also, even if I am not able to rank, this approach does increase the probability of showing your pins under related pins section.
Step 6: Research the Top-Ranking Pins Annotations
Okay, this next step is probably the most important part of my entire process, and it’s something most bloggers have never even heard of.
I went back to Pinterest and searched for “Ham and Bean Soup Recipe With Great Northern Beans.” Then I looked at the top-ranking pins – the ones that were getting the most saves and clicks.
Now, here’s the secret sauce: Pinterest uses something called “annotations” to categorize and understand pins.
These are basically tags and labels that Pinterest’s algorithm associates with high-performing content.
If you can figure out what annotations the top pins are using, you can include those same elements in your content.
But how do you find these annotations? They’re not visible on the pins themselves.
This is where I use Pintrendo’s Annotation Hunter feature.
I copy the URL of a top-performing pin, paste it into the tool, and boom – it shows me all the annotations associated with that pin.
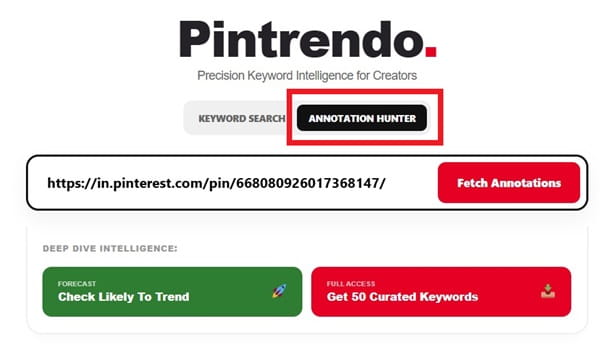
I did this for the top 3 or 4 pins ranking for my keyword and here’s what I collected:
- Ham And Beans
- Ham And Bean Soup
- Bean Soup Recipes
- Bean Stew
- Comfort Food Southern
- Winter Soups
- Smoked Ham
- Bean Soup
- Creative Food
- White Bean Soup Recipes With Ham
- Ham And White Bean Soup Recipes
- White Bean Soup With Ham
- Easy White Bean Soup With Ham
- White Bean With Ham Soup
- White Bean And Ham Soup
- Bean Soup Recipes Ham And
- Ham White Bean Soup
- Ham Bone And 15 Bean Soup Recipes
Now, some of these annotations were directly relevant.
Others weren’t a perfect match for my specific recipe. And that’s fine – I’m not going to force keywords into my content that don’t make sense.
But having this list gives me a roadmap for the language and terms I should naturally include in my blog post.
Step 7: I Write the Blog Post (With a Very Specific Prompt)
Now it’s time to actually write the thing. And honestly? This is where I’ve refined my process to a science.
I take all those annotations, all that research, and I head over to ChatGPT. But I don’t just say “write me a blog post about ham and bean soup.” That’ll get you generic garbage that nobody wants to read.
Instead, I use a very detailed prompt that incorporates everything I’ve learned. Here’s the exact prompt I used for this ham and bean soup post:
“I want you to help me with an article on topic ‘ham and bean soup recipe with great northern beans’. Target article length is 1000 words. The recipe should be detailed and whoever reads it should be able to make it on their own. Mix and match long and short sentences. Write like human as if human is talking. No need to be grammatically correct, infact make atleast one grammatical error in atleast 3 sentences sporadically, well spread out. Ask question, change the tone of voice every sentence, but do not compromise with the accuracy and quality of the recipe. The intro should be less than 120 words and should include the phrase ‘ham and bean soup recipe with great northern beans’. The final thoughts should be less than 120 words and should not be a plain summary, instead it should be something knowledgeable, interesting and something that adds value. Also mention the 5 image prompt all of completed (no in process or ingredients) at the end of the recipe from top angle, the food image should scream home made ham and bean soup recipe with great northern beans and have that amateur looking photography, focus on ham and bean soup recipe more and less on background. While writing make sure to naturally include the keyword ‘ham and bean soup recipe with great northern beans’ and the associated synonyms, entities and associated season, occasion and other important things associated with the topic ‘ham and bean soup recipe with great northern beans’. Also, naturally include the below annotations naturally in the article: [then I paste all those annotations I collected] Note: Please ignore the annotations that do no suit the topic. No forceful inclusions please.”
See what I’m doing here? I’m giving ChatGPT very specific instructions about:
- Length (important for Pinterest – longer content tends to perform better)
- Tone (conversational, human, imperfect)
- Structure (short intro, valuable conclusion)
- Keywords (natural inclusion, no keyword stuffing)
- Images (yes, I plan my images before I even finish writing)
The result? A blog post that reads like a real person wrote it, not a robot. It’s got personality. It’s got the keywords Pinterest is looking for. And it’s actually useful to the reader.
Now, I don’t just copy and paste what ChatGPT gives me. I always edit. I add my own stories, my own tips, my own personality. AI is a tool, not a replacement for your own voice.
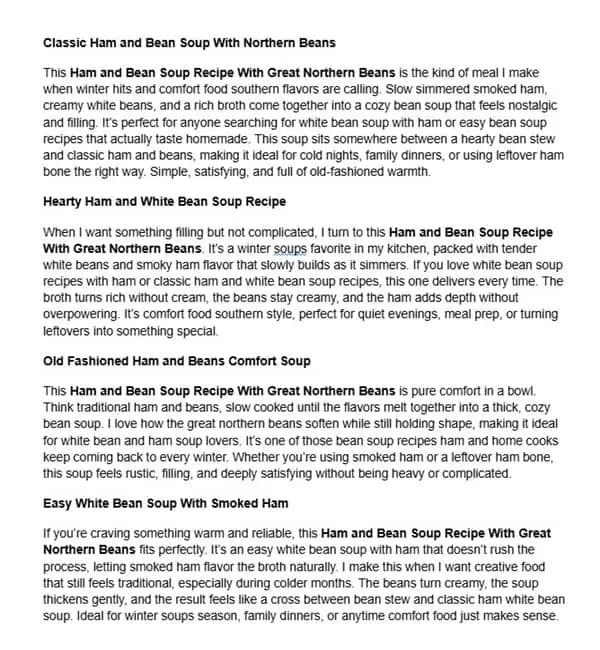
Here’s what the article looks like after I completed it.
Step 8: Create Pinterest-Optimized Titles and Descriptions
Once my blog post is written and edited and published on my site, I’m ready for the Pinterest side of things. And this is where a lot of bloggers drop the ball.
They spend hours crafting the perfect blog post, and then they just slap any old title and description on their pin. Big mistake.
Your pin title and description are just as important as your blog post itself – maybe more so, because that’s what determines whether Pinterest shows your pin to users in the first place.
So I head back to ChatGPT with another specific prompt:
“Keeping the below annotations in mind HELP ME with the following: 1. 5 pinterest optimized pin titles in less than 60 characters. Make sure to include the relevant annotations 2. 5 Pinterest optimized pin description in less than 750 characters and more than 650 characters. Make sure to include the phrases and other associated terms and phrases that best describes the topic ‘Ham and Bean Soup Recipe With Great Northern Beans’. Use the below annotations naturally. 3. the format should be title followed by description.: [then I paste those annotations again] Note: No forceful inclusion of these words only natural inclusions.”
Why 5 of each? Because I’m going to create multiple pins for the same blog post. Pinterest actually wants you to create multiple pins for your content.
It gives you more chances to show up in search results, and different designs appeal to different users.
The 60-character limit on titles is crucial. Pinterest truncates longer titles on mobile, and most Pinterest users are on mobile. You want your entire title visible.
The 650-750 character range for descriptions is also strategic.
Too short, and you’re missing opportunities to include relevant keywords. Too long, and Pinterest truncates it.
That sweet spot gives you plenty of room to naturally include your keywords and annotations while staying within Pinterest’s display limits.
ChatGPT gives me 5 title-description pairs that I can use for different pin designs.
Each one emphasizes slightly different aspects of the recipe, includes different annotations, and appeals to slightly different search intents.
Here’s how the Pin description looks like…
Step 9: Create the Pin Images
Now it’s time to create the actual pin graphics. And yes, I know some bloggers just screenshot their blog post or use a random photo from their post.
Please don’t do that. Your pin image is an advertisement for your blog post – treat it like one.
For this ham and bean soup post, I needed images that would stop scrollers in their tracks. Based on my research of top-performing pins, I knew I needed:
- Top-down angle shots (they perform better for food content)
- Amateur, homemade feel (overly polished photos can actually perform worse because they don’t feel relatable)
- Focus on the soup itself, not fancy backgrounds or props
- Completed dish only (no ingredient shots or step-by-step photos on the pin itself)
I generated 5 different pin images, each with a different title from my ChatGPT prompt. Some variations I created:
- One with the bowl front and center
- One with the soup in a rustic pot
- One with a spoon lifting some of the soup
- One with bread on the side (because who doesn’t love bread with soup?)
- One close-up shot showing the beans and ham chunks
Each image got paired with one of my 5 title-description combinations.
(Not sharing the pin designs as of now.. for obvious reasons.. but you get the point).
Step 10: Upload to Pinterest Strategically
Finally, it’s time to get these pins onto Pinterest. But I don’t just upload all 5 at once. That’s another rookie mistake.
I space out my pins over several days or even weeks. Here’s my typical schedule:
- Day 1: Upload pin #1 to my most relevant board
- Day 3: Upload pin #2 to a different relevant board
- Day 7: Upload pin #3
- Day 14: Upload pin #4
- Day 21: Upload pin #5
Why the spacing? Because Pinterest’s algorithm doesn’t like spam. If you upload 5 pins to the same URL all at once, Pinterest might flag it as spammy behavior. Spacing them out looks more natural and gives each pin a chance to perform on its own.
For each upload, I:
- Use one of my optimized titles
- Use the corresponding optimized description
- Select the most relevant board
- Double-check the destination URL is correct
- Add a custom alt text to the image for accessibility
The Results: What Actually Happens
Okay, so you’ve followed all these steps. Now what?
Here’s what I typically see with this method:
In the first week or two, not much happens. Pinterest is indexing your pins, figuring out where they fit, testing them with small audiences. Don’t panic. This is normal.
Around week 3 to 4, I start seeing impressions increase. My pins are showing up in search results and related pins. Saves start trickling in.
By week 6 to 8, if I’ve done everything right and my timing is good (remember that seasonal research from Step 3?), I’m seeing steady traffic. Sometimes it’s 10 visitors a day. Sometimes it’s 100. Sometimes it’s 1,000.
And here’s the beautiful part… it compounds. Unlike social media posts that die after 24 hours, Pinterest pins can drive traffic for months or even years.
That ham and bean soup post? It’ll spike every April as long as it’s ranking well. That’s passive traffic, baby.
I’ve had pins that took off slowly and are now driving 500+ clicks per month, month after month, for over a year. That’s the power of Pinterest when you approach it strategically.
Common Mistakes I See (And How to Avoid Them)
Let me save you some headaches by pointing out where most bloggers go wrong with this process:
Mistake #1: They skip the trends research. They write about whatever they feel like writing about, then wonder why their pins don’t get traction. Pinterest tells you what people want. Listen to it.
Mistake #2: They ignore seasonal timing. They publish their “best Easter recipes” post on Easter Sunday. Way too late. You need to publish 45-60 days before the peak, minimum.
Mistake #3: They only create one pin per post. One pin = one chance to rank. Five pins = five chances. It’s not complicated math.
Mistake #4: They use the same title as their blog post headline. Your blog post title is optimized for Google and for readers who are already on your site. Your pin title needs to be optimized for Pinterest search. These are not the same thing.
Mistake #5: They give up too soon. Pinterest is a long game. If you’re expecting viral traffic in week 1, you’re gonna be disappointed. But if you’re willing to play the long game, the payoff is absolutely worth it.
Mistake #6: They don’t use those annotations. This is literally Pinterest telling you what words and phrases to include in your content. Ignoring them is like ignoring the answer key on a test.
Let’s Talk About Consistency
Here’s something nobody tells you about Pinterest success: it’s not about one viral pin. It’s about consistent, strategic content creation over time.
I aim to publish at least 2-3 Pinterest-optimized blog posts per month. Each post gets 5 pins. That’s 10 to 15 new pins hitting Pinterest every month, each optimized for different keywords, each with multiple chances to rank.
After a year of this? You’ve got 24-36 blog posts and 120-180 pins working for you 24/7. That’s when things really start to snowball.
The bloggers I see getting life-changing traffic from Pinterest aren’t the ones who had one lucky viral pin.
They’re the ones who showed up consistently, followed a proven process, and built a library of optimized content over time.
Tools I Actually Use (The Honest Truth)
Look, you can do a lot of this process with free tools, but if you’re serious about Pinterest traffic, some paid tools are worth every penny.
Here’s my actual toolkit:
Pintrendo: For free keyword research and annotation hunting. This tool allows you to use 10 to 15 searches per day which is more than enough for you to write 5 to 10 blog posts per day.
Canva: For creating pin graphics. The free version works fine, but Pro gives you access to way more templates, photos, and features. Worth it.
ChatGPT: The free version of ChatGPT works, but Plus gives me access to GPT-4 which produces way better content. Also worth it.
Total monthly investment? $0.
Fine-Tuning Your Approach
After you’ve been doing this for a while, you’ll start to notice patterns. Certain types of pins perform better for you. Certain keywords drive more engaged traffic. Certain boards get more traction.
Pay attention to these patterns and double down on what works.
For me, I’ve noticed:
- Recipe pins with “easy” in the title perform better than those without
- Pins published on Tuesday mornings get more initial traction (not sure why, just what I’ve observed)
- Boards with “Recipe” in the title seem to rank better than generic food boards
- Pins with cream or white backgrounds outperform those with dark backgrounds
Your patterns might be completely different. That’s fine. The key is to test, track, and adjust.
What About Algorithm Changes?
Pinterest changes their algorithm pretty regularly, and yeah, it can be frustrating.
But here’s what I’ve noticed: if you’re creating genuinely valuable content and following best practices, algorithm changes don’t destroy you. They might cause temporary dips, but good content always rises back up.
The bloggers who get hammered by algorithm changes are usually the ones who were gaming the system somehow – misleading pins, clickbait titles, thin content. Don’t be that blogger.
Focus on creating content that actually helps people, optimize it for Pinterest search, and you’ll weather any algorithm storms that come your way.
Final Thoughts
Here’s what really gets me excited about this approach: it’s not just about traffic numbers. It’s about building a sustainable blog business.
When you create content based on actual search demand, optimized for a platform that sends long-term passive traffic, you’re building equity.
Every post you publish using this method is an asset that can keep working for you for months or years.
Compare that to social media, where your post is basically dead after 24 hours.
Or even Google SEO, where you’re competing with massive websites that have way more authority than you.
Pinterest is the sweet spot for bloggers. It’s a search engine (so the traffic is targeted and consistent), but it’s not as competitive as Google.
It’s visual (so it works great for niches like food, DIY, fashion, home decor), but it’s not as time-sensitive as Instagram or TikTok.
And the best part? Most bloggers still aren’t doing this right.
They’re treating Pinterest like an afterthought, or they’re following outdated advice from 2018. Which means there’s still so much opportunity for those of us who are willing to approach it strategically.