I love scrolling cute stuff late at night.
That’s how this list of kawaii diy crafts came together.
Some are paper. Some are clay-free. Some are perfect for kids.
Some look fancy but are actually forgiving.
This is not polished studio craft talk.
This is messy table, glue on fingers, “did I cut this wrong?” energy.
If you enjoy Diy Cutecore Crafts, Diy Kawaii Decor, and easy aesthetic fun, you’re in the right place.
Let’s start slow. Let’s keep it cute. Let’s keep it doable.
1. Kawaii Face Plain Notebook Cover (No Sewing)
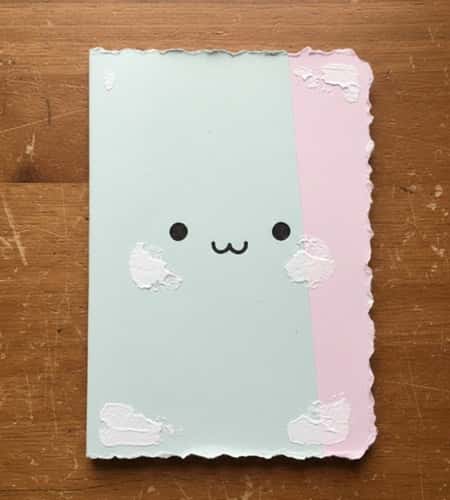
This is one of those Easy Kawaii Crafts that looks store-bought but feels homemade.
Perfect for school, journaling, or Girly Craft Ideas shelves.
What you need
- One plain notebook (paper or cardboard cover)
- Pastel colored paper or craft foam
- Black marker or gel pen
- Pink marker / blush / soft pastel
- Glue (stick works better than liquid)
- Scissors
How to make it
- First, measure the front cover of your plain notebook.
- Cut pastel paper slightly bigger. Don’t stress if edges are uneven, it’s fine.
- Glue it down starting from center, press outward slowly.
- Now draw a simple kawaii face. Two dots for eyes. Tiny curve for mouth. That’s it.
- Add pink cheeks using marker or even real blush. Yes that works.
- Let it dry fully before closing notebook or it will stick, and thats annoying.
2. Marshmallow-Inspired Paper Charms (No Clay)
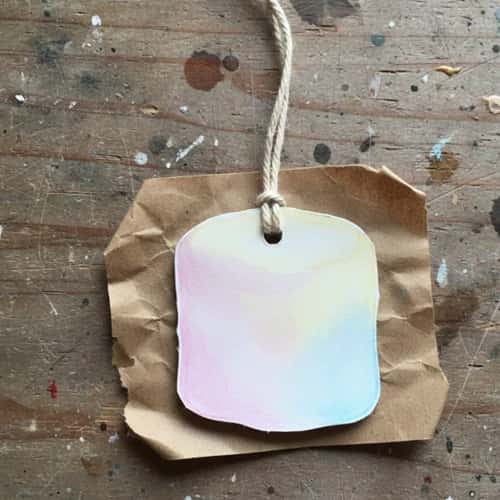
This is not edible.
But it looks squishy and soft.
Think Marshmallow Crafts without mess.
What you need
- White cardstock or thick paper
- Pastel markers (pink, blue, lavender)
- Scissors
- Hole punch
- String or keyring
- Clear tape or glue
How to make it
- Draw a rounded rectangle shape. Think pillow, not perfect square. Cut it out. Make two identical pieces.
- Lightly shade edges with pastel marker for soft look. Draw kawaii eyes on one side only. Keep it minimal.
- Glue both pieces together, leave tiny gap.
- Slide folded tissue paper inside for puff. Close it.
- Punch hole on top. Add string or keyring.
It won’t look factory-perfect and it shouldn’t.
That soft puff? That’s the charm.
Great for Crafts For Kids Diy and even backpack decor.
3. Pastel Galaxy Kawaii Wall Cards (Paper Only)
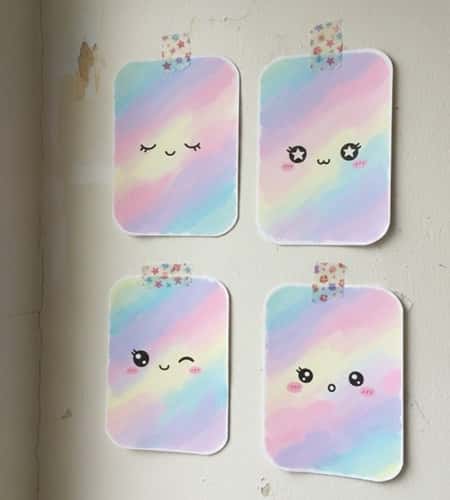
This one is calm.
Almost therapeutic.
Great if you like Pastel Galaxy looks and Easy Paper Crafts Diy Room Decor.
What you need
- Thick white paper or cardstock
- Watercolor or brush pens (pastel pink, purple, blue)
- Black fineliner or marker
- Old toothbrush or paint brush
- Scrap paper
- Tape
How to make it
Step 1: Tape your paper edges down on a table. This prevents curling.
Step 2: Lightly wet the paper using clean brush and water. Not soaked.
Drop pastel colors randomly. Let them blend. Don’t overbrush or it turns muddy.
Step 3: Let it dry fully. Be patient here, rushing ruins it.
Once dry, splatter white paint using toothbrush for galaxy stars.
Step 4: Now draw tiny kawaii stars, clouds, or faces on random spots.
Add tiny smiles. Keep expressions simple.
Cut into postcard size.
Tape them to your wall using washi tape.
The wall can have stains or chips, that actually helps the look.
4. Kawaii Pencil Topper From Paper (Zero Fancy Tools)
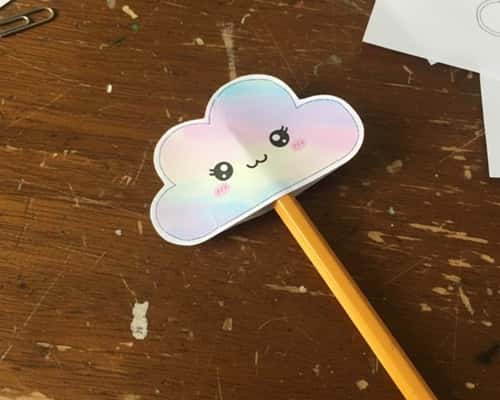
This is one of those Diy Easy Craft Ideas that looks silly at first.
Then suddenly cute.
Then suddenly you make five more.
What you need
- Colored paper or craft paper
- Pencil
- Glue
- Scissors
- Black pen
- Cotton or tissue paper
How to make it
Step 1: Wrap paper loosely around pencil top to measure size.
Remove pencil. Cut paper into a short tube shape.
Step 2: Glue the edge and form a cylinder. Let dry fully.
Stuff small cotton inside. Not too much or it bulges weird.
Step 3: Close top with a circle cutout. Glue slowly.
Draw kawaii face on front.
Add tiny paper ears or bows if you want extra.
Slide it onto pencil.
If it’s loose, add tiny paper strip inside.
It’s okay if it leans a bit, handmade things do that sometimes.
This is classic Kawaii Craft energy.
5. Kawaii Jar Lid Decor (No Painting Skills Needed)
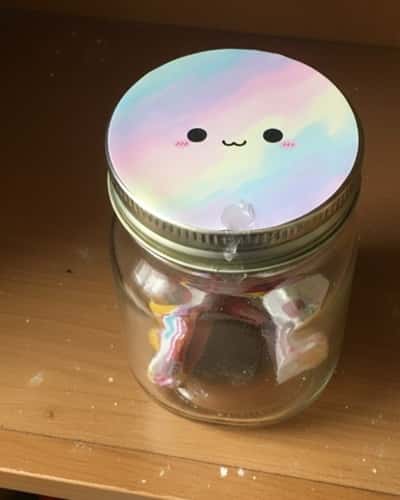
This is cute clutter control.
Also very Best Diy Crafts energy for reuse lovers.
Think Diy Kawaii Decor with zero pressure.
What you need
- Any old jar with lid (jam, coffee, whatever)
- Colored paper or scrapbook paper
- Glue
- Black marker
- Scissors
- Clear tape (optional)
How to make it
- Remove the lid. Trace it on colored paper. Cut slightly smaller circle.
- Don’t cut exact or it wrinkles.
- Glue paper onto lid top. Press from center outward. Now draw a kawaii face. Dots. Smile. Maybe sleepy eyes. Don’t overcrowd it.
- Add tiny blush using pink pen or pencil color.
- Let it dry fully before closing jar or paper lifts.
Use the jar for hair clips, buttons, tiny toys.
6. Easy Kawaii Mini Wall Flags (Paper + String)
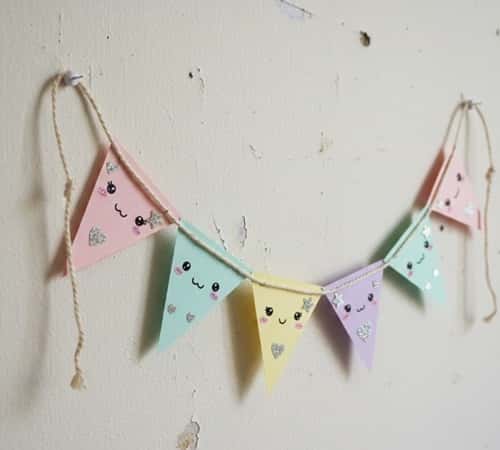
This is soft decor.
Not loud.
Perfect for Girly Craft Ideas corners or study walls.
What you need
- Pastel paper
- String or yarn
- Glue
- Scissors
- Black pen
- Tape
How to make it
- Cut paper into small rectangles.
- Cut tiny triangle from bottom center to make flag shape.
- Draw kawaii faces or symbols on each flag.
- Keep expressions different. Some happy, some sleepy. Flip flags. Glue string across the back top edge.
- Let dry fully before hanging or it slides off.
Tape string onto wall.
Wall doesn’t need to be clean. Slight marks adds realism.
7. Kawaii Desk Card Stand (Paper-Only, No Wood)
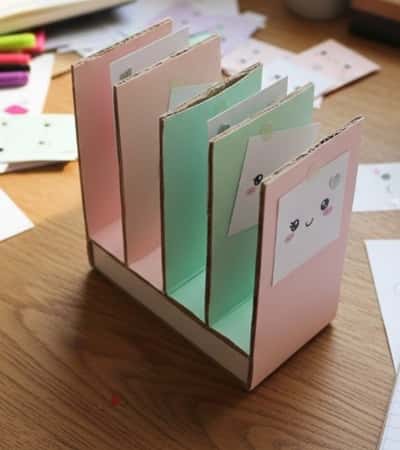
This one looks useful.
Also looks like something from a cute stationery store.
Perfect Kawaii Diy for desks and shelves.
What you need
- Thick cardstock or cardboard
- Colored paper (pastels work best)
- Glue
- Scissors
- Black marker
- Ruler
How to make it
Step 1: Cut two rectangles from cardboard, same size.
One will be the base. One will be the back support.
Step 2: Cover both pieces with colored paper. Smooth with fingers.
Step 3: Now glue the bottom edge of the back piece onto the base at an angle.
Hold it for a minute. Don’t rush or it collapses. Once dry, draw kawaii face on the front base. Add tiny cheeks or stars if you want.
Use it to hold photos, notes, or reminder cards.
If it leans slightly crooked, that’s fine.
8. Cute Kawaii Paper Storage Box (No Measurements Stress)
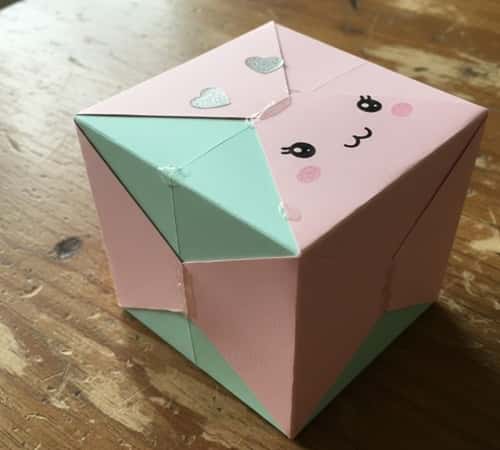
This is forgiving.
Even if you mess up folds, it still works.
Great for Crafts For Kids Diy and adult mess too.
What you need
- Thick paper or old magazine cover
- Glue
- Scissors
- Black pen
- Optional pastel stickers
How to make it
Step 1: Cut a large square. Size doesn’t matter much.
Fold all four edges inward about 2 to 3 cm.
Step 2: Cut small slits on corners so sides can overlap. Glue sides upward to form a box shape.
Step 3: Press corners firmly. Let dry completely.
Now decorate the front with kawaii face or symbols.
Add stickers if you want but don’t overdo it.
Use this box for washi tape, clips, tiny toys.
Some corners might look rough and thats ok.
9. Kawaii Light Switch Decor (Paper + Tape Only)
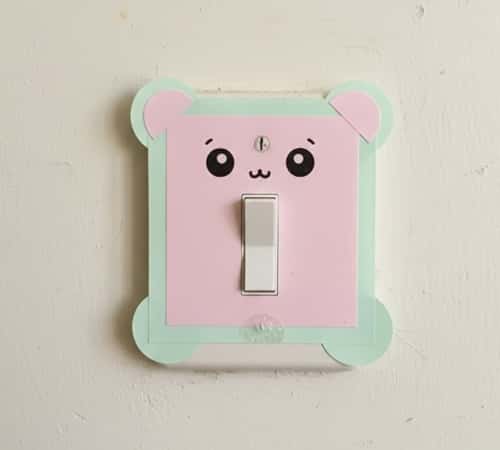
This one instantly changes a room.
No tools. No damage.
Very Diy Kawaii Decor vibes.
What you need
- White or pastel paper
- Pencil
- Scissors
- Black marker
- Double-sided tape or normal tape
How to make it
- Trace your light switch plate on paper.
- Cut slightly bigger. Not exact, exact is stressful.
- Cut out the switch hole carefully. Take time here.
- Draw a kawaii face around the hole. The switch becomes the nose or mouth. Cute trick. Add tiny stars, hearts, or sleepy eyes.
- Tape it over the switch plate gently.
If paper shifts a bit, it’s okay.
Kids love this. Adults smile at it.
10. Kawaii Quote Cards (Positive but Not Cheesy)
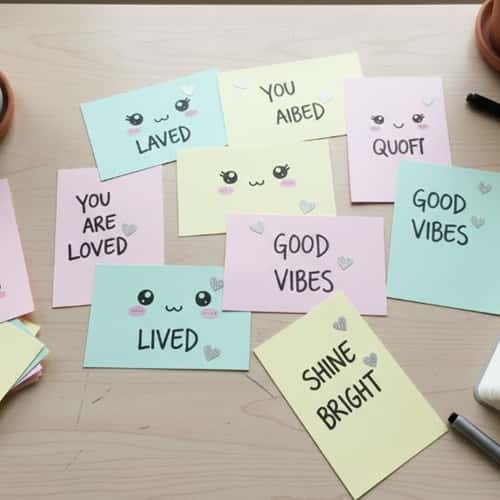
This is quiet cute.
Also thoughtful.
Perfect ending for Diy Kawaii Crafts list.
What you need
- Thick paper or cardstock
- Colored pens or markers
- Black pen
- Ruler
- Scissors
How to make it
- Cut paper into small cards. Rectangles work best.
- Lightly draw border lines using ruler. Don’t press hard.
- Write short positive words like “you tried” or “still cute”.
- Add small kawaii faces next to words.
- Keep spacing loose. Don’t cram things.
- Make a few cards, not just one.
Stand them on shelf or desk.
They don’t need frames.
Some letters might look uneven, that makes it human.
Final Thoughts
Here’s the thing about kawaii diy crafts. They’re not about perfection.
They’re about softness, play, and letting mistakes exist.
Most people quit crafts because they expect clean results.
Kawaii style doesn’t want that.
It wants uneven lines. It wants glue showing.
It wants personality.
If you’re doing this with kids, let them lead.
If you’re doing this alone, slow down.
Cute isn’t rushed.
And honestly, handmade always beats perfect.


